If you’ve been reading Hackaday for awhile, you’ll know we’re big fans of OpenSCAD around these parts. There’s a number of reasons it’s a tool we often reach for, but certainly one of the most important ones is its parametric nature. Since you’re already describing the object you want to generate with code and variables, it’s easy to do things like generate an arbitrary number of cloned objects by using a for loop.
There are a number of fantastic OpenSCAD libraries that explore this blurred line between code and physical objects, and one that recently caught our eye is scadqr from [xypwn]. The description says it lets you “Effortlessly generate QR codes directly in OpenSCAD”, and after playing around with it for a bit, we have to agree.
How effortlessly are we talking about? Take a look:
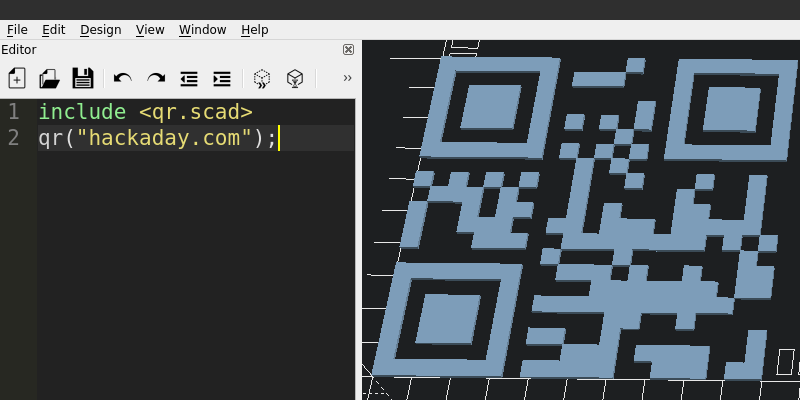
Yeah, that’s pretty damn easy. Even better, there’s no alphabet soup of libraries or APIs going on behind the scenes here. It’s just a single file you include in your OpenSCAD script. In fact, you don’t even need to go that far. As [xypwn] explains, the source for the library itself is just the one file, so you could just copy its code right into your project if you didn’t want to have to pull it in as an include. That could be especially handy if you’re deploying this code somewhere that doesn’t let you pull in external files, like Thingiverse’s Customizer.
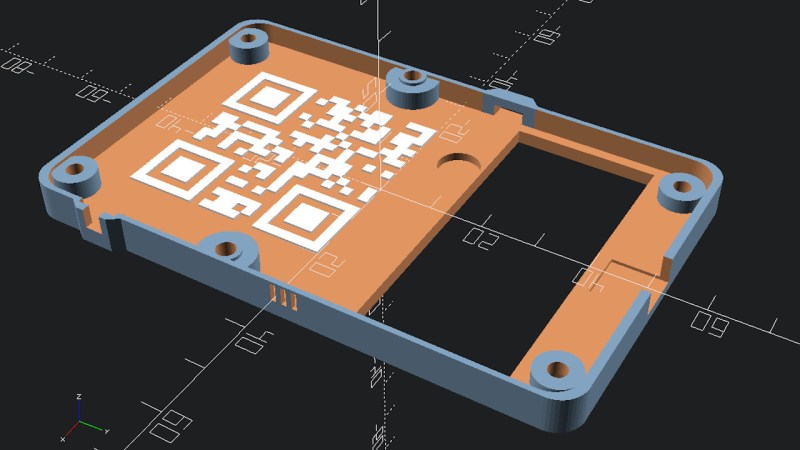
Now, there’s all sorts of reasons you might want to create a QR code from within OpenSCAD. But one of first ones that popped into our heads is for the purposes of part identification. Forget simple version numbers, this library would let you physically embed all sorts of ancillary data into your printed components, like who rendered them and at what time. Or perhaps each printed part in an assembly could have a unique QR code that pointed to its respective page in your online documentation.
Got any interesting ideas? Let us know in the comments.


This is a very cool project and it works very well! I’m a big fan of OpenSCAD which I use to build and iterate parts very quickly. It’s not too uncommon to design or edit a part and generate the g-code before my simple printer finished the ‘prepare PLA’ sequence. Today I designed a few simple pulleys in about a dozen lines of code.
I understand OpenSCAD is also a program people love to hate, but I would just encourage you to learn many programs as many programs you need to do the thing you want to do. OpenSCAD is my go to for quickly knocking out simple parts, and generating thousands of slightly different complex parts. Where the best part is that it’s all just code, and resides on my machine, without any subscriptions.
I’ve been sitting on the fence trying to decide between learning openscad or freecad. This blog and your comment is tipping me towards openscad.
I have been a long time fan of OpenSCAD, and recently learned FreeCAD. In the past FreeCAD was a wreck. These days, the RealThunder branch of FreeCAD has few headaches and rarely crashes. I would recommend using OpenSCAD for projects that Jan-Willem describes, and FreeCAD for more complex projects that can become easier when dealing with shapes that OpenSCAD struggles with, like drafts, bevels, and fillets to name the most commonly desired and yet most frustrating to code features.
When FreeCAD v1 is released sometime later this year (projected) I may switch over to the main branch, but for now, RealThunder is the only way to go.
The best part of using both of these programs is that OpenSCAD is incorporated into FreeCAD, and you can import the parts you designed in OpenSCAD, and easily edit them graphically or, (here’s the clincher) output them to various other formats like Step files. :)
Thanks!
The really good bit is that openscad can be used alongside other CAD software. You do mathematically defined shapes, like gear teeth, in openscad, then you can export as stl (once you’ve refined them to be perfect in form) and import that as a mesh in to mesh modelling softwsre where you start adding things which are defined more by the physical requirements of interlocking with other parts and/or organic like curvatures. Openscad works really well as a way to make particular forms, which can then be used as a part of something larger that you design in a more “layout” and “3d navigation” focused CAD package.
OpenSCAD seems like a great tool for many things. So you invest into learning it, you do a few small learning project using it. All looks and works. Nice and dandy. Then you feel like you are ready to do something for real. And the first large, serious project you do with it puts it down to its knees and you along with it when you wait like 15 minutes for it to do the rendering at full CPU usage.
At least that was my experience. YMMV.
Try
a) to use the Development Snapshot instead the latest official download or/and
b) switch the renderer in the settings.
Both can speed up the using from minutes to seconds.
THIS!
With this new rendering settings->functions->[x] manifold the full rendering basically replaces the preview function.
And last update gives colored rendering. It is really exciting.
OTOH chamfers and roundings are still a paint to create.
Oh, you beat me to it!
Manifold does make minkowski quick even though it’s a pain to write.
https://pythonscad.org/ is a friendly fork of the development version of OpenSCAD (with the Manifold kernel integrated) that allows using both OpenSCAD and Python syntax. It also integrates pylibfive and lets you use SDFs for fillets, but only from Python. This I’m aware of but haven’t experimented with.
More specifically, turn on the Manifold kernel in the settings. I’ve seen 100x or better improvements in performance. It’s changed “wait five minutes to render” to “no point in bothering with the preview” for some of my objects.
Bonus: the Manifold kernel won’t (modulo increasingly rare bugs) create non-manifold output. The days of the slicer complaining about 273 openings in your mesh will be behind you. ☺
I really appreciate the idea, and the execution. I however feel, from my own experience, that 3D printing convoluted features is usually taking longer time, consume more filament, and make parts weaker. Now, I favor simpler volumes, and use a pen instead of ‘integrated text’. That’s very personal.
Nice thumbnail: HACKED U
KiCad also has a script based footprint generator for QR code. You can put the code either in copper or on silkscreen. It looks like it only supports version 2 (33×33) with up to 50 characters.
https://en.wikipedia.org/wiki/QR_code
Ooh! Thanks for that bit of knowledge. Ill look for it.
The real question is if you can get the OpenSCAD file small enough to fit in the QR code.
I’ve made several QR code plates with OpenSCAD, although I did it by using one of the online QR code generators and then importing the image into OpenSCAD after converting it to .svg format. I used the two color QR plates as novelty coasters and also for block printing on a T-shirt.
OpenSCAD is YAFIYGI (You Ask For It You Got It) instead of WYSIWYG.
It is like writing documents in postscript.
And of course, I am that type of person that use both OpenSCAD and postscript :) .
You misspelled “troff”