We’ve seen several methods of repairing plastic gears. After all, a gear is usually the same all the way around, so it is very tempting to duplicate a good part to replace a damaged part. That’s exactly what [repairman 101] does in the video below. He uses hot glue to form a temporary mold and casts a resin replacement in place with a part of a common staple as a metal reinforcement.
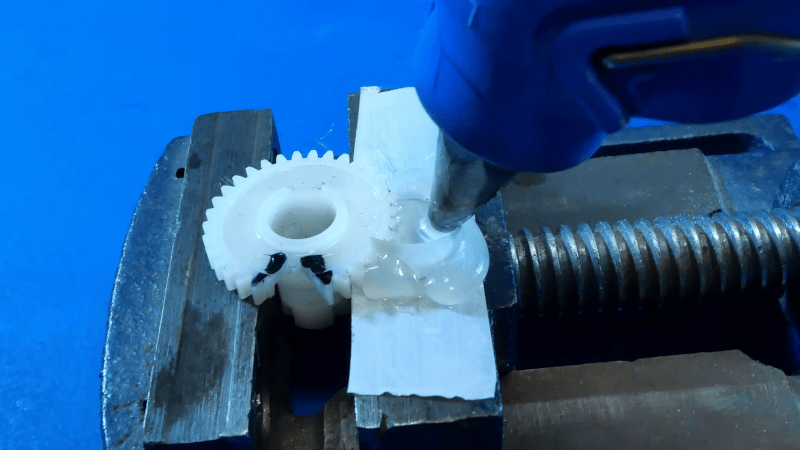
The process starts with using a hobby tool to remove even more of the damaged gear, making a V-shaped slot to accept the repair. The next step is to create a mold. To do that, he takes a piece of plastic and uses hot glue to secure it near a good part of the gear. Then, he fills the area with more hot glue and carefully removes it.
He uses WD-40 as a mold release. He moves the mold to the damaged area and cuts a bit of wire to serve as a support, using a soldering iron to melt it into the gear’s body. Some resin fills the mold, and once it is cured, the gear requires a little rework, but then it seems to work fine.
We would be tempted to use some 3D printing resin with UV curing, since we have it on hand. Then again, you could easily scan the gear, repair it digitally on the computer and just print a new one. That would work, too.
We’ve seen the same process using candle wax and epoxy. If you want to see an example of just printing an entire replacement, we’ve seen that, too.


AI voice is a hard “no” for me, sorry.
A hard no is written like “NO”, please use capitols to emphasize your point.
If you write NO like no, is simply doesn’t seem as hard as you suggest it to be, it’s simply confusing making your comment a hard “NO” for me.
“…use capitols…”
Like Washington DC for instance?
Or did you mean ‘capitals’?
haha… you’re absolute right, what a silly mistake. And since Hackday in 2025 still doesn’t have an edit button this silly typo will remain here forever.
Hackaday promotes responsible posting
There was audio? I had watched this video earlier by hovering the cursor over it with it muted. It got the point across just fine.
Much respect for people who can work with very small things!
I just struggle for a few hours, then flip my table and walk away
There’s your problem. You need a small table
I can certainly relate!
After it got to a certain point, went on a bit of a quest for ways to make it more comfortable to work on tiny things. A really strong light mounted above my workbench helped the most. Also some cheap tweezers – I have a set from Harbor Freight, and some cheap ones with very small, sharp tips that come with connector kits.
After trying many different magnifiers, I found that the head-mounted ones work the best. Like the ones from Harbor Freight that have about for different choices in magnification. Those work pretty well, while a stereo microscope stays on my wish list.
With good light, a magnifier, and tweezers, tiny things feel about 4X larger.
The AI narration is uncanny valley for me.
Well… hold on, it’s gonna be a rough future then…
It makes for a lot fewer videos to watch already, so I would say there are benefits. Simply put I would rather have text onscreen (ideally proper captions) and no audio. Even better if they drop the transcript in the description.
Machine audio is not ear friendly, nor accessibility friendly, it can go.
I just turned the sound off as the video really was self explanatory. But I agree, use text or just ‘talk’ — none of the fake garbage….
Neat fix. I like. I would have probably just found a replacement gear or junked the whole thing :) as unfix-able.
Sounds like one
of those annoying synthesised
voices.
Plus, the damage was contrived, and the “machine” not particularly useful. But, like and subscribe!
It’s significantly less annoying than the old speech synthesizer voices like Microsoft Sam. I would much rather listen to a good AI generated voice than have to read subtitles or listen to crappy audio because someone doesn’t have a good mic.
nope, burn this with fire!
+1
This is not a “good” voice. Even if it was I would rather not have it.
I would rather listen to crappy audio from a human than listen to AI mangle simple words in English. It is surely NOT the most user-friendly language, but being the “language of commerce” for many decades, it is imperative that it be “spoken” correctly.
Also, in context, I have seen far too many examples of auto-generated subs which are accurate, but the best AI voice on YouTube cannot determine where the words break, one from another, and have (apparently) no ability to track it own wild variations in prounouncing the same word multiple times, even in the same sentence.
Hehe, reminds me of the dreaded odometer nylon gear in the old 911 VDO speedos. The VDO clowns used a non compatible lubricant/grease that eats nylon. Cuz well a metal gear would cost more… Douchebags…
If you every needed a sterling example of a first world problem…
I don’t know, I’d wager that grease eating plastic gears is a problem that can be enjoyed all over the globe.
Technically, so can 911s I suppose. But the schadenfreude is great in this one.
I’ve done a similar thing to repair unobtanium knobs on older Tektronix equipment, but using J-B Weld instead of plain resin.
Worked really well.
https://www.youtube.com/watch?v=U5LQpqwqNIU
Has anyone ever repaired those off-white gears that were in all of the WEN electric tools?
Used to see the electric chain saws everywhere at one time, re-branded under various names. Always had that one busted gear in a high torque area.
The plastic looked like uhm.. semen, to be blunt about it.
Always splitting, usually across the hub or close to it.
And No one ever could get the replacement gears, not even WEN offered them. Claimed obsolete anytime you tried to find one.
Craigslist used to always have people trying to unload the Wen tools “runs great, only needs a little plastic gear”.
I still see that plastic in gears in things like coffee grinders. I try to look at spare parts listings and avoid anything with that stuff in it.
heh but “plastic isn’t strong enough for this use” is the specific factor motivating the replacement.
i haven’t seen the gear in question but i have had mixed luck doing things like embedding metal in plastic to make it more capable of managing torque. a lot of things i print, i can figure out right away how to put metal in the load path productively with a strategically-placed bolt…but for gears and knobs, i haven’t found a good way to transfer a tangential load to an axle. that’d be the hackaday article i want to read! instead of this reprise of the greatest hits of facebook clickbait
probably all the articles about using 3d printed plastic to make different kinds of castings are where i should be looking instead. for all i know something dead simple like filling a mold with jb weld is all i’m missing
JB weld and similar is, basically, only strong in compression.
The problem with fixing the weakest link is it just reveals the next weakest. See also drag racing.
Everything in a cheap tool is cheap.
Find a better project.
nice tutorial
Baking soda and superglue works well too, turns out very strong and hard.
With graphites from simple pencil, a powder and mix it with Soda. After that, normal application with super glue. Better is only epoxy.
Modern 2-part polyurethanes (like “liquid plastic”) are great for this sort of repair. Even better are the purpose-designed formulations like (e.g.) Smooth-On’s “Task” series. But if all you got on hand is J-B Weld, that’s great too — just be sure to give it time to cure properly.
I’ve seen similar videos in the past, but had forgotten about them, so thanks for the reminder.
Of course YouTube also recommended other similar videos; one of them used a piece of PVC pipe as the dam for making the mould, and candle wax as the mould material. He then used clear epoxy resin to patch the gear, mixing it with aluminum shavings / filings before pouring it.
This reinforcement strikes me as a good idea, although at that point I might just use JB Weld or JB Quik instead. I also might melt in more wire – probably a piece bridging the gap between the teeth if it would fit – to anchor the casting more securely.
Really appreciate this 😊