When film all came in rolls, it was fairly easy to play with the frame of the image. Companies like Hasselblad (and many others) made camera backs that would expose longer strips of 35 mm film to create stunning panoramic images in one single shot. [snappiness] wanted to bring that style of camera into the digital age, and ended up with a 2-in-1 Sony-based frankencamera.
Sensors just aren’t readily available in the wide aspect ratio [snappiness] was looking for, and even if they were, bare sensors are hugely expensive compared to consumer cameras. Lacking the budget for high-res scientific CMOS, [snappiness] did what any of us would do, and hacked two Sony A7ii full-frame mirrorless cameras together to get a combined 24x72mm sensor frame.
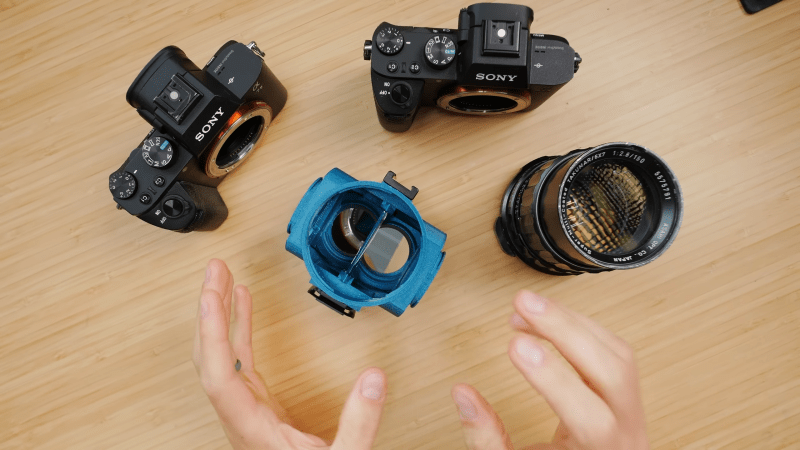
Conceptually, the hack is really very simple: a 3D print acts like a T-fitting, with the two cameras held parallel off the arms of the T and the lens making the shaft. Inside, the only optics are a pair of mirrors serving as a beam splitter. Each camera sees half the FOV of the lens in its corresponding mirror, which means the images can be stitched together later to make the double-wide pictures [snappiness] is after.
Of course both cameras must be triggered at the same time, but with what looks like a headphone splitter and an aftermarket remote shutter button, that part works perfectly. The optics, not so much– as always with conceptually simple projects, the devil is in the details, and here it’s the mirror alignment where you’ll find Old Nick. [snappiness] made no provision for adjustments, so everything needed to be designed and built with very stringent tolerances. Somewhere along the way, those tolerances were exceeded; as a result, the two cameras don’t share a focal plane.
That means half the composite image will always be out of focus, or that the main lens needs to be refocused and two snaps taken, rather defeating the point the frankencamera. If [snappiness] attempts a version two, perhaps an adjustment mechanism to focus each sensor would be in order. Still, even if it didn’t work perfectly, he’s proven that the idea is sound, and we can’t imagine many people will see this and argue it isn’t a hack.
The world of film did make all of this easier, perhaps– we’ve seen large-format film cameras out of lego, and a panorama made from four full rolls of 35 mm film. If you know of any other great photography hacks– film or digital– don’t hesitate to send us a tip.


jep. back focus is a bitch and a difference of 0.01 mm is significant. in my time as cameraman, setting the back focus of a zoom lens was quite a undertaking.
Written by someone who clearly knows what “back focus” really is, unlike most of the poseur Canon fodder who make a fool of themselves when they use the term when complaining about their focus.
I’m from the “point and click” camp, so please pardon my ignorance. How does this improve the end-result compared to using a stock camera with a wider-angle lens and just cropping off the top & bottom? One obvious factor is resolution (half a sensor vs two sensors), but is this really the main point here?
Yeah, 2x resolution but a lot more effort and sources of failure.
If resolution were truly the issue (maybe you are a professional who makes large posters) then I would still lean towards either buying a Canon 5DS which doubles the resolution vs this camera for very roughly the same price (used). Or use stacking tools to combine a burst of almost-identical photos into one high-resolution final.
i think this is a project similar to fabricator types who build a car that drives backwards (driver looks/faces out the back window). is it practical, or worth much more than a ‘wow, what?!? cool!!’ from people who see it? not really.
definitely a hack (unlike some other featured posts), but doesn’t mean it makes any sense. more of a ‘because I can/want to’. respect for that. but sheesh you must have a ton of free time.
imo, a much more practical hack for combining two cameras would be a shutter-synced stereoscopic adapter. then you could actually do something cool with the resulting images.
To get the same aspect ratio in the final image by cropping, would lose half the pixels in the vertical direction, because you’d be chopping the image in half.
For the layman, resolution of the final result would be the obvious difference, but more importantly the difference is the focal length.
Even if you have infinite resolution, a cropped image taken with a wide angle lens is optically different than an equivalently framed image taken with a telephoto lens.
In filmmaking the optical difference is on display in the dolly zoom effect which you may have seen in Jaws or The Fellowship of the Ring (or countless others). The cropping in this case is being accomplished by physically moving the camera closer while a zoom lens turns a telephoto lens into a wide lens (the reverse can also be done but doesn’t look as off putting).
The whole wide-exposure concept made a lot more sense when “pixel” resolution was determined by the size of silver nitrate grains (in turn variable if you selected faster or slower film, and often at the limit of what was possible when framing for full-page or billboard use) and there were no digital tools for stitching together a pair of very high resolution analog images. You are also depending on the lens to project a quality image somewhat larger than its design requirements, a bit of slop that is less likely to be there with today’s miniaturized lenses. Nowadays it’s very hard to see the use case for not just cropping the bottom and top of a normal sensor frame.
seems like a jig to turn or spin the camera and join images would be an option.
These rigs are common for capturing reference images for vfx for films. Search “nodal head” or “nodal pan rig” they offset the camera to put the center of rotation at the nodal point of the lens. Otherwise even the slight offset of the rotation point creates parallax issues that make stitching the images harder. (Or at least used to… now you’d just fake it with some generative ai fixing probably) also critical for that kind of stitching is a good lens distortion model because you need to get all the images back into perfectly straight lines.
I am still waiting for the scannercam crowd to weigh in. 4800×20000 pixel panos using motor-driven linear document scanner sensors, for maybe a hundredth was this rig cost. Or are those hackers all too old now?
do you mean something like this (regarding the principle, not the image quality):
https://www.sentex.ca/~mwandel/tech/scanner.html
Yep, that’s the idea.
Maybe it was the lists I was on at the time, but it seemed like hundreds of similar things got built, and some produced really good images. They’ve been around a looong time: first one I saw in person was in 1985. It used a telescope azimuth drive to do the scan.
I was going to link to one of the old Hackaday articles about a scanner camera, but they were very old by Hackaday standards and it seemed like they’d mostly succumbed to link rot. I’m not sure why that hack has fallen so far out of fashion.
The big advantage this sort of setup has is it avoids the drawn-out exposure from a scanner camera, so isn’t limited to a fixed scenes. OTH, I remember seeing scanner cameras that worked really, really well… which this hack doesn’t yet.
That long exposure could be exploited. Back in the ’70s and before, large group photos were sometimes taken with film cameras that rotated in sync with film movement, similar to a scanner camera.
Some people would stand on one side of the group at the start of the photo and then run to the other side and get in the picture again!
Like the photo of the Viking Lander imaging team: https://www.planetary.org/space-images/-3 (Viking used a scanning camera)
Which I swear I’ve seen in higher resolution somewhere, but my google-fu fails me.
You can still do this today with the pano mode on smartphones. Or even better group shot “selfies” person holds the phone and starts the pan then when person two has been captured they take the phone and person one runs into the uncaptured part of the scene.
The scanners that were easiest to use for that were the Canon LIDE series. For reasons unknown to me, they lost Windows support years ago. Not sure if there’s some issue that prevents them from being used with Linux.
You had to have a good lens for them, like a lens for a sheet film camera, or an enlarger lense. I have an Eskofot Ultragon lens that makes an 18″ diameter image circle and would be ideal for a scanner camera. One of these days…
LIDE were the easiest to get working, yes, but aren’t very good for the task. The huge sensor made for a view-camera sized device, and had really quite angular poor field of view, causing vignetting in all but very long focal length lenses.
Much better were the units with the shorter sensors and the folded optical path: Throw away that lens assembly and use the 2″ sensor alone with an ordinary camera lens. Though some “digital backs” scanned the sensor across the focal plane, you could instead rotate the lens and sensor assembly around a vertical axis and get much larger panos, even 360 degrees.
The A7M2 as well as all Sony A7/R/S Mods 1’s and 2’s had a panorama selection on the upper dial. The panorama was an in camera organized image. You can start from left or right and you have to watch the speed of the rotation or it stops and you have to try again. You can use any millimeter lens wide or telemeter. So all that work in making this could have been done just by looking at the dial selecting the on dial image of a panorama. One added thing is there are on camera apps that were available for download (no longer available) that proceed in camera images in jpeg or raw or both, my favorite is the “Digital Filter” that had presets or you can select setting in three different areas in any camera setting from SS to white balance.