A barograph is a device that graphs a barometer’s readings over time, revealing trends that can predict whether stormy weather is approaching or sunny skies are on the way. This DIY Digital Barograph, created by [mircmk], offers a modern twist on a classic technology.
 Dating back to the mid-1700s, barographs have traditionally used an aneroid cell to move a scribe across paper that advances with time, graphing pressure trends. However, this method has its shortcomings: you must replace the paper once it runs through its time range, and mechanical components require regular maintenance.
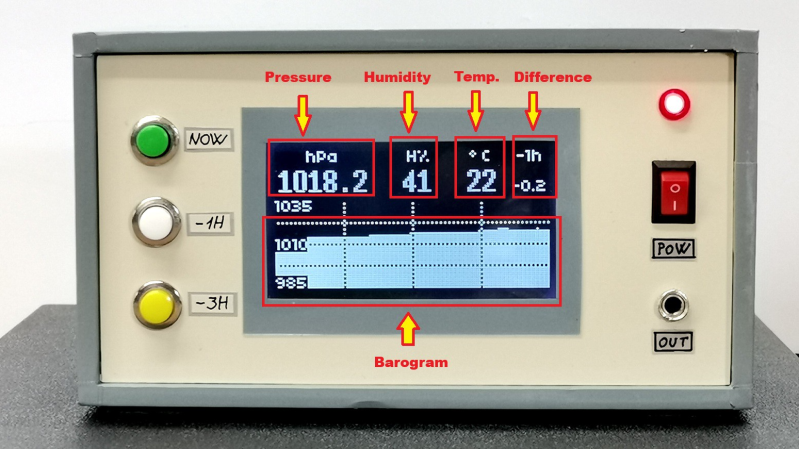
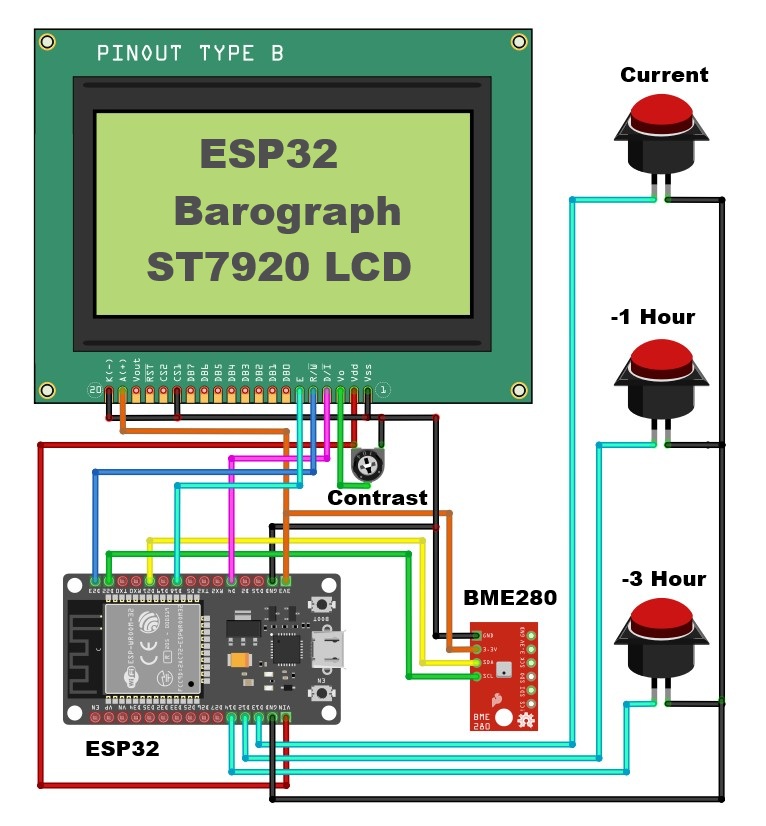
[mircmk]’s DIY Digital Barograph ditches paper and aneroids for a sleek 128×64 LCD display that shows measurements from a BME280 pressure sensor. Powered by an ESP32 microcontroller — the code for which is available on the project page — the device checks the sensor upon boot and features external buttons to cycle through readings from the current moment, the last hour, or three hours ago. Unlike traditional barographs that only track pressure, the BME280 also measures temperature and humidity, which are displayed on the screen for a more complete environmental snapshot.
Head over to the project’s Hackaday.io page for more details and to start building your own. Thanks to [mircmk] for sharing this project! We’re excited to see what you come up with next. If you’re inspired, check out other weather display projects we’ve featured.


Built one a few years ago around an Arduino. I might steal some ideas from this one and update mine.
Interesting, it would be nice to build one with e-paper to mimic to graphic proces more.
BRAVO: I like the implementation of BAROGRAPH … much more refined that the old Arduino projects of mine (STM32F103 Maple Mini/Blue Pill); much of the effort there was directed to core and libraries as they were not nearly as mature as today’s products.
http://forum.arduino.cc/t/barometer-project/935657/4
In this implementation, an IR sensor detects the wave of a hand over the display to switch momentarily to the barometric display and automatically returns to the GPS clock.
http://www.youtube.com/watch?v=nAPr7fRsu_A
http://web.archive.org/web/20190316202535/https://www.hackster.io/rayburne/color-barometric-extension-to-gps-date-time-clock-a8b121
Opinion: the ESP32 has way too much capability to be dedicated to just the barometer, but it is readily available and inexpensive so I can understand why it was chosen if it was already on hand. And, there is always the option to use WiFi to make the device accessible anywhere inside the home.
Also in for a past Arduino build, but with a suggestion: Compensation. There are several barometric values to fool around with (Station, MSL, and Altimeter Setting) and the adjustment is just accounting for the altitude of the instrument. I did it with simple code adjustments since my effort was for home, but being able to change this would be useful.
https://www.weather.gov/bou/pressure_definitions
Personally I’d rather stick with a $3 Arduino and spend on a nice ePaper display, but to each their own.
How does one do an absolutely calibration of the atmospheric pressure reading? I could do a relative one by making a barometer out of tubing and water but without a precision instrument close by I can’t figure out how to do an absolute calibration.
int localCorrect = 3575;
// +/- hPa*100 to correct for local altitude
// 100X delta: 3625 == Briscoe Field, Ga (1061 feet)(323.3928 meters)
I prefer to tell folks to just stick in a number, compile, upload and view the barometric pressure… then look online to the local airport pressure report and adjust your ‘guess’ higher or lower to zero in on the value!
I went ahead and posted my entire project from 10+ years ago to my hackaday.io pages:
https://hackaday.io/project/204027-wow-barometer-stm32-ili9341-bmp180