Inkycal Makes Short Work Of E-Paper Dashboards

The e-paper “dashboard” is something we’ve seen plenty of times here at Hackaday. Use it to show your daily schedule, the news, weather, maybe the latest posts from your favorite hardware hacking website. Any information source that doesn’t need to be updated more than every hour or so is a perfect candidate. All you’ve got to do is write the necessary code to pull  down said data and turn it into a visually attractive display.

Well, that last part isn’t always so easy. There are plenty of folks who have no problem cobbling together a Raspberry Pi and one of the commercially available e-paper modules, but writing the software to turn it into a useful information center is another story entirely. Luckily, Inkycal is here to help.

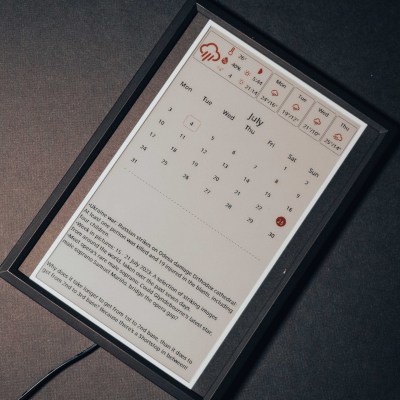
This open source project uses Python to pull information from a wide variety of sources and turns it into an e-paper friendly dashboard. It works with Waveshare displays ranging from 4.2 inches all the way up to the massive 12 inch tricolor panels. While it could theoretically be deployed on any operating system running a modern version of Python, it’s primarily developed to be run under Linux and on the Raspberry Pi. All of the versions of the Pi are supported, so no need to spring for the latest and greatest model. In fact, the notoriously pokey Raspberry Pi Zero is their recommended platform thanks to its low power consumption.

With Inkycal on the Pi — they even provide a pre-configured SD card image — and the e-paper display hooked up, all you need to do is pick which sources you want to use from the web-based configuration page. Look ma, no code!

Not feeling like putting the hardware together either? Well, we might wonder how you’ve found yourself on Hackaday if that’s the case. But if you really would rather buy then build, you can get a pre-built Inkcal display right now on Tindie.

A 3D-printed mechanical system that moves weather symbols around

3D Printed Mechanical Contraption Shows Live Weather Forecast

“What’s the weather going to be like today?” is a question that’s near-permanently on the mind of those living in places like Britain, where brilliant sunshine can follow thick clouds, only to turn into drizzle an hour later. Nowadays you simply need to glance at your phone to know whether you need to pack an umbrella, but where’s the fun in that? Why not have a huge mechanical display to show you a summary of today’s weather?

As a fan of automatons and other contraptions filled with gears and pulleys, [Mike] decided to build just such a machine for his latest Mikey Makes video. It uses brightly coloured indicators inspired by the BBC’s famous “fluffy cloud” symbols that can show various combinations of sunshine, clouds, rain and snow. These symbols are moved around by dozens of gears, levers, swinging arms and other moving parts which were all 3D printed. We especially like the system that folds out rays of sunshine from behind the cloud; you can see it working in the video embedded below.

Live weather data is fetched through an open weather API by an Arduino MKR WiFi 1010. This then drives the mechanical system through a pair of motor driver ICs. The heavy work is performed by stepper motors and servos, while micro-switches and optical detectors determine the end point of each movement.

If you’re into weather displays, you’re in luck: we’ve featured many different styles over the years, including e-paper screens, analog gauges, split-flap displays and even a miniature recreation of the local weather.

Continue reading “3D Printed Mechanical Contraption Shows Live Weather Forecast”

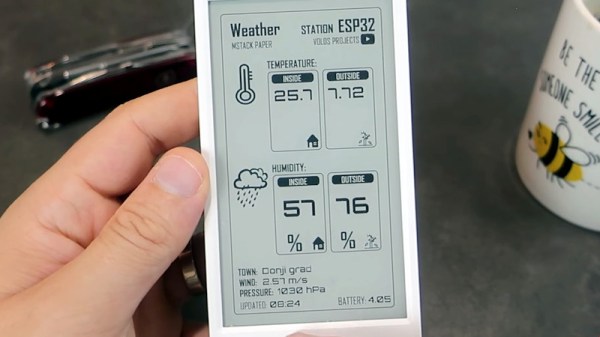
M5Paper Gets Open Source Weather Display Firmware

We know you like soldering irons, we’re quite fond of them ourselves. But the reality is, modular components and highly capable development boards allow the modern hardware hacker to get things done with far less solder smoke then ever before. In fact, sometimes all you need to finish your project is the right code.

Case in point, check out the slick electronic paper weather display that [Danko Bertović] shows off in the latest Volos Projects video. While it certainly fits the description of a DIY project, he didn’t have to put any of the hardware together himself. The M5Paper is an ESP32 development kit designed around a crisp 4.7″, 960 x 540 e-paper panel that includes everything from environmental sensors to an internal 1150 mAh battery. To make your handheld e-paper dreams come true, the only thing you need to provide is the software.

The weather display code provided by [Danko] should certainly get you going in the right direction. Now don’t get us wrong, there’s certainly no shame in just flashing his code to the device and plunking it on your desk. It’s a gorgeous looking interface, and we all know that a sprinkling of open source code is often all it takes to make a standard consumer device extraordinary. But by using the code he’s provided as a launching point, you can take this turn-key device and really make it your own.

Continue reading “M5Paper Gets Open Source Weather Display Firmware”

E-Paper Weather Display Is A Great Base To Build From

As e-paper modules have become more affordable, we’ve started to see them pop up more and more in hacker projects. It used to be that you had to force a second-hand Kindle to do your bidding, but now you can buy just the screen itself complete with a header to plug right into your Raspberry Pi. It will still cost you as much as a used Kindle…but at least it comes with some documentation and there are Python libraries to talk to it.

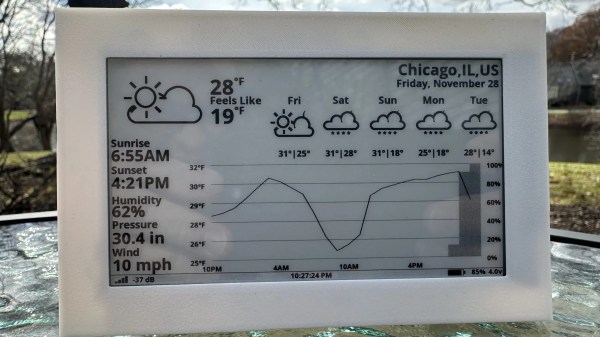
But where to start? If you need some inspiration, and perhaps a little source code, this very slick weather display put together by [James Howard] is a great as baseline. Not that it really needs any additional refinement, as we think it already looks gorgeous. But rather than starting from scratch for your own project, it would be much easier to graft some additional functionality onto his code.

A lot of that has to do with how concise and well commented his code is. We’ve seen enough of these projects to know the kind of spaghetti that’s often running on the backend, but there’s none of that here. [James] assembles the display using the powerful Pillow graphics library, which lets you draw primitives and drop in text and icons with just a couple lines of code.

Once all the data is plugged in, the entire screen is saved as an image file which is then opened up on the e-paper display. Even if you aren’t a Python expert, you should be able to understand what’s happening and how to bend it to your will.

We’ve always had high hopes for electronic paper, and it seems the technology might finally be hitting critical mass. While it’s still a bit expensive, we’ve started seeing it pop up in unexpected places to great effect. Hopefully projects like this one will inspire others to take the B&W plunge.

Vintage Gauges Turned Classy Weather Display

It’s always good to see old hardware saved from the junk pile, especially when the end result is as impressive as this analog gauge weather display put together by [Build Comics]. It ended up being a truly multidisciplinary project, combing not only restoration work and modern microcontroller trickery, but a dash of woodworking for good measure.

Naturally, the gauges themselves are the real stars of the show. They started out with rusted internals and broken glass, but parts from a sacrificial donor and some TLC from [Build Comics] got them back in working order. We especially like the effort that was put into making the scale markings look authentic, with scans of the originals modified in GIMP to indicate temperature and humidity while retaining the period appropriate details.

To drive the 1940s era indicators, [Build Comics] is using an Arduino Nano and a DHT22 sensor that can detect temperature and humidity. A couple of trimmer pots are included for fine tuning the gauges, and everything is mounted to a small scrap of perfboard hidden inside of the custom-made pine enclosure.

This is hardly the first time we’ve seen analog gauges hooked up to modern electronics, but most of the projects are just that: modern. While the end look might be somewhat polarizing, we think maintaining the hardware’s classic style was the right call.

Weather Display Is Cloudy With A Chance Of ESP8266

[Mukesh Sankhla] writes in to share this unique weather display that looks to be equal parts art and science. Rather than show the current conditions with something as pedestrian as numbers, this device communicates various weather conditions to the user with 25 WS2812B LEDs embedded into the 3D printed structure. It also doubles as a functional planter for your desk.

So how does this potted plant tell you if it’s time to get your umbrella? Using a NodeMCU ESP8266 development board, it connects to openweathermap.org and gets the current conditions for your location. Relative temperature is conveyed by changing the color of the pot itself; going from blue to red as things heat up. If there’s rain, the cloud over the plant will change color and flash to indicate thunder.

[Mukesh] has made all of the STL files for the printed components available, as well as the source code for the ESP8266. You’ll need to provide your own soil and plant though, there’s only so much you can send over the Internet. Incidentally, if the clever way he soldered these WS2812B modules together in the video catches your eye, you’ll really love his “RGB Goggles” project that we covered earlier.

Continue reading “Weather Display Is Cloudy With A Chance Of ESP8266”

Viewing Countrywide Weather At A Glance

For his latest project, weather display aficionado [Richard] has put together a handsome little device that shows the temperatures recorded at nine different airports located all over the British Isles. Of course the concept could be adapted to wherever it is that you call home, assuming there are enough Internet-connected weather stations in the area to fill out the map.

The electronics are fairly minimal, consisting of a NodeMCU ESP8266 development board, a few seven segment LED display modules, and a simple power supply knocked together on a scrap of perfboard. As you might expect, the code is rather straightforward as well. It just needs to pull down the temperatures from an online API and light up the displays. What makes this project special is the presentation.

As [Richard] shows in the video after the break, the key is a sheet of acrylic that’s been sanded so it diffuses the light of 42 LEDs that have been painstakingly installed in holes drilled around the edge of the sheet. Combined with a printed overlay sheet, this illuminates the map and its legend in low-light conditions. It’s a simple technique that not only looks fantastic, but makes the display easy to read day or night. Definitely a tip worth mentally filing away, as it has plenty of possible applications outside of this particular build.

With his projects, [Richard] has shown himself to be a master of unique and data-rich weather displays, and a great lover of the iconic seven segment LED display. While his particular brand of climate data overload might not be for everyone, you’ve got to admire his knack for visualizing data.

Continue reading “Viewing Countrywide Weather At A Glance”