
The header image above shows a completely unsupported 3D-printed bridge, believe it or not. You’re looking at the bottom of the print. [Make Wonderful Things] wondered whether unsightly unsupported bridges could be improved, and has been busy nailing down remarkably high-quality results by exhaustive testing of different settings.
It all started when they thought that unsupported bridges looked a lot as though they were made from ropes stretched between two points. Unlike normal layers, these stretched extrusions didn’t adhere to their neighbors. They are too far apart from one another, and there’s no “squish” to them. But could this be overcome?
His experiments centered mainly around bridge printing speed, temperature, and bridge flow. That last setting affects how much the extrusion from the hot end is adjusted when printing a bridge. He accidentally increased it past 1.0 and thought the results were interesting enough to follow up on; it seemed that a higher flow rate when printing a bridge gave the nudge that was needed to get better inter-line adhesion. What followed was a lot of testing, finally settling on something that provided markedly better results than the stock slicer settings. Markedly better on his test pieces, anyway.
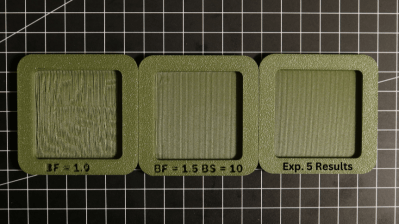
The best results seem to come from tweaking the Bridge Flow rate high enough that extrusions attach to their neighbors, printing slowly (he used 10 mm/sec), and ensuring the bridged area is as consistent as possible. There are still open questions, like some residual sagging at corners he hasn’t been able to eliminate, but the results otherwise look great. And it doesn’t even require laying one’s printer on its side!
All the latest is on the project page where you can download his test models, so if you’re of a mind to give it a try be sure to check it out and share your results. Watch a short video demonstrating everything, embedded just under the page break.
Thanks to [Hari] for the tip!


Shallow and pedantic
Unlike you I do not embrace opsies like that. Depth of expression is usually measured/comes from oneself.
Says the person who doesn’t put any punctuation after “lol,” and then starts with a capital letter.
What is worse? Header with errors in the article broadcasted multiple times or LOL without full stop in unworthy comment (judged by you)? There is no stop because I keep laughing. I have this picture in my head every time – printering like ironing – you grab a printer and move it arround… Who is more petty – the one indicating error or the other pointing fingers on the first one? Why you are so precious about it?
*broadcast
You know what they say: where there’s smoke, they pinch back.
Tried the BF = 1.5 BS = 10 on my bambu lab a1 and it worked like a charm immediately.
What does BS=10 mean?
Bridge printing speed. In bambu lab go to Global process (Advanced) -> speed tab -> bridge
Bridge speed = 10
I’ll absolutely try this! Especially on my Bamboo P1S PLA bridges have been a pain with ripping lines and sagging left and right!
This is truly thrilling! Once Cura integrates this, along with the concentric overhangs trick, my whole existence will be completely transformed.
I’d never thought about bridges before, but now I’m wondering if a slight side-to-side wobble would encourage the strings to stick to their neighbors (or variations on that theme).
Loke have it do the fuzzy skin jitter while bridging. My guess you would get better side to side adhesion but mess up the smoothness that the original tester was able to achieve.
Would be neat to test it but I don’t know how you would be able to combo the commands
It’s in the experimental settings of Cura 5.10.1
I haven’t tried the settings above but have tinkered with bridge flow and speed in a previous project and although the above examples trump what I came out with, if you play around a little it makes a huge difference to the end quality of the print 👍
So cool! This seems like such low-hanging fruit. Always easy to say that in hindsight, but really awesome to see a slicing solution for this constant problem.
Does this work in prusa slicer?
I think that I found the reason some time ago in Orca. In my opinion the problem is, that the slicer doesn’t calculate properly, that the lines are in the air, so they are not squeezed by lower layer. So the lines are thinner then slicer think. That’s why the lines are never connected together, even that slicer show it like that.
I experimented with manual edit of the g-code to get the lines closer together and the result was much better. It’s not possible to do by Orca settings, because the setting of bridge density is not possible to set over 100%