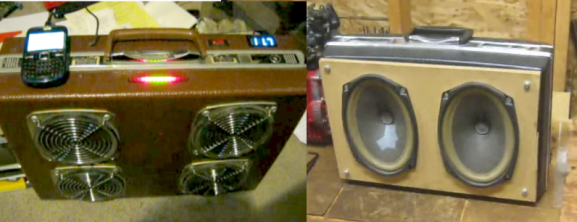
Here are two different briefcase speaker projects. [Dale] built the offering on the right back in high school and the upgraded version 2.0 more recently. He was inspired to send in a tip for the projects after seeing yesterday’s suitcase full of tunes.
The first version uses a pair of speakers pulled out of a car at the junkyard. They’re mounted on some particle board which beefs up the side of the plastic briefcase. The amplifier that drives it is mounted inside the case along with a battery to power the system. [Dale] included a crude storage bracket for the input cable and since the amp can drive four speakers there are connectors on the outside for two more.
Version two has quite a bit more polish. He doesn’t show that one off quite as much, but you can see there is a LED strip on the case that serves as a VU meter, as well as a numeric display which might be battery voltage? He mentions that this blows away any commercially available systems his coworkers have brought to the job site.
Video of both rigs can be found after the break.
Version 1
http://www.youtube.com/watch?v=QFu5p7hGFpw
Version 2


Interesting there are 2 ways to post, this one has a cursor. The first words are overlayed on the enter your…! I just clicked somewhere in the field now the format changed the cursor is gone (curses) I have to type by looking at the keys ONLY!
On topic: The model one has naked speaker damage ,the second one has poke potential from small things plus the grills could zing on resonant notes making a sort of sitar jambox.–
Rear mount always works . Front mount is for some auto installs and totally glued up wooden enclosures with a recessed front and grille or cloth. Old style wood enclosures had a removable back (lots of screws) to rear mount the speaker. Good way; get animal proof screen at hdwr store ,stretch behind cut out and tape in place. Silicone inject thru the cloth or screen. After cure mount speaker, cut of excess and tape. Or stretch as you bolt the speaker down . With the thin stuff use a wood or metal rim on the outside to frame and rigidly make contact between the bolts. Quickest; buy door mount speakers with grilles. What the… I have a cursor now while composing this post. Humm?
inferiror quality, but much increased functionally (volume&runtime)
I LOVE IT !!!
puts the ghettoblasters of all the angry teenage trolls to shame. I LOVE IT !!!
I put together something like this, albeit slightly less portable. It got me my first ever hotel noise complaint!
http://www.youtube.com/watch?v=8zPxX0FQ7EY
I wish I still had the one I built for when I worked at UPS, It was a angle iron cage with wheels and a fold out handle; Ford factory stereo a couple of weather proof radio shack speakers and a rechargeable battery. keep in mind this was about 20 years ago so don’t give me any grief about the parts I used, I was a bulk handler at the Indianapolis 16th street hub and it rode on the back of the tug I used. kept me rocking all night.
Wow! Thanks guys. Yes, you’re right. The numerical display is battery voltage. Both are powered by 12 volt 17 Amp-hour alarm backup batteries. They typically last a week, playing 8 hours a day.
Briefcase 2.0 is a similar setup to the first, with a physically smaller amp. The VU meter was purchased in a kit off ebay, as was the voltage indicator.
Voltage indicator runs off a source voltage of 5volts, so a DC to DC converter was required, and I just repurposed a commercial one that I had.
Future plans are to include a USB port. Since the display required a 5 volt converter, we already have the power present to charge USB devices through the port.
a lot of us street performers use ready made battery powered amps, but i’ve seen a few people with amps made from car amplifiers and speakers,
the best ones ive seen are made with a class d amplifier and li-poly batteries.
class d amps can be bought ready made on ebay, use hardly any power and a re really powerfull for the size.