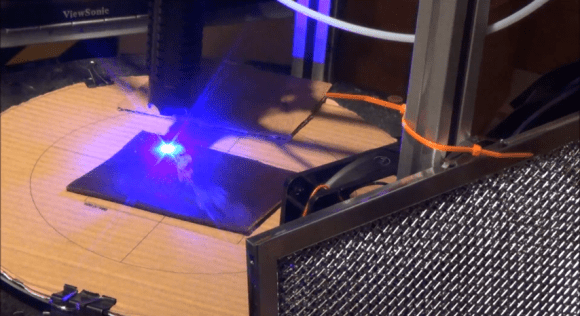
[Z LeHericy] has a SeeMe CNC Rostock Max 3D printer, and a 2W WickedLasers Spyder Artic blue laser. Naturally, he had to try strapping them together.
Most of our homemade laser engravers featured here use recycled DVD burner diodes, and while they certainly work, they leave a bit to be desired… Well, if you want more power, let us introduce the Class 4 Artic Spyder 2W blue laser from WickedLasers — a company that sells super high-powered lasers to anyone who can afford them — because that’s a great idea!
Safety concerns aside — wear your darn laser goggles! This pair can etch wood and leather quite well. He’s been using it to etch celtic knots onto pieces of leather. To do this he’s used Inkscape to convert a .BMP of the knot into a vector image, and then using the G-Code tools included with Inkscape he can create a tool path for the printer.
The finished leather looks awesome — Stick around after the break to see the laser in action!
[Via Hacked Gadgets]


Can anyone enlighten me, why anyone would use an blue laser for this purpose, and not an infrared laser? Not much of the 2 watts is absorbed, when using the blue light …
Why? It has cool name, fits on a 3D printer, makes a lot of smoke and blink. Too bad he didn’t attach arduino to it.
Don’t forget a Raspi.
Well, the article clearly states that he already had a blue laser. So I would just assume he used what he had on hand. An infrared module at that power is not as easily sourced, and definitely more difficult to focus.
Define infrared. If you are talking infrared from a diode, it won’t make much of a difference, Infrared from a CO2 laser, now that’s a different story. An optical system that could deal with the delta design would be difficult, about the only thing that work work is either a knuckled system or a GaAs fiber optic, both are expensive.
405nm is scary. I was repairing a 105mw Coherent diode module for a friend and the beam power is deceptive. It looks like about 5mw on most surfaces until you find something that fluoresces and then it lights up big time. So you are getting more exposure than you think, combine that with the effects of blue light on your eyes and it is something I would not want to be shining around everywhere.
Well, if you want more power, let us introduce the Class 4 Artic Spyder 2W blue laser from WickedLasers — a company that sells super high-powered lasers to anyone who can afford them — because that’s a great idea!
As someone who has built several lasers, and bought some pre-builts before, let me just say that WL is probably the worst company to go to for lasers. They are over-priced, underpowered and frequently fail. I have gotten two from them that have failed in recent memory. Though, I must say, they do make some beautiful hosts. This whole post seemed a little bit like a plug for WL though, which upsets me. WL is far from the cheapest, and far from the most powerful. It is quite easy, and commonly done to build a far more powerful laser than an Arctic for much cheaper.
Is there a company that you could recommend that I can order an assembled 1W+ laser module from for less than $300? Preferably in the $100 range.
if you search ebay you will find loads of blue laser (and red and green) pulled from DLPs.
they are the same lasers that wicked lasers are using. I got a 2W one complete with focussing lense etc (already press fitted for me) for just shy of £40.
Then you’ll need to construct a current limited power supply, (or just use a regular lab supply that already has current limiter) -that’s what I’m doing, set with the appropriate voltage and current sense/limiting.
(a basic one starts around £50 and goes up, but you can make your own supply, or again buy one from the on-line tat bazaar for a few quid)
After this you’ll want a heat sink to put the laser diode in, I’ve used an old pentium 7 heat sink with a 10mm hole drilled in it. this makes a much “flater” package than the one pictured above that I found reasonably easy to attach to a 3d printer… also using a supply hooked up to the mains (no fading batteries/fading power), and heat sink I already had etc I was able to save quite a lot (i.e £40 rather than the hundreds + possible confiscation from customs). also at the time I got mine it took 4 days for the diode to arrive, and various forums were awash with people saying how they bought their latest thing from wicked lasers and were wondering if they’d ever come through as they were facing some supply issues?
Finally, you want a decent pair of safety glasses.
because lasers are so god damned cool, and I found a good deal I bought five that way friends can join in with the setting random stuff ablaze with a really bright light games.
as for why I bought a blue one…
A. cool
B. I knew very little about lasers and was shopping by power factor alone, the visible light lasers have really high power numbers (2W for example) but I didn’t know enough to understand that an IR laser would cut and etch a lot better with lower power numbers.
the £45 that the set-up cost me is certainly cheaper than the $300 a wicked lasers toy costs. -and it’s completely un-portable so no chance of theft or taking it outside to “play with”
I suspect what you mean is where can I buy a pre-made laser pen/torch thing from?
Thanks for the reply. Your comment was interesting, but I am more interested in a drop-in solution. I’ve played around with laser diodes off E-bay and found them to be very hit-or-miss when it comes to quality. Furthermore, putting together a robust, current-limited power supply for a system to be mounted on a CNC is no walk in the park. Your method, as you state, is fine for playing with lasers, but I was hoping for a package that would work as a replacement tool head. Preferably one with a manufacturer that will stand behind their product.
Just browsing the web and saw this… My company sells an upgrade kit for $225 than includes a 1.7W laser, laser driver board, and power adapter. It works with most all 3D printers and CNC machines. There are also instructions on upgrading a lot of 3D printers that include mounting as well. Check out http://www.laser-bot.com or http://www.jtechphotonics.com for details.
For $300 you can buy a real laser – CO2 40W.
2W? Powerful? Lol.
Correction. For $300 you can buy a 40W CO2 laser tube from an unknown chinese vendor, with no power supply.
This is awesome – I have a vaguely similar setup using a ShapeOko CNC (1st Gen) with a no-name chinese focusable 2.4W IR laser – it has a lot of teething trouble though. Positioning the laser module for it’s minimum distance for a sharp focus is tough to achieve with the ShapeOko – having a delta robot would be amazing for this. Also, the TTL control on the laser driver is basically undocumented, so I’m not sure how to interface it with my control board (currently a BuildLog CNC shield for an Arduino Uno, soon to be a Smoothieboard 4X).
I’m very envious of OP’s results!
Good build!! great result!!
The safety issues in these continue to bother me, though it looks like he’s got goggles on and is reasonably safety conscious. The laser output can be reflected from any reflective surface as a coherent beam and do really bad things like start fires or burn holes in retina – there should be some kind of shield around the engraver when it operates (we use fiberglass welding blankets if nothing else will serve; ~$20 at Harbor Freight).
The finished leather looks awesome but smells like burned leather for months and months. It even rubs off!
Forgive my ignorance, but surely it can be washed afterwards?
I recently did a project like this out of a scanner and a printer then after about a week of cutting and making stuff the diode went on thermal runaway and died the cheap driver i sourced from china failed and took the diode with it, supplying the diode with almost 2 amps. Moral of the story make your own drivers.
WOW… Just now saw that I’d gotten featured here on Hackaday! Holy crap this is awesome!!! :) As the person who posted the instructible featured here, I feel it’s my responsibility to answer some questions:
* I used the blue laser because it’s what I had laying around
* Yes, I know there are cheaper and better lasers than WL ones, but I happen to be one of the lucky guys who got an over-spec super reliable unit (runs at close to 3W measured, and I’ve run it well over 1K hours at full power with no issues)
* 3W in this spectrum is actually pretty nasty (causes skin cancer)
* I use a fairly sharp focusing lens, so any reflected beam diverges very fast
** THAT SAID, I always wear safety glasses with this, and nobody else in the room while it’s running.
* I now have a proper laser cutter (50W CO2)
* There is both an arduino and a rpi in this :) arduino running the RAMBO motherboard for the printer, and rpi running OctoPrint to drive that.
Overall this was a really fun project to do, and I made quite a few bracelets (30 or so) that turned out great, but now on to better things lol.
My new laser is a 50W CO2 laser, but the cutter it was on had a bad control board, so re-building it with a GRBL shield similar to what’s used in the shapeoko, modulating the laser TTL style with the spindle enable pin.
Not sure if I’ll be able to manage raster engraving, but should be able to do vector cutting pretty well!
-Z