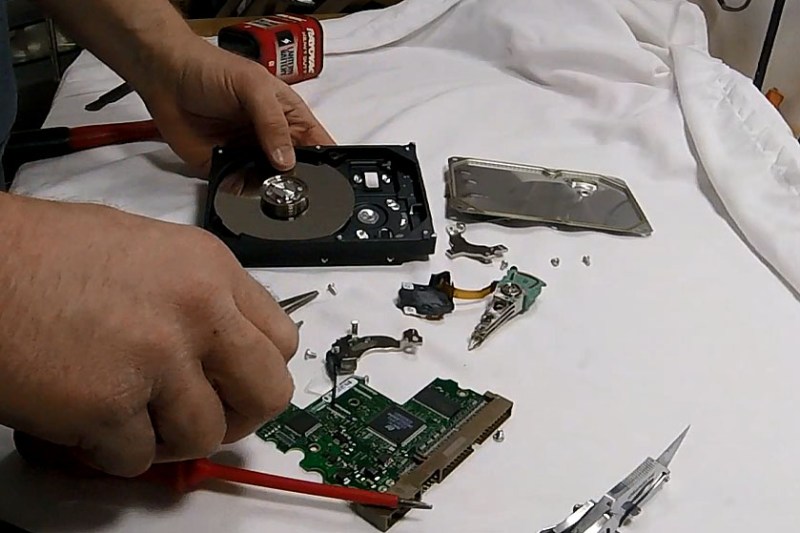
Have any dead hard drives kicking around? Hackaday alum [Jeremy Cook] shows how easy it is to disassemble a hard drive to scavenge its goodies. The hardest part is having the patience and the tools to get past all those screws that stand between you and the treasure inside.
The case screws are frequently of the Torx variety. Any self-respecting hacker probably has one or two of these already, but if you’re in the market, [Jeremy] recommends a nice set that looks way better than ours. Once the case is open, you can find rare earth magnets, bearings, and one or more platters.
Those terrifically strong magnets are good for all kinds of projects. Glue a couple of them to the back of an attractive piece of wood, mount it on the kitchen wall, and you have yourself a knife block. Keep a couple on the bench to temporarily magnetize tools. Use them to build a pickup to amplify a cigar box guitar or thumb piano. Or run the pickup into a small amplified speaker and wave it like a stethoscope near your electronics to hear them hum. As far as liberating the magnets goes, [Jeremy] resorted to clamping his in a vise and using a hammer and chisel to pry it away from the actuator hardware.
You’ve no doubt seen clocks made from old hard drives that were kept mostly intact. Many makers including [Jeremy] will extract the shiny platters to use as bases for clock faces and engrave the numbers, etch them, or glue them on. Those platters also make excellent chimes. Even if you just hang one platter off of a finger and tap it with a fingernail, it sounds really nice.
If simple chimes don’t really butter your muffin, there are all kinds of sonic projects for dead hard drives. How about making a microphone or speakers? Maybe an HDD MIDI controller or a synthesizer is more your speed. Speaking of synths, watch [Jeremy] take a hard drive apart to some sweet sounds after the break.


Was this really news worthy? I’d be more surprised if anyone who frequents this website hasn’t cracked open a HDD by now
Several. And made a clock out of one, using head actuator arms for the hands.
And rather old idea. I’ve seen a clock made from old hard drive at computer shows 20 years ago (when computer shows were still around, internet made selling used stuff easier) and in the past 20 years I’ve dismantled a few dozen bad drives. I got around 30 of the 5″ platters and easy near 100 of the 3″ plus I got a few 2.5″ drives begging to be pilfered.
Lol. You are so right
If you’re into home smelting of metals, HDDs make a great source of castable aluminum. The alloy used beats the pants off molten drink cans and such. (But as always, ensure you’ve separated out any magnesium parts!)
Also, sprite_tm has shown us that you may be able to reuse the controller boards into embeddable hardware.
I’ve never looked into casting as something to do myself.. What is the process and importance of removing magnesium parts?
Magnesium catches on fire easily, but the real danger is the fumes. Once it gets into your lungs, it never comes out. Same for zinc fumes.
I can’t imagine simply melting magnesium (or zinc, for that matter) will release significant oxide fumes. I can say from personal experience, though, that you don’t want to breath zinc oxide fumes. Recovery is days of no fun at all. (I was young and stupid and ignorant, welding galvanized steel. I’m a bit less ignorant and much less young now, still working on the stupid part.)
While there are Al-Mg alloys uncontrolled amounts of magnesium can have unpredictable effects on the casting.
For aluminum, you can use a steel pot as a stand-in for a proper crucible. Hard disk cases can be tossed in. Steel and copper parts (motor windings, bearings, screws, etc) will drop to the bottom of the molten metal, but you must be sure to dump them out before cooling or the aluminum will act like unbreakable glue.
Hard drive magnets came in handy when the latch on glove compartment door of my 2003 VW Jetta broke internally. Epoxied one to the door and one to the frame, and the door stayed closed, nice and tight. There was about a 1/16″ gap between the two, so no worries about the magnets slamming together. Now to figure out something to do with the other 200 hard drive magnets stuck to the side of the tool box…
The magnets can also trigger street light sensors if your vehicle (bike anyone) won’t do it.
A fiction. The buried inductive loop detectors can’t detect a small magnet. They need a biggish chunk of ferrous metal or an even bigger chunk of other (nonferrous) conductor.
It’s suppose to work in combination with the steel of your bike to enhance the effect of it.
Genius, my fuel door on my vw tdi is currently not working correctly and this is would be a beautiful fix.
You could make a powerful axial flux electric motor with them (or generator).
Just placed an order for a few from Newegg. Thanks!
The platter make great shaving mirrors. I’ve had one in the shower for a couple of years now.
A much better place for doing that. The sink stays clean now.
They are great mirrors till they eventually cloud and tarnish. They have no double reflection unlike a back reflective mirror. Unbreakable mirror in tool box, glove box, etc.
“Unbreakable”, ha! Some platters are aluminum-coated glass. I’ve shattered one in my hand before by trying to flex it a bit.
That’s true, in 2.5″ drives. I’ve never found glass platter in 3.5″ disk. It’s probably too expensive to make glass plate with required tolerance.
They exist – I’ve shattered one before.
I second [shockerengr]’s comment; I found a laptop in a dumpster with an HDD full of 500GB worth of glass shards :'(
Somehow, the LCD survived. I’m thinking of getting a driver board and using it as a 2nd monitor.
People also use shard of platters as laser reflectors, so even if it breaks you got something.
HD magnets are great for pulling tiny steel slivers from wounds and (yikes!) eyes. Keep one near the drill press or mill for emergencies.
I also use them to ‘magnet fish’ for small items around popular fishing docks. The mounting plate makes it easy to tie it to some strong cord.
I think I will stick to the safety glasses for the drill press.
They look like cheap sintered metal bits. There’s no reason to recommend these.
Anyone with what works to separate the magnet from the stiff steel plate? Sometimes they break trying to get them off. I have tried bending the plate away form the magnet (more like pealing) still that glue is strong. Haven’t tried heat but those magnets don’t like it hot. Chemicals?
Every shop should have one on a string with it’s backing.
Get ’em while they’re around, won’t be long that SSD’s take over.
Put them in the freezer. It kills the epoxy and they usually just pop right off after.
I use a thin knife blade and wedge it between the magnet and the base. Then tap on the blade a few times and the magnet separates. Sometimes the coating of the magnet peels slightly.
I’ve always found peeling the plate away works ok for me and the glue’s not too tough. I think the backing is normally soft iron, not steel.
The hard drive motors are great too, generally three phase brushless DC. I hooked one up to an R/C brushless speed controller and it worked a treat, easily did 10000 RPM. They are super well balanced and quiet too, much smoother than a regular hobby brushless motor, albeit heavier.
I’ve seen two interesting projects with broken hard drives:
http://www.elektroda.pl/rtvforum/viewtopic.php?p=6984995#6984995 – HDD clock that looks just awesome.
Other one was simple grinder made by gluing sandpaper to platter. That one I’ll make myself from small HDD, for book sharpening.
Some use motors with platers for making DJ-style MIDI controllers…
I read about a guy who uses a HD as a gyro to stabilize his camera. just attach the whole thing vertically to a board and put the camera on the board and the spinning resists movement.
Not sure if it was an instructable or here on HaD, but I found it an interesting use.
Be ware of 2.5″ notebook drives. Those have glass platers (at least the 4 i opened) they shatter when forcing them.
Pro tip, when opened a drive will work for at least an hour. Seeing your computer boot is nice. scratching it while running even cooler (instantly turns on my destructieve inner child…
once upon a time (20 years ago? – I forget exactly), some desktop platters were made of glass. Not many people believe me when I tell them this. ISTR it was IBM that used them in their drives.
IBM’s (and later Hitachi GST) “Deskstar” line was one such line of 3.5″ drives with glass platters. I’m not sure how long Hitachi used IBM’s original design, but the drives had earned the nickname of “Deathstars” due to a high failure rate.
Those bloody drives gave me PTSD. I lost four of those bastards.
I can just hear the x-wings flying around inside bombing the 1’s and 0’s out of ‘vents’ in the platter surface.
I lost two Deathstars while working on my doctoral thesis. Both I managed to get the data off once I heard the clicking start, but it was _very_ touchy. I think I got like $10 from a class-action lawsuit!
There was something wrong with a few batches, AFAIK, it’s fixed now.
It’s funny because the portable ones are suppose to be extra sturdy, and are I assume.
I grew very fatigued of cheap capacitive stud finders which consumed batteries and either stopped working, or didn’t work very well to begin with. Looking for an alternative, I found a non-powered model which used a magnetic pointer and had very good reviews. Right before buying, I thought: why not just use a hard drive magnet? So I did, and it was the best! I’ve shared this one weird tip with my friends, and now they all do it too.
To find wood studs, I sweep the magnet diagonally across the wall. You can easily feel when the magnet is in proximity to a metal fastener. As a bonus, it’ll usually hang from that spot to serve as a visual indicator. Keep several for mapping out complex picture hanging needs, without permanent marks!
Some older HDDs contain magnets coated with white enamel, which helps protect the painted walls. Some have contoured brackets which are easy to hang a plumb line from. Some had mounting ears just the right width to add small equipment handles. I gave those to my mother for fridge magnets. Practical and free!
Just wanted to add: while Wiha makes some of the best miniature screwdrivers you can buy, for stripping hard drives I use and endorse the Harbor Freight security bit set:
http://www.harborfreight.com/100-pc-security-bit-set-with-case-68457.html
Usually on sale for ~$10, it’s a surprising value and covers most of the screws you’ll encounter in a 3.5″ HDD (or anywhere else). (Laptop drives occasionally do have smaller screws.) The bits are precise and robust. Use in conjunction with your favorite cordless screwdriver and reduce any HDD to its component parts in 2-3min.
For a cordless hex screwdriver I strongly endorse either generation of the Milwaukee M4 (new 2102-20, old 0490-20) or even the venerable Milwaukee 6545-6, for their high speed and powerful torque. I have heavily used this product family for 20 years and IMO they are the most performant cordless screwdriver on the consumer market. (And priced accordingly.)
I have a set of ‘Kendo’ miniature drivers that include T5, T6, T7 and are about 13cm long. I think there much better than the ‘bit’ screwdrives as there are no small ‘bit’s to roll off the edge of the bench and get lost. It also has the normal tip that you would find in jewelers sets.
I have a smaller set again for smart phones.
Does the way that knife has been left in the title image just bug the hell out of anyone else?
Ha, didn’t, but now that you mention it, it is bugging me a little!
I got rid of the HD plates I had when I moved last summer. I SO want to make a giant tuning capacitor out of them for a homebrew radio project.
That sounds so wonderful. It would be the perfect ‘bling’ to have shiny plates of a variable air capacitor as a centerpiece of a retro radio project.
When your ready to go, post a ‘stack’ page on HaD.io. I.m sure that many hackers would like to donate some platters for a worthy cause.
Postage systems usually have special packages for CD’s and HDD platters would fit perfectly and be cheap to post. Just a layer of ‘food wrap’ plastic in-between and it’s good to go.
What country are you in?
That is a fantastic idea! I now have something to try out with all these platters that I refuse to toss. Would make an interesting-looking radio set.
Giant variable capacitors give me the smiles.
what brand and model number is the hard disc? it looks like it has 3 pins on the motor, is this correct? i’m looking for these motors for a project.. most have HD’s 4 pins, so its good to know for me what hard disc this is.
for this project: http://gieskes.nl/eurorack/?file=seagout
Couple of shameless plugs for my pages that might be of interest –
Running HDD motors using a brushless fan controller IC: http://imajeenyus.com/electronics/20140125_brushless_motor_driver/index.shtml
Using HDD platters as CO2 laser mirrors:
http://imajeenyus.com/optical/20140813_hdd_mirrors/index.shtml
The mirror trick is nothing new, but does work quite well, although the reflectance is only 80% or so. I’ve been using three of these in my 80W laser cutter for a couple of years now, because the mirrors were f*cked when it arrived.
[I’m still not getting email notifications to replies on this, by the way]
Unless you know something that I don’t (do tell) … you should be able to use the 4 pin motors as well. Especially if you are just picking off one phase. Both 3 and 4 pin motors are three phase. The 4 pin is a start configuration and you can ignore the extra connector if you want. The 3 pin is a delta configuration.
PS: I have some t 3 pin one here (from memory) I’ll go look.
What country are you in?
I have two that look exactly like the ones in the project that you linked to but they have different part numbers. I doubt that they’re from seagate drives as I don’t buy seagates.
In any case you should be able to use a four pin motor. One pin will have half the resistance to the other the pins as compared to any other pin combination. Just ignore the one pin that has half the resistance to three other pins.
Let me if you want them and I can post them to you.
.
thanks, i have 4 pin ones but they have a lower voltage, and maybe they send out a les nice wave also.. don’t remember. i use “seagate u series” not so easy to find, have to get lucky. but found some source for other type of seagate that might also have this same motor, need to order one its only 5 euro p.s. they have quite a few.
its this version you have it?: ST340014AS
I don’t know what hard drives they were out of.
Their makings are –
1) BSWOY 2OMYA
2) JSW04 24MYS
Please not I have tried not to mix up 0’s and O’s but it’s very hard with the fonts they have used. I’m thinking perhaps the first is BSW0Y 20MYA
They look identical so they seem to be made to the same spec. I am thinking perhaps they were out of Seagates as I found about 20 other old drives and there not all mine to start with. Many were Quantums rebadged as IBM and I didn’t buy those either.
Also I looked at the circuit and there is a adjustable gain stage at the start so you can adjust for different input voltages.
I am in Australia.
One idea that I had was to cut the (aluminum) platters into wedges, smoothen the edges, drill a couple of holes in them and make ‘Mithril Scale Mail’ armour.