Two weeks after my review of the MP Select Mini 3D printer, Monoprice’s own website has said this printer has been out of stock, in stock, and out of stock again several times. This almost unimaginably cheap 3D printer is proving to be exceptionally popular, and is in my opinion, a game-changing machine for the entire world of 3D printing.
With the popularity of this cheap printer that’s more than halfway decent, there are bound to be improvements. Those of us who have any experience with 3D printers aren’t going to be satisfied with a machine with any shortcomings, especially if it means we can print enhancements and mods for our printers.
Below are the best mods currently available for this exceptional printer. Obvious problems with the printer are corrected, and it’s made a little more robust. There are mods to add a glass build plate, and a few people are even messing around with the firmware on this machine. Consider this volume one of the MP Mini hacks; with a cheap printer that’s actually good, there are bound to be more improvements.
Unautomated PID Tuning
The biggest, and most easy to fix problem with the MP Mini is poor temperature control. 3D printers use a PID controller to keep the temperature of the hotend and heated bed at a constant, accurate temperature. The theory of PID control is far beyond the scope of a post on hacking a cheap 3D printer. The consequences of a poor PID loop do vastly affect the quality of this printer, though.
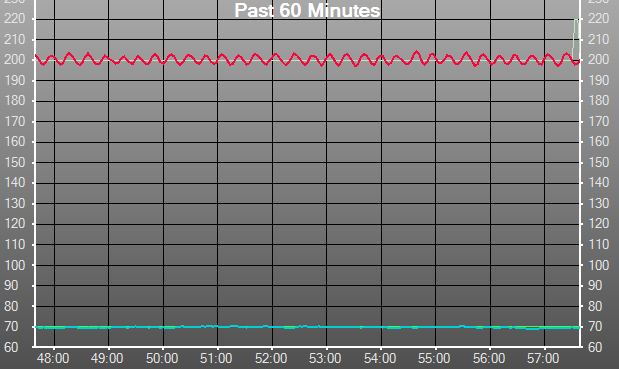
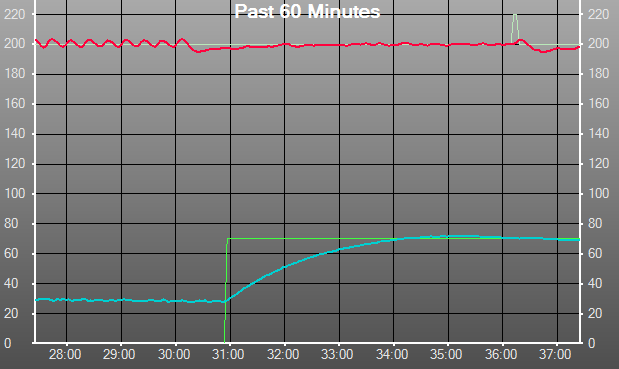
The stock PID loop causes the temperature of the hot end to oscillate ±5 degrees from the set point. This is not good; bridging is already hard without a proper fan on this machine, and poor temperature control only makes it worse. The good news is, you can fix this with one simple Gcode command.
To fix the poor temperature control, simply enter the following into Repetier, Octoprint, or whatever else you use to control your printer over USB:
M301 P20 I0.02 D250
M501
M500
This Gcode changes the Kd component of the PID controller to regulate the temperature more evenly. M501 saves the value to the EEPROM, Flash, or whatever the firmware has, and M500 displays the new PID values so you can check your work.
It works – with an updated Kd value, the hotend is stable to ±0.5 degrees. It’s not perfect, though: the KI is probably too low, and the KD term isn’t perfect. It’s not as good as PID auto tuning, but it’s good enough.
Now is a good enough time to mention the accuracy of the thermistor and hotend. I tested this with a Fluke meter and thermocouple, and the temperature is accurate to half a degree or so. That’s as good as you’re going to get without the ability to modify the firmware and thermistor table.
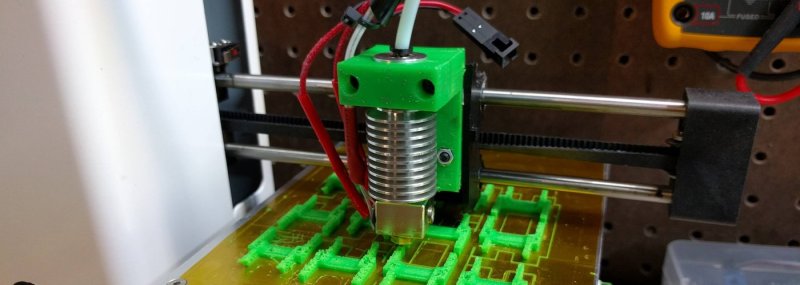
A New Hot End
The stock hot end on the MP Mini is a bit of a mess. The unconstrained filament path means flexible filaments are out of the question, and even loading new filament into the machine is a bit tricky. Let’s see what we got here, shall we?


From the heatbreak down, the hotend is actually all metal. The heater block accepts a standard heater cartridge and screw-mounted thermistor. The heater cartridge is held in place with a grub screw, and the thermistor is affixed with a little sheet of metal that wraps around the heater block. Other than that, there’s really not much to write home about. The nozzle appears to be the same as the nozzle for a hexagon, but I have no way of testing that.
Since the hotend uses a standard heater cartridge and a thermistor that bolts onto the heater block with a screw, that means an e3d hotend is a drop in replacement. I’ve designed a mount to install an e3d (or any other hotend that uses the groove mount) on the MP Mini. I’ve tested an e3d V6 with the stock heater and thermistor – it works. It works rather well.

What does a new hotend get you? First, you’ll be able to replace the nozzle once it clogs for good. This may also be the case with the stock hotend, but I couldn’t get the stock nozzle off even with a big pair of channel locks. Secondly, you’ll be able to print in weirder, more exotic materials. The stock hotend is already all-metal, but as I said the unconstrained filament path means flexible filaments are impossible. With my setup, you can print with flexible filaments. Even with a bowden setup, you can print in Ninjaflex and Semiflex.
A New Bed
The stock bed on the MP Mini is an aluminum clad PCB. For the price, it’s an awesome achievement; you don’t actually need a glass bed to print on this machine – all you need is a little bit of masking tape. That said, aluminum bonded directly to a PCB isn’t going to stand up over time, and it’s a good idea to put a piece of glass down.
This is a problem for the MP Mini. The bed leveling adjustment only has so much play, and the mount for the Z axis limit switch is built right into the frame. Some sort of modification is necessary to raise the print head up, and for that, a simple print is all you need.
[Sumpy]’s Glass Bed Spacer is precisely what you need if you want to put a piece of glass on the bed. It effectively makes the Z axis carriage taller, making it hit the limit switch higher than it usually would.


Clip this spacer onto the carriage, and you can raise your bed up 3/32″. While this is a great print, a better MP Mini Glass Bed Spacer would make use of Thingiverse’s Customizer. Being able to input the thickness of a sheet of glass, a glass and PEI sheet, or any other build platform stack up and get a perfectly-sized adapter would be great, but unfortunately the Thingiverse community doesn’t place any value on releasing the original design files for a part. That’s just another way Open Source reduces workload and effort duplication, kiddos.
Firmware
Perhaps the most interesting feature of the MP Mini is one that Monoprice isn’t putting on the spec sheet. This printer has WiFi, it has an ARM-based controller board, and it’s far more capable than anyone is letting on. [Matthew Upp] has managed to find the original manufacturer of this printer and get his hands on some firmware that adds WiFi printing to his machine:
This is not a true wireless, headless 3D printing solution like you would find in a Raspberry Pi + Octoprint setup. The WiFi connection is effectively just a wireless USB connection – you still need to run Repetier-Host to print wirelessly, although you could very easily use WiFi to transfer a file to the SD card and print from there.
It’s The Model T of Printers. That Means It’s Not That Great.
This is the Model T of 3D printers. Like all consumer 3D printers today, the technological heart is extraordinarily simple – open loop stepper motors, no way for the printer to tell if filament is in the machine and coming out the nozzle, and very little in the way of making sure a print is coming out right. Compare this to the Model T; the accelerator is on the steering column and the transmission has wood in it. This printer and the Model T are fantastically cheap and extraordinarily popular, and Monoprice is going to make a fortune on this printer.
There’s still a way to go until we get the Model A of 3D printers, with advanced features such as an accelerator on the floor. Until then, a ton of printers will be sold, and there are going to be a lot of DIY improvements to this fantastic printer.


I just bought one of these as my first printer and so far I’ve been really impressed with the quality. Once I got the bed properly adjusted it prints perfectly (for a $200 printer) every time. However, getting it to work with arch linux has been a beast and for now I’m just running their included Cura on a Windows XP VirtualBox instance I’ve had for several years. The latest Cura (which runs on Arch) no longer has a wizard for making custom printers (thus requiring json editing which takes a while seeing as there are no docs and I have to guess what everything means), the repetier-host available through the AUR currently doesn’t build and I had to make a custom package with a patch to make it build (even then its super buggy).
Aside from the linux software problems, it works great on Windows and I’m going to have to try some of these modifications.
If you join the facebook group for this https://www.facebook.com/groups/1717306548519045/ there’s a ton of useful info for this system; and someone just posted a Cura .json file for it.
I was looking for that group yesterday and could not find it for the life of me! Thank you!!
Can someone post a link to the cura json file here? The group appears to be closed and facebook isn’t a great place to share things.
That link is for a closed Facebook group. What other site are people supposed to use that don’t have, or want, a Facebook account?
I just clicked on the link now and asked to join. It’s “closed” meaning that it’s not open for everyone to read by default. You have to ask to join.
I just got mine last night(also my first printer). On OSX, but I’ve had success using Repetier downloaded online. It took a little bit to figure out how to change the slicer settings(you have to open their slicer, make your changes, save them to a set of profiles(one for filament and one for printer), and then go *back* to Repetier and choose those profiles in the slicer menu.
I’d rather spend an extra $70 on the Folger Tech Prusa i3 2020
You mean $270 for a box of parts. Then add in how many people-hours to put it together and *maybe* get it working. If it breaks, what then??
The mini you take out of the box and it’s printing in 15 minutes. If it breaks there’s a real manufacturer, real tech support, and a real warranty.
Then you got a fragile monstrosity with wires and gears and belts consuming your desk rather than an immocolus little thing sitting on a corner- about the size and complexity of an espresso machine :-)
Depends on what you want.
If you want a cheap thing to use to death then throw out – it’ll do. Good luck with parts and warranty. No appliance in this price range has cheap parts or a real warranty!
Fancy case aside, I don’t think the Folger is any weaker. Everything’s just in plain view. Notably, the Folger is made of 99% standard parts – Arduino Mega, the standard power supply, normal belts, NEMA17’s, the usual bearings and rods. The hotend is a little odd, but you can replace it. Anything else wears out, you can fix or replace from ordinary reprap supplies.
So if you’re the kind of person who replaces your own brakepads, you might like the Folger.
Replacement parts list from the MP Select Mini Wiki:
https://www.mpselectmini.com/replacements_parts
I bought a Folger Tech Prusa i3 2020. Almost a year later I’m still debugging it. Its mostly my fault for not having enough time to just get it done. 2 of my friends have monoprice printers and are pretty darn happy with them. I guess it depends on whether you want to print or troubleshoot.
Stuck at work checking my shipping tracking for my MP Mini. Delivered an hour ago and I don’t get a lunch break today.
Extruder Clicking…. It didn’t for the first dozen prints, now it is. Have done atomic pulls to clear hotend (look good), have raised temperature on the hot end (225-230… for pla…), have the proper bed level and bed height, have realigned both ends of the Bowden, have changed out the spring for less tension (to not deform filament), and have even added a sponge w/ oil inline for lubrication.
printing hot and very slow allows me to not skip but the prints take forever and are low quality… I believe my extruder stepper driver isn’t set to the proper current… more troubleshooting is in order…
I ran into the clicking as well, but in my case it would only happen when the Z axis was about 3″ off the bed. The feed tube in the Bowden system was getting angled to the point that the filament was jamming.
I have been able to fix it by moving the filament feed directly onto the hotend carriage. The feed path is now about 1.5″. I have a hotend with the integrated stepper motor feed sitting on my porch to remove the zip ties from the “upgrade.”
I upgraded to the all metal hot end, but need to come up with a good way to mount the filament cooling fan. I also found out the hard way that you need to tighten the all metal hot end after it is hot, otherwise you will have liquid filament leaking past the threads.
have you threaded a wire in your nozzle and cleaned it out?
Sir, I’ll thank you to keep that sort of deviant behaviour to yourself!
Instructions unclear: wrong nozzle, printer stuck on ceiling fan.
Same problem with almost all UP! printers. Try a dust-sponge first. If that does not work, try a drop of canola oil on that sponge… Worked for us.
I’ve never heard of an ‘atomic pull’. 2 minutes later and I’ve learned something.
https://ultimaker.com/en/resources/19510-how-to-apply-atomic-method
Thanks!
Me neither. From now on I will just call it “rinse cycle”. Same way I call respiration breathing heheh.
I haven’t tried it yet but according to Malyan the automatic PID tuning is fixed in one of the newer firmware versions.
Someone else tried it and it wasn’t fixed.
The heatbreak tube actually is PTFE lined if you remove it from the heat block and see it from the underside, (not all metal). I replaced my nozzle with no problems a few days ago. I had the hotend on while doing it to keep any plastic from binding it up.
Of note is that after removing the heatbreak tube and nozzle, it seemed like the nozzle or heatbreak might not have been screwed in all the way, as there appeared to be plastic residue about the threads of the heatbreak, nozzle, and inside the heater block. Not sure if this residue is something that just normally happens after a while, but it seems the heatbreak tube and nozzle might not have been meeting up in the middle of the heat block properly. I could see this possibly being the result of a lot of the clogging issues some might be having. Hopefully, a nozzle with a longer thread and tightening things up better fixes this for me, even though I have an E3D coming in the mail right now.
Ethan Anderson’s on-going community contributed google doc is a great source of info too:
https://docs.google.com/document/d/1HJaLIcUD4oiIUYu6In7Bxf7WxAOiT3n48RvOe5pvSHk/edit
I had a problem with the bed being sufficiently warped that I couldn’t level the bed. I have returned the printer for a replacement but I think the bed needs reinforcing to keep it flat. I will see when I get the replacement. Also, the bed heater can only be preheated to 60 degrees which is low for ABS. I can get it to 80 when printing but that is still quite low. If I can sort out the warping problem, it is still a good deal for $200.
Most add a glass sheet on top of the bed. The 60C can be set in g-code ie pronterface. Just had mine up to 80C printing nylon :-)
Happy to see the PID settings I developed are making their rounds! Some credit where it’s due would be nice, though :)
Else it’s pistols at dawn!
I bought one after the last story on it. Power supply died about 30 minutes into first print. Tried calling monoprice, but their system hung up on me after 9 minutes on hold. Replaced power brick with external 13.8 volt 20 amp regulated supply. No problems since.
My power supply also died in the first day. Called tech support and they’re going to RMA the whole printer once it’s back in stock. The LCD had a broken column of pixels too so it’s probably better to do a full replacement anyways.
For reference though, where did you get your replacement power brick? The stock 12V 10A one doesn’t give me much confidence…
My A/C adaptor was DOA so I ordered a replacement because 2-day shipping and it worked perfectly: https://www.amazon.com/gp/product/B00IF4WYOS
I’d like to know what power supply you ended up using, too. The one that came with my MP Select Mini died within the first hour of use. I just started the RMA process, in case I’m misdiagnosing the problem, but it would be nice to have a more reliable power supply on hand for when the next one dies.
Get yourself a 203W XBox 360 power supply off eBay for $10-15 and attach the DC output cable from the stock brick.
Follow these instructions. I went a little farther by disassembling the end connector on the 360 power supply to keep the strain relief, and put the cables into a little project box with a switch.
http://thevariableconstant.blogspot.com/2012/12/xbox-360-power-supply-hack.html
Unless this printer is using firmware that is only tangentially related to Marlin, your PID gcode is incorrect – “M301 Pn In Dn” is fine, but “M500” is used for saving the PID values to EEPROM; “M501” afterwards is alright, but what you really want is “M503” to print out the values that are currently in use – “M501” loads the EEPROM values into memory, so in the original order of commands, would actually reset the current values to the previously stored EEPROM values, and then save the “new” values.
Might someone explain to me, simply, a fundamental point I have not gotten yet (?) What is the ‘difference’ between a ‘hot end’ and an ‘extruder’ ? Two different terms for the same thing, or what ? Or is it ‘hot end’ + ‘extruder’ ? The e3D head mentioned, is it one, or ‘both’ ?
Yes, I’ve ran into that problem too.
The extruder is the mechanism that mechanically “pushes” the filament, while the hotend is the part that melts the plastic and (thanks to the mechanical pressure given by the extruder) forces it through the nozzle.
If we think into a hot glue gun, the extruder would be the “trigger” mechanism, while the hotend is the aluminium part that gets hot and where the hot glue goes out.
English is not my first language, I hope this to be understandable :-)
The E3D head is a hot end. As Metis said the extruder is the part that pushes the filament into the hot end. Here is a good explanation http://www.fabbaloo.com/blog/2015/11/11/bowden-or-direct-a-primer-on-extruder-styles
There’s a lot of overlap between the two terms, but in general usage – the extruder is the entire assembly that takes in cold filament and extrudes it as a thin hot strand, while the hotend is the specific section of the extruder where the filament is heated up. As I said though, there’s lots of overlap, and plenty of people using the terms differently/interchangeably.
The “hot end” is the hot end of the extruder … literally. The extruder includes everything from where the filament is pulled in to where it hits the print.
Since reading the previous review I’ve been keeping an eye on monoprice stock as I try to make up my mind. Then Moritz Walter did his ‘guide to self-built’ the other day and that pushed me back towards ‘no… I need to just wait and continue working my way through my Mendel90 BOM’.
At this point I think I’m just going to to ahead with the MP Select as my introduction and continue on with the Mendel90 as money allows. Even if the Select ends up getting the majority of its use from printing that first set of M90 parts it’ll be worth it just from the practice with the software toolchain.
You may want to edit the PID tuning section. It looks like M500 is what writes to EEPROM and M501 will read the parameters from EEPROM.
Yes, it should be:
M301 P20 I0.02 D250
M500
M501
The updated firmware provides a very stable hot end temp on mine.
I haven’t seen it mentioned but if you install the wifi enabled firmware you can upload your file to print via its web interface – it is very basic and very slow but it does work.
“the Thingiverse community doesn’t place any value on releasing the original design files for a part.”
Speak for yourself. I always release my .scads on Thingiverse, and my default license is public domain dedication. I find that lots of people in the Thingiverse community provide their sources.
Your claim is like saying the Hackaday community doesn’t care about correcting their mistakes because there’s no edit button on user posts.
One good person doesn’t correct a barrel of rotten apples lol. it’s RARE that the designs have source files even when people specifically nicely asked. I’m talking random stuff like custom printer parts- nothing that has any commercial value.
It’s at Jet.com Opt out of free returns, use a debit card and (here’s the catch) it has to be your first time ordering to use the TRIPLE15 discount code for $30 off. Shipping is free.
https://jet.com/product/MP-Select-Mini-3D-Printer/6aacb19912cd471b9a4bfa697da6cc24
Improved E3D V6 mount. http://www.thingiverse.com/thing:1676107
Bad link? Get thingiverse 404 page :(
Can someone provide some insight on the removal of the heat sink from the carrier? Are the screws under the timing belt on the X axis. If so, how can I best move / remove the belt to access them?
Ha, yes, I struggled for a bit with the same thing. The screws are, indeed, under the timing belt. To get to them, you have to unscrew the one at the end of the z-axis arm, which will release the belt. Then it’s easy to unscrew them and remove the heat sink.
Thanks, much appreciated!
The bed rails are most likely not 8mm as they should be. Good excuse to buy a digital caliper to check them. I got a piece of 8mm precision rod off eBay, cut two lengths off it matching the original bed rods and swapped them.
Goodbye bed wobble!
The hardest part of the swap is cutting the new rods to length. Remove the right one first and use it to mark the cutting length of the new rods.
After getting both rods installed, only finger tighten the two screws at the ends of the bed, fully tighten the vertical screws holding the rods in their holders.
Push the bed to the rear and tighten the end screws then pull the bed to the front and tighten the back end screws. That aligns the rod spacing to the bearings so it won’t bind.
Of course you’ll need to re-level the bed.
Hobbyking is promised to make this printer available from eu warehouse from November / December. I was wondering how many of you would be interested in this opportunity, because if everybody leaves a comment under the product, demanding its earlier availability, maybe we can pressure them to make it available sooner: http://www.hobbyking.com/hobbyking/store/__103391__Malyan_M200_Desktop_3D_printer_US_Plug_.html
(This is not intended to be an ad, but so far it is harder (and more expensive) to get this 3d printer in the eu than in the us, because of the higher price, shipping cost and customs)
I apologize as I’m new to 3D printing but by the heat cartridge being standard, can you elaborate? I.e. is this the same? http://a.co/5xbEh2M
So naturally my first printer some filament got stuck so I cleaned it out and I’m pretty sure I killed the heater cartridge and/or the thermistor. The printer doesn’t get above 205 degrees, and even at lower temperatures I no longer get consistent flow of filament. Thanks!
that link is a heat block, not a heat cartridge. But it and the mini use the same cartridge. Random example: https://www.amazon.com/ALUNAR-Printer-Cartridge-Heater-impresora/dp/B01M2ZA9IU/
But you can buy complete kits of parts for about the same $
e.g.
https://www.amazon.com/Haobase-Assembled-Extruder-Printer-Filament/dp/B01I4ZQU88
These are just examples, not recommendations.
Did final highest specs ever get verified/tested
per various posts/threads?
0.0475 mm layer height
55mm 300mm printing speed, etc…
Many thanks!
oops 0.04375 layer height…
I run a .04375 layer height on my MPSM daily, works perfectly. I’ve always just left it at 50mm/s print speed though, but I can definitely confirm the layer height.
That’s mostly stock, but with a newer printer – they fixed the issues earlier ones had in later revisions. Just the belt tensioners because the stock spring tensioners are awful.
Interested in replacing the X and/or Y axis linear bearings with Igus Drylin sleeves. I’ve had black particles appearing on the X-axis guide rods, and increasing noise from the X-axis carriage. Not sure if the LM6LUU and LM8LUU bearings are pressed into the bearing blocks, and how difficult to remove and replace. Has anyone tried this ?
Hi guys.
Sorry for the noob questions!
When i look at cloned e3d hotend’s i have an option to go for the 6v or the 12v version. What should i go for?
Thanks!
Hi
While doing some mods I accidentally cut the extruder fan whilst the power was on. Now the fan does not run when the extruded heats up. The fan still works when 12v applied to the plug at the board. I cannot see any exploded components on the board near the fan power socket. I guess I blew the tiny SMT transistor when the wires shorted. Can anyone confirm that this is the likely and only point of damage.
Thanks
I ended ip replacing the main board.
Sorry to hear that, I will be extra careful about cutting the power when working inside of the bottom enclosure …
Recently the rocker switch (power) on my Mini went flaky, started sticking halfway between On and Off, even cut out a couple of times when printing. Fortunately the KCD1-101 switches are common and cheap, you can pick up a pack of five for $2 or $3 on eBay or Amazon …
On examination inside, the stock switch was cheap and poorly built, I would recommend replacing it whenever the bottom cover is off for any reason. Compressing the plastic tabs on the switch from the inside with adjustable pliers pops it out easily after removing the lugs from the switch tabs, and the new switch just pops in. I didn’t want to mar the paint by prying it from the outside …
My Mini is starting to look like a Frankenstein, after replacing so many of the short lifecycle parts that keep the price so low … :-)
Also, the Igus Drylin bushings are working great on the X-axis carriage. They seem a little sticky at first, but break in after awhile, and are absolutely silent, no lubrication necessary. They also seem to have zero backlash, resulting in sharper corners on prints …
I’ve printed new ABS bearing blocks for the Y-axis, for two sets of tandem Igus 8mm bushings, and am working on a design for a screw-driven Y-axis belt tensioner to replace the spring tensioner, it only takes about 1 or 2mm of travel to tension the belt, since it stretches very little …