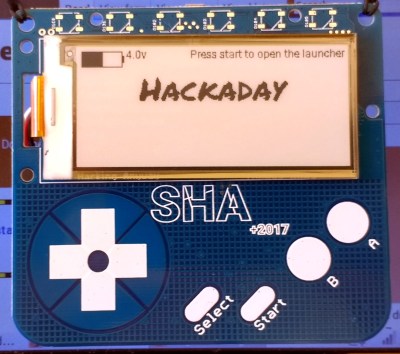
 The badge has become one of the defining features of a modern hacker camp, a wearable electronic device that serves as both event computer and platform for some mild software and hardware hacking. Some events have had astoundingly sophisticated badges while others are more simple affairs, and the phenomenon has even spawned an ecosystem of unofficial badges which have nothing to do with the event in question.
The SHACamp 2017 badge is the latest to come the way of a Hackaday writer, and certainly contains enough to be taken as representative of the state of hacker camp badges in 2017. It doesn’t have a star turn like CCCCamp 2015’s software defined radio, instead it’s an extremely handy little computer in its own right.
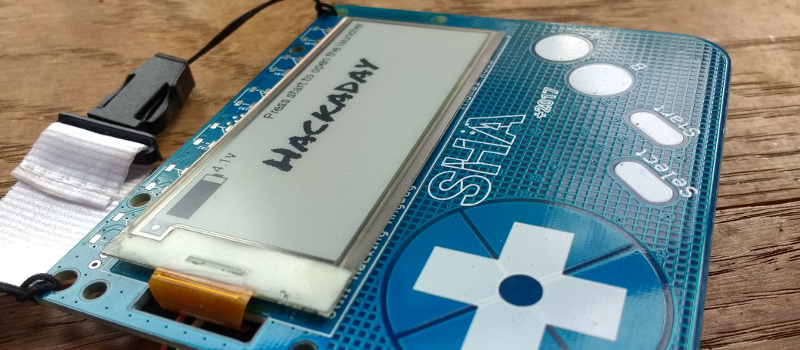
The badge itself is a blue PCB roughly 95mm by 85mm in size, with a front panel dominated by a 296×128 pixel e-ink display and a set of capacitive touch buttons in a layout reminiscent of a Game Boy. At the top of the front panel are spaces for a set of Neopixel LEDs that the badge owner must solder themselves.
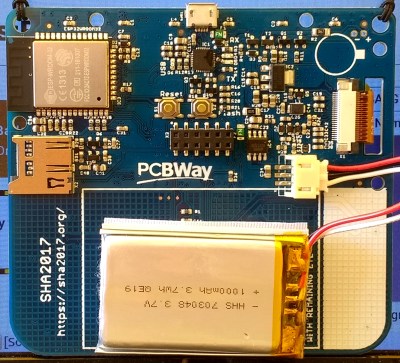 On the rear of the PCB is the badge circuitry and a 1000mAh lithium-polymer cell. There are surprisingly few integrated circuits, as the “brains” of the device comes via an ESP32 in a postage-stamp Wi-Fi module. The rest of the components are dedicated to the Silicon Labs CP2102 USB to serial interface, power regulation and battery charging, and the Freescale MPR121 touch sensor and GPIO expander chip. Aside from the USB interface there is a microSD card socket and an expansion socket for so-called “scarves”, or add-on boards. A further component that must be soldered by the user on this side is a vibrator unit. As of the end of the camp, the only scarf board created was a bare prototyping board.
As a camp attendee though this describes only the first impressions as a customer. No badge like this is a mass-produced piece of consumer electronics, instead each one is a custom design for that particular event. Behind the assembled badge we attendees received upon check-in lies many months of development and manufacturing steps from a team of volunteers, and it was this that the badge team supremos [Sebastius] and [Kartoffel] explained as we took a break in the Dutch sunshine outside the badge hacking tent. Our story then becomes less of a description of the badge, and more a fascinating exploration of the manufacture of a medium volume electronic assembly from scratch.
How To Make Four Thousand Badges Without Losing Your Hair
The genesis of this particular badge came two years ago after CCCCamp 2015, but solidified into something approaching the final production with some heavy influence from the functionality of EMF 2016’s Tilda Mkπ badge. It might seem obvious to list the desirable features of a camp badge, but it needed to display the owner’s name or handle, be easy to hack, provide access to event information, and most importantly of all, be working for its users from the start of proceedings. A secondary requirement was that the badge be readable in intense sunlight, as previous badges had been somewhat disappointing in that respect. Networking was originally to have been provided via Bluetooth hotspots, but it was later decided to use WiFi instead due to concerns over excessive use of 2.4GHz spectrum at the event. And finally the success of the EMF badge pointed the way to a MicroPython software environment with an associated library of apps.
![The various layers of the badge PCB. [Kartoffel]](https://hackaday.com/wp-content/uploads/2017/08/sha-badge-schema.png?w=400)
With a minor headache of their chosen touch control chip going end-of-life and thus shooting up in price, they weren’t done with those USB sockets. The replacement for their socket with the plastic protrusions turned out to overlap the edge of the board enough to touch the next panelised board during pick-and-place, and PCBWay, their manufacturer and one of their sponsors, pulled off some heroic mass reworking to deliver the goods. All seemed well, and the boards were manufactured and despatched from China to Europe.
When the completed boards arrived, they worked perfectly. Or at least, they seemed to. It soon became apparent that for about half the boards though there was an unexpected problem in that a switch from USB to battery power would reset the ESP32. This was eventually traced to the Silicon Labs USB to serial chip, and a fix had to be concocted.
It’s a Fake!
The Silicon Labs part had been chosen due to ease of software drivers across all platforms compared to familiar alternatives such as the FTDI chip. Silicon Labs themselves had provided some sponsorship in the form of a significant number of the chips, but that had not been sufficient for the whole production run. The remainder had to be sourced in China, and as some of you are probably guessing at this point, the chips from China turned out to be fakes.
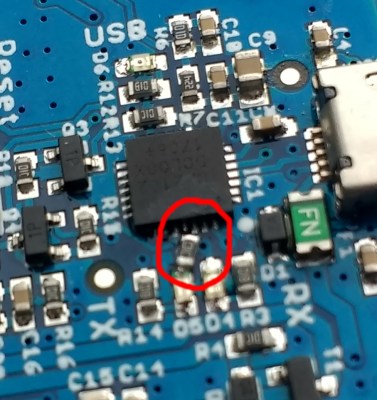
Even then, they weren’t bad fakes, they performed as you’d expect the original to, but their designer had made a crucial omission in leaving out a protection diode on the USB lines. The resulting spike on disconnection was thus enough to reset the ESP32, spelling potential disaster for the project. The fix proved to be both simple and hellishly difficult at the same time, a cut track and a piece of extremely fiddly soldering of a tiny SMD resistor, for which a heroic effort was made by a team of volunteer solderers. The fix can be seen on the reverse of the affected boards, and firmware has a bit of code to identify the fake chips and display the chip type through a pair of letters in the corner of the splash screen for easy identification.
All this design, sourcing, and reworking must have been a Herculean effort, and those of us who attended the camp should all be extremely grateful to the team for delivering us a badge that worked from the start. Some of us noticed the reworked resistor immediately on receipt of the badge, but without any idea of the scale of the work behind it.
What About The Software?
The hardware is only half the story with any badge though, because it is upon the software that a badge makes it or fails. In this context the SHA badge follows the tried and tested route you’d expect of booting into a nickname screen, with a launcher for installed apps (in the badge’s parlance, “eggs”) at the press of a button. There is an app library (The Hatchery), and as this is a hacker camp badge the user is encouraged to write their own apps in MicroPython. The camp attendees did not disappoint in this respect, with many apps pushing the capabilities of the badge to its limit.
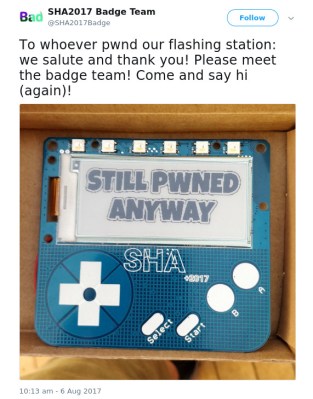
But this is a hacker camp, and despite our generally not being too enthusiastic about negative connotations surrounding the word “Hacker”, of course people are going to do mildly naughty things with the badge. There was ransomware, for instance, and viruses that would brick the badge of anyone unwary enough to install them. The write-up from the creator of the first SHA badge ransomware is a fascinating read in its own right. Then there was the badge reflashing station, a laptop in the badge hacking tent that people whose badges had problems could visit to refresh their firmware. This was a common occurrence without viruses or ransomware, even the most well-behaved of apps sometimes end up with crash cycles. This reflashing station was thus a significant target, and sure enough, someone managed to compromise it and use it to distribute a mildly malicious firmware. It is a mark of the nature of our community that both these exploits were embraced and applauded by the badge team, they’re part of our culture.
As an end user of the badge, what was my impression? It’s typical of such badges in that the software is rough around the edges and it’s not always the most stable of experiences, but this one is better than many others. The Hackaday badge required several trips to be reflashed after crash loops rendered it unusable, and there were plenty of apps that either don’t work or made the badge lock up. But this is par for the course with hacker camp badges, and with each successive firmware update the experience became smoother. The touch buttons would sometimes trigger unexpectedly particularly when the badge was being worn rather than held, so I ran the nickname app to display “Hackaday” on the e-ink screen, then disconnected the battery to make a static badge when I wasn’t using it. Otherwise, my display fixing glue succumbed to the heat (as it did with many users), so I got a piece of double sided tape from the badge bar to fix it.
Development wise, apps for the badge can be easily written in MicroPython. It’s time to shamefacedly admit that while I did some desultory hacking at it I created nothing worthy of the app library. It is however worth looking at for anyone who has a SHA badge, because of all the camp badges I think this one has least chance of being left on the shelf. We’re used to badges with all sorts of amazing capabilities, but until now we’ve not had one like this with an e-ink screen. This is a badge whose extended battery life and persistent screen will give it a place in all sorts of monitoring and information apps long after the memory of SHA 2017 has faded.
In conclusion then, what’s the verdict on the SHA 2017 badge? The e-ink screen and the ESP32 processor are a departure from the established trend with hacker camp badges, and when combined with a MicroPython environment inspired by the EMF 2016 badge it makes for a very practical badge platform indeed. The design is entirely open source, so it is entirely likely that given the ready availability of ESP32 modules we’ll see more than a hint of its DNA making an appearance in future badges. The SHA badge team have made a badge to be proud of here, and if other camps build upon their work then they will do so upon a solid base.
 Postscript: The badge team at SHA2017 had a logo all of their own, featuring a pair of cartoon animals. For the curious among us who do not hail from the Netherlands, they are a SHA-themed parody of the popular Dutch children’s characters, the two friendly dogs [Woezel en Pip] (Google Translate link). Since the stickers seemed to be everywhere during the event, it seemed appropriate to clear that up.



What an awesome writeup to conclude such an awesome project! We had a lot of fun (and still do actually, our software guys are still making pull requests, people are writing apps and just having a nice time with the thing.).
Two additions to the article from my perspective:
The talk about the badge can be found here: https://media.ccc.de/v/SHA2017-51-sha2017_badge
Second, my personal favorite feature for SHA2017 was the ‘Badge Bar’. It turns out that badge hacking and a bar really mix well. The hacking area was packed and had such a nice atmosphere.
The SHA2017 Badge was a massive project and it would not have been possible without the hundred volunteers to help us out. Thanks to them we got 3650 boards out at launch, of which at least 2000 were unpacked and used at some point.
Oh yes, I’d second that on the bar in the bar. :) Very nice to have a cool not-a-pint of Grolsch while queuing in the heat. :)
I was at another UK hackspace to my own last night, and saw plenty of SHA badge hacking still going on. That’ll be replicated all over the place, expect more apps to roll in.
For those who still have the ransomware, did not install the latest firmware, and want to remove it manually:
1. Connect your PC using USB and open a terminal at 115200 baud.
2. Reset your badge and at the same time start hammering CTRL+C
3. When you get the python prompt enter “import shell”, the badge will now boot into a clean shell.
4. enter the following commands:
= import badge
= badge.nvs_set_str(“boot”,”splash”,”splash”)
5. Now reboot your badge. In case it boots into a dickbutt image repeat process and delete boot.py as well (using uos), I will look up the exact procedure tomorrow.
OR: manually update to the latest firmware version
– Follow step 1 to 3.
– Set your wifi settings:
badge.nvs_set_str(“badge”, “wifi.ssid”, “”)
badge.nvs_set_str(“badge”, “wifi.password”, “”)
Then run the OTA update manually by entering “import ota_update” into the prompt.
You can also manually start the normal homescreen by running it manually “import splash”
Once you have the latest firmware version you can boot into a “safe mode” where ransomware (or any app) has no chance to ruin your badge experience. You can enter the safe mode by resetting the badge while holding the button.
Wonder how much these badges add to the entry fee?
About 3 euro ;-)
Not that much. The badge received a few major and a few minor sponsors.
Source of the epaper displays please?
This is what I want to know. The design may be open, but the components, specifically the E-Eink display is another story.
I remember looking for cheap E-Eink display for a project and checked digikey which unsurprisingly showed ludicrously overpriced panels. Then I checked good ole aliexpress and ebay, but much to my surprise they also tended to lay on the expensive side there. From what I understand, there is some asinine patent thing going on with the panels, preventing the price from dropping? And a trademark issue.
This is the est epaper display I’ve found…. for size vs price
https://smile.amazon.com/gp/product/B00VV5IMN0/ref=oh_aui_search_detailpage?ie=UTF8&psc=1
What I’d really like to find is a 296×128 pixels, ***2-bit*** e-ink display.
The documentation site says it is a DKE Group DEPG0290B1.. (https://wiki.sha2017.org/w/Projects:Badge/Documentation#Components)
It is a electronic shelf label type display, and this type of screens an be found as AM EPD on various sites.
Something like this is a similar form factor (although iirc it is not a drop in substitute): https://nl.aliexpress.com/item/2-9-EPD-display-e-paper-display-panel/32218091929.html?spm=a2g0z.search0302.4.26.EReirK
The type mentioned is not known on the internet, except for the pages about the badge. The most similar one seems to be the Good Display one. I too would like to know where the screen came from.
Scarves is it now?
Well, I guess that goes along with shields, hats, capes, merkins…
Fun fact: The laser etching on the fake USB-to-serial converters differed slightly from the real ones, but we found an easier way to detect the difference: send a slightly illegal packet and look at the response. In this case, we sent a packet requesting a multibyte response with a command that only should ever give back an one-byte response. Some chips neatly give back just one byte like you’d expect a well-behaved chip to do, some happily return the one byte plus a vomit of bytes of (presumably) internal RAM. From that result we could see which chip was which: the well-behaved one was actually the fake one.
Yeah the batch number on the fakes was DCL00X, i’ll remember that one on my deathbed probably…
That’s actually a great story. Thanks for sharing.
Too many “badge” articles.
Don’t worry, it is just a batch of badges. Betcha they diminish as convention season winds down.
That’s about it. Lots of them appearing right now, then you won’t see any for months.
I would just like to see more about what is covered at the conventions rather than a brief about the badges people make for them. It seems like the editors are focusing solely on the badges, largely ignoring everything else that would be of interest to the hacker/maker community offered by the gathering.
Haha, I just spun a board with an esp32 and the serial circuit had a resistor on the TX line. Didn’t know why it was there but the schematics I referenced had it so i added it. Now i know what its for.
Is it listed? Where can I buy it?
Here it is, running a PDP-11 emulator with diagnostics (XXDP+): https://imgur.com/a/8xxpsaF