
Before we get into the how-to, we felt it would be appropriate to explain a little bit about how this came to be. As many of you may remember, a couple of months ago we attended CES 2010. While there, we also attended the It Won’t Stay in Vegas Blogger party and ended up meeting the guys from Woot. After all of us spent a little bit of time appreciating the open bar, a group of us stood ended up standing around and talking shop for a while. All of a sudden, a member of our group, Jeremy Grosser, proposed the idea that Hackaday and Woot form a partnership. Basically, they would give us a heads up on what they are going to sell and we would write up a how-to on how to do something cool or useful with that product. Then, when the day came for Woot to sell the product, we would post our how-to. What you are reading right now just so happens to be that idea in action, the first official partnership between Hackaday and Woot. In this how-to, we’ll be taking apart the Wowwee Rovio mobile webcam robot, adding some super-bright LEDs for better see-in-the-dark action, and see how some software called RoboRealm can give it a little bit of artificial intelligence.
If don’t have a Rovio yet, you should probably head over to Woot and pick one up so you can follow along. Also, be sure to pick up a copy of RoboRealm at deals.woot while you’re at it. It is important to note that while writing this how-to, we used a modified design of the Rovio Head-Mounted LED hack, posted to RoboCommunity by [Rudolph].
Parts
– 6 super-bright white LEDs (Ours were rated for 3.3v with an intensity of 7000mcd.)
– 1 2N2907 PNP Transistor (We found ours in a 15 transistor combo pack from RadioShack.)
– 1 22ohm resistor
– 1 2.2k ohm resistor
– 22g solid hookup wire
– RadioShack 3x2x1″ Project Enclosure (We used the plastic back panel as a place to mount our LEDs.)
– 5mm LED holders (Optional. We ended up using them to mount our LEDs in their poorly drilled holes.)
– Heat-shrink tubing (Optional, but recommended.)
– A small strip of perfboard
We picked up most of our parts from RadioShack, but these parts are so common that you should be able to pick them up from any electronics components store.
Disassembly
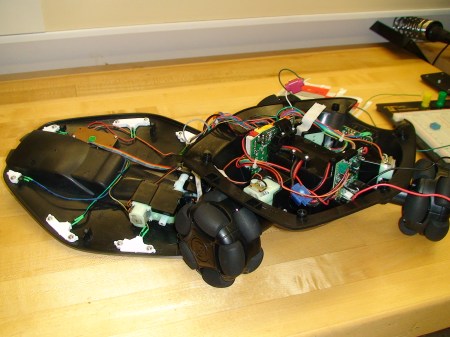
The first step towards giving our Rovio some much needed extra light is, of course, to disassemble it. After turning the Rovio upside down, remove the six phillips-head screws and carefully remove the top shell to gain access to the Rovio’s internals. While you won’t be able to fully detach the top shell, you should be able to lay it next to the bottom part of the Rovio as seen above.
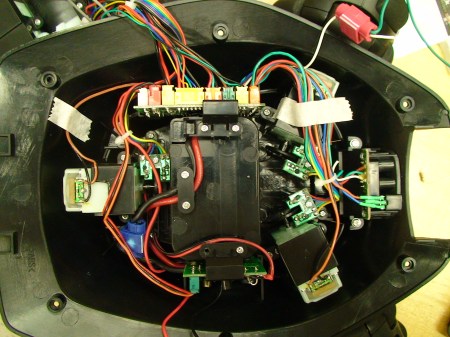
Inside of the Rovio, there are two main PCBs, the control board and the power supply board. For the purposes of this how-to, we will only need to modify the power supply board. To gain access to the power supply board, simply remove the two phillips-head screws that secure the board vertically. After you gain access to the board, you will then need to identify the ground and positive pads on the PCB. We will be tapping into these pads later to power our array of LEDs. One other item of interest to us is the white wire leading from the control board to the LED headlight board. This wire will allow us to control our new headlights through the Rovio’s web interface.
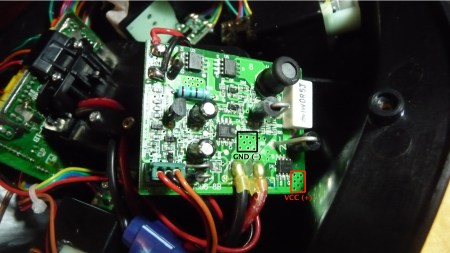
After firing up your soldering iron, you’ll need to solder two wires onto the power supply board. As you can see above, there are two areas with tiny little holes, allowing for easy access to both GND and VCC. After you have soldered both of these wires, screw the board back in and then turn your attention towards the white wire mentioned previously. After cutting the white wire, solder a length of hookup wire to the end of it and insulate it with appropriately sized heat-shrink tubing. Also, it’s probably a good idea to remove the LED headlight board entirely. This gives you three openings to run your wires out of from the Rovio to our new headlight panel. After you’ve removed the board, you can cut the wires leading to both the infrared LED and receiver. These function as a forward facing “radar” to alert the user if there are any obstacles ahead. We decided to salvage ours by placing them both in the new panel that we will soon be creating. If you choose to salvage your infrared “radar” as well, then remember to solder extension wires between the appropriate leads and the LED and receiver. We actually used some telephone tap connectors (from RadioShack) to extend the three wires leading to the infrared receiver, but soldering should work just fine. Now that you’re finished with all of the internal modifications to the Rovio, we can move on to the circuitry behind this hack.
The Circuit

In order to make sure that we can control our replacement LED headlights through Rovio’s web interface, we need to build a circuit that will detect when the headlights are triggered via the web interface and activate our headlights accordingly. To do this, we’ll use a PNP transistor to switch the ground of our headlight circuit. As you can see from the schematic above, the white wire that we mentioned earlier will be connected to the base of the transistor via a 2.2k resistor, the ground from the power supply board will be connected to the collector of the transistor, and the emitter of the transistor will be connected to the ground of the parallel array of LEDs. If you want to, you could probably add a few more LEDs to this design. Just remember, if you change the number or type of the LEDs, you will have to recalculate the value of the current-limiting resistor between VCC and the positive pin of the parallel LED array. After we’ve reviewed our schematic and we’re comfortable with it, we should be ready to breadboard.
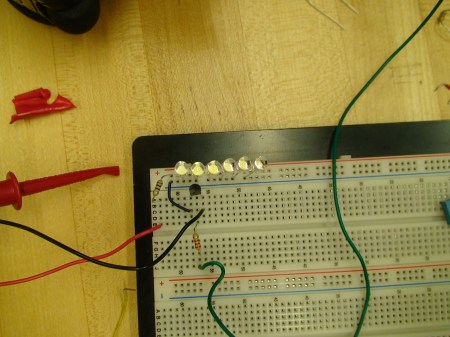
As you can see, there really isn’t that much to our circuit as far as components go. The black and red wires come directly from the power supply board. Our voltage reading was right around 6.5v. Please note that your voltage may vary depending on the charge of your Rovio’s NiMH battery. The green wire was soldered to the white wire inside of the Rovio, and controls whether the transistor lets the ground flow to the LEDs. We found that the best way to test this circuit while breadboarding was to turn on the Rovio and turn on and off the headlights using the web interface. After confirming that the circuit works consistently, you can go ahead and solder the circuit onto some perfboard and connect to the Rovio.
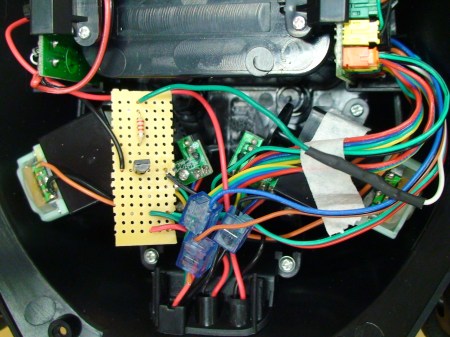
The circuit really doesn’t take up much space on the perfboard. We decided to use the extra space on our board as a makeshift terminal block to extend the infrared LED. While soldering the circuit onto the perfboard, be sure to remember the orientation of your transistor. If you accidentally put it in backwards, you could switch the collector and emitter, burning out the transistor. We mention this only because we actually did it the first time we assembled our board, and we ended up having to swap in a new transistor before reassembling the board. After you’ve assembled and verified that your circuit works, we can move on to assembling our headlight panel.
Drilling and Wiring
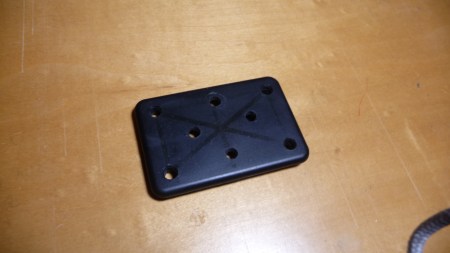
On your blank panel, carefully drill 8 holes in any configuration you would like. When drilling your holes, be sure to use a 3/16″ drill bit. While it is actually slightly smaller than a 5mm LED, you can rotate the drill once or twice around to widen the hole. The main thing is that you don’t want to make the holes too large for the LEDs, which, incidentally, we ended up doing. One of them was so wide that we had to change the placement of our LEDs to make sure that they all more or less fit.
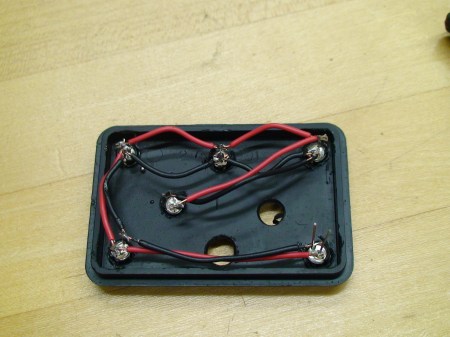
I don’t think that I need to get into too much detail here, but the major thing to remember is that the LEDs need to be wired in parallel. Also, be sure that you are connecting cathode to cathode and anode to anode, otherwise the whole circuit just won’t work. After you’ve completely assembled the panel, attach the wires the ground from your perfboard and the VCC from the power supply board to the circuit, and use the web interface to test that the LEDs get switched on when they’re supposed to be. If you decided to salvage the infrared “radar”, don’t forget to attach the infrared LED and receiver to the board in the two holes left over.
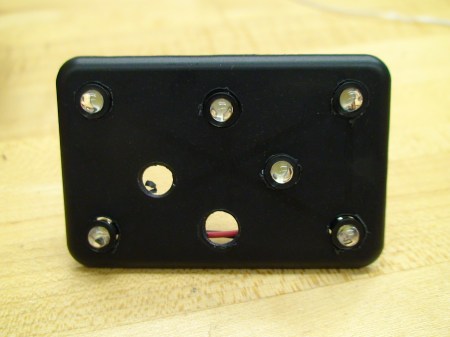
After you’ve finished with the drilling and wiring, you should be ready to attach the panel to the Rovio. While it was a little tricky for us, we were able to epoxy the panel to the underside of the front of the Rovio so that it looked like it was vertically mounted.

Now that your Rovio can see better in darker situations, lets take a look at RoboRealm.
RoboRealm

While investigating all of the different things that we could do with our Rovio, we stumbled upon a piece of software called RoboRealm. RoboRealm allows you to take video input from any webcam, including the Rovio, and run it through any number of different modules to process the images. After the images are processed, the software can even see if any pre-defined conditions are met, and if they are it will instruct the robot to act accordingly. Combine that visual input with the audio input/output on the Rovio, and you can do some pretty cool stuff. The interesting part about this software is that it officially supports the Rovio out of the box. We’ve had a chance to mess around with it a little bit, and as far as we can tell, it seems like pretty powerful software.
We already know all of the cool things that we want to do with this software and our Rovio, but we’re curious, what would you do with it? Leave us your answer in the comments, and if we see something that we find truly inspiring, we’ll do some research, write it up, and post a how-to explaining how to do it. Who knows, there might even be a brand new Rovio and a free copy of RoboRealm in it for the winner too…


It’s still most irritating that woot refuse to ship outside the US.
Can I put a text-to-speech synthesizer and a speaker in it? Then send it text messages that it will ‘speak’?
“Prepare to be assimilated.”
“Stupid human.”
“We’ve come for your women.”
J: Have you ever used a international mail forwarder? They charge a lot (To deliver the rovio to my country would add more than U$S100 to the woot price), they are slow and don’t make things easy at all.
Hack a day: next time think about the people outside the USA, look at your site stats, we are a lot!
Man… sure was hoping for something cool with this when I saw Hackaday linked over at Woot. Big let down.
Honestly, I was hoping for IR with a camera mod.
@J, you spastic.
Have you ever used mail forwarding? It’s very expensive.
Good grief! It’s not like HAD intentionally screwed people outside of the USA. They happened to meet the people from Woot and came up with a great idea. Why should they abandon a good idea just because Woot doesn’t ship internationally? Most likely international readers can still purchase the same product through a different supplier, they just may not get it for the same price as from Woot. So quit crying you big babies.
@Mike: Nobody suggested that HAD does this intentionally. I just can’t understand Woot doesn’t ship internationally. I buy from lot’s of US and Asia based shops, most shops do ship to Europe.
The LED adding was cool I suppose. But what about a hack that gets the speed up to 35-40mph, then some mods for the shocks for a 4×4 experience. Once you get that finished, tie it to the dog and have Rovio take it for a run around the park.
no one else said it, so i will. which way to the girls locker room?
I would like to see magnetic wheels so you could send the thing into HVAC ductwork. I would use it as a diagnostic tool without tearing a ventilation system apart. Maybe mount another magnet to pick up lost tools or parts. It could drive upside down and straight up a 90 degree section. I could also be able to monitor heating systems remotely without having it blow off a roof. You could also walk it up the side of a metal building.
i plan on putting a large array of infrared LED’s for night vision on it, that will be on all the time. i will take out ALL LED’s in the visible spectrum, and instead have a remotely activated LED spot-light. (to scare people lol)
i will take the original battery out and put a bigger one in (maybe lead-acid?).
i will put a mobile cellular wifi internet connection on it, so i can drive it around my town remotely from home (i heard boost mobile gives you 3cents a month for internet!).
i will attach it to my remote control truck because i want it to go fast, or i will modify the existing chassis to be wider and put bigger motors in it.
this monster will be driven at night, and not be seen by anyone, but will see YOU fine due to the infrared lighting (ps i will take the infrared filter out of the camera)
Really sorry about the schematic. Everything should be alright now, but I did decide to tweak the resistor value a little bit. Now it’s 22ohm instead of 10ohm.
OMFG i would so buy this guy if I had 100 I could even just barely spare right now. Just to be able to get my own sentient robot guard dog.
the killer ap for the product would be to equip it with a recordable camera for bands to record themselves while they are on stage. Its very difficult to get someone to record from different angles and sometimes take more than one camera. Okay… I gave away a million dollar idea I know… but think about it! I’ll be the first to buy one!
I would use the robot to communicate with my family when I am on business trips or at the office. I have always wanted one for this purpose. I would probably hack it to include a display of some sort or just a puppet talking head. The waypoint ability sounds like a really cool way to look around the house without manually driving everywhere.
The RoboRealm software would be neat just to add some play functionality when I am at home. I don’t think you could get much cheaper for a robotic platform this functional to play with. As mentioned before. Controlling it with coded flash cards would be something fun. Facial recognition would be cool too. Imagine having it find the person you were looking for automagically from afar. Neat!
It’d be really cool if there were multiple Rovios that is each controlled by a person to play laser tag or some sort of shooting game. Making the Rovio move faster would be a big plus. Basically, a first person shooter using robots.
I like the texting with TTS idea or making the camera read text and send it anywhere.
Attach two parallel lasers to the camera so that it can judge distance based on the distance apart to laser lights appear to be. Now that it can judge how far away things are, the mobile, self-aiming turret idea is looking a lot more promising.
Also the software package has built in detection of logos for target stores, so you can easily tell it what to shoot at.
I love the above idea about putting some IR lights in place of the LEDs. I don’t know if you would have to change the camera to work with IR or not. With the IR in place I would use it outside my home to see which neighbors cat is digging/crapping in my mulch flower beds. Maybe you could put a poison dart turret attachment too. Or maybe just a antifreeze holding tank and discharge on command…here kitty! j/k
I personally would use this at the babysitters house. Hopefully I could access the netcam thru my iphone. Then I would be able to rove around the house anytime during the day and see my child, and make sure he is okay.
I would really love to see this modded with a small lcd/led screen below the camera, if I were at my pc (instead of my iphone) using my pc cam, we could have a father/son video conference. Pretty high tech for my 2 1/2 year old.
@Danny: Lately, I’ve been using the Rovio Driver app to control the Rovio from my iPhone.
http://itunes.apple.com/us/app/rovio-driver/id295725992?mt=8
HackADay should add a woot! hacks category for this sort of thing. Easier to keep track of them.
Strap an airsoft gun with a servo next to the trigger to the top and somehow tie it into the camera–nobody’s ankles will be safe.
This is a little disappointing. The first time two great websites get together this is the best they can come up with.
Rovio looks really cool. Never heard of it until today and I’m really having to resist the urge to pick it up (baby on the way!) but I can think of some sweet uses for it.
I love home automation and have an old Mac mini running Indigo at home. It controls a few Insteon devices but I have a number of X10 switches and lamp controllers that I got for free from a friend so I’ve put those around the house as well and control those programmatically. It would be great to integrate Rovio into my home automation system as a roaming sensor and status device.
For example, one immediate benefit would be fixing some of my irritation with my Cat Genie. I love my Cat Genie but for whatever reason 100% of the time when I return from a trip the Cat Genie is beeping because it’s had an issue while I was out of town for a week. No huge deal for the box to get a little messier than normal since I only have one cat (and she’s small compared to other kitties) but when the box is beeping it kinda freaks her out and she’ll do her duty elsewhere in the house…and who wants to come home from vacation to see that? The error beep usually means that the Cat Genie thinks it couldn’t drain all the water in the pan which is invariably due to a dirty water sensor in the control unit (it’s a little plastic thing that you remove and clean). The beep code happens at the end of the cycle and cycling the power to the box clears the beep code until the next time it runs. Since kitty uses the box several times a day I flip an x10 module off and then back on every few hours while I’m out of town (house is in vacation mode) and this makes sure that kitty never has to hold it for more than an hour or two…but since I have a limited number of x10 modules I have to remember to plug one in before I go, make sure I have the logic turned on in Indigo, etc…and cutting power to the Cat Genie makes the schedule drift since it has an internal timer, not an internal clock. So if the power’s out for an hour and it’s scheduled to run at 3, it’ll run at 4 from then on until you manually reset the schedule which requires you to be at the box at the time you want it to run.
If I had a Rovio I’d mount a little mirror at a 45 degree angle above the status lights on top of the Cat Genie and have Rovio roll in there after it should be finished. Have it peep the lights — the beep code is accompanied by some blinking lights and normal status is just solid green on one of them — and if it’s beeping, power cycle the box and wait for a solid green light before returning to base.
As a second (but probably a little more complicated) project I’d stick a traffic-cone orange dot sticker on the top part of the scooper. The top of the scooper faces the back of the unit when it’s off so it’s normally not visible. I’d have the Rovio roll into the room a few minutes before the Cat Genie is scheduled to start its cycle and see if I could use RoboRealm to pick up the appearance of the orange dot. Once Rovio saw it I’d know what time the cycle started. I usually have the cycle start at 3pm so it’s just wrapping up by the time I get home, so if the start time drifts by say 30 minutes or so I could take advantage of the Cat Genie’s internal timer and cut power to the Cat Genie by (24 hours – drift time) so that the next time it’d run it would be back on schedule. This means it’d correct for power outages which happen far too often here in Tampa.
Other than that, it’d be cool to wire up a temperature sensor and have it take temperatures around the house if you can get that info over wifi…probably a little beyond my expertise though…
Great partnership guys! If it weren’t for this link in Woot, I probably wouldn’t have bought the Rovio!
Ok enough ideas about entertaining one’s cat…
It would be quality if a hack would allow this robot to be productive while you are away so you could get your money’s worth.
Examples:
-Detects light levels to see if you left lights on and have ability to turn them off
-Detect bad odor levels and can spray febreeze or whatever
-Pick up small trash
-Shoo animals away when in a stance that looks like they are going to pee on carpet
-Fly swatted robot mode
-Anything that would make our lives easier…. then when we r home… play time
It would seem great for running cabling above ceiling tiles. Provided it could climb over small obstacles and the LEDs would provide enough light for pitch black conditions. You could put up a colored LED on the opposite side to help it find its way.
@Eric: That’s a great idea!
I’ve been doing a little research on Rovio and it looks like it’s got some big problems. Not so sure I’d buy one now. If you’re a good hacker, it looks like you’ll have to fiqure out how to make it work first. No wonder the price dropped all the way to $100. Still that’s too much for something that doesn’t work. See for yourselves:
http://www.youtube.com/watch?v=4lJpY9Cz8Ps
Now, who’ll be the first to use their hacked Didj to control their Rovio?
PinkFreud I will most likely :-D
@Ajaxx That video was from way back in 2008 and it appears that they’ve fixed most of the bugs as the comments on YouTube state.
I’m hoping for a good camera situation, but I’m really looking forward to hacking with it!
Newer connect LEDs parallel, they all vary a little bit, ones who have lowest drop voltage will burn first due to exceeded current others too dim at start but will follow chain reaction
I just got one, was going to build my own robot but this is a good base to start with.Will replace cam with ir cam,run on wireless phone network and new body and wheels to run outside.
Why not have an RFID tagged to your hat and then have the rovio basically trail you around the house, without having to be programmed to follow you? It could just follow the RFID tag, and still follow you. Or if you want to keep track of your kids, put one in their shirt tag so the thing follows them around the house all day.
I just pick one up this morning. Can’t wait to hack it. I will mod in one of my SureFire LED flashlights on it. It should be a pretty bright.
Maybe hackaday can send me a woot item to hack before it sells. :)
Does HAD hire hackers? I’m cheap. let me keep the hacked item ;)
damn! the one day I didn’t check woot!
May need to mount some PV cells on it if the battery life is too short, but this really has some potential to be a semi-autonomous device. Pair it with a cellular wireless/gps (smartphone dock) for internet access and the ability to find its own location, the ability to read sidewalks (apply to crosswalks and the flashing walk/don’t walk signs), and online google maps… you have a device you can pretty much tell it where to go and then pathfind the best way to get there… like the AI in a video game but in the physical world, limited only by your battery life. Want to see who’s at the Starbucks down the street from you right now but don’t want to go check it out yourself? Have the Rovio navigate itself there once you enter the address. Send it to the 7-11 down the street to pick up a pack of beef-jerkey. Heck, want to go check out MOMA but don’t want to go yourself? Send your robot (wonder what they would charge for admission?) and have him beep you once he gets there. Lots of fun potential with this, beyond playing with your pet or checking on your house while you are out… beyond my ability to code but I imagine that some of you out there could manage it. For me it’s pretty much just going to be for checking on the dog while I’m out of the house :)
Perhaps some of the toys from kids.woot.com could be included in this hacking partnership (crossing my fingers for some Tyco Psycho hacking :-D )
Can you do a Howto on adding software control to the USB powered Woot-Off lights before the next Wootoff?? :)
@another-anonymous: I’ve always thought that would be a kickass idea; sometimes I’m not at my computer when an IM comes in. The woot-off lights, or an ambient orb, or something similar could be set to go off at certain events.
Two of my favorite websites coming together… I’m so happy! I just might cry…
My Rovio arrived today. So far I’m a bit disappointed as I seem to have received one that has battery or charger issues.
@another-anonymous: To control the woot-off lights from software all you need is a per port powered usb hub. This will allow you to shut off/on the power of each port.
Here is one with Per port power:
http://www.amazon.com/Cisco-Linksys-USB2HUB4-USB-4-Port-Hub/dp/B00007AKAZ
Then you just need a program call hub-ctrl from here
http://www.gniibe.org/ac-power-by-usb/ac-power-control.html
Write a little script and there you go!
For those having issues with battery life of their Woot Rovio (e.g. Jronald above), here’s what I did to fix mine: You need to do a deep discharge and then a full recharge, i.e. cycle the battery. I did this using an R/C charger/discharger built for this purpose. Both charge and discharge were done at 2 amps. I went from a few minutes of battery life to a few hours.
If you don’t have such a charger, ask to borrow one from a friend who’s into R/C cars or electric airplanes (or combat robots, which is how I came to own such equipment).
With the battery working right, this has gone from total waste to interesting toy (my kids love it). While the LED light hack isn’t too creative, you’ll quickly see why it’s so popular. Low-light performance of the stock cam is abysmal.
Hello, My mod/hack would be a Hi-Powered Chinese Laser, if available IR(yes I know illegal in the States). mount it on the camera arm and go around popping balloons, lighting matches, burning ants and spiders, yes yes. Using RoboCommander II you can vary the height of the arm. Not just the three arm positions. ah-yes (wringing my hands with sinister glee) I can think of thousand of things to do. Oh yes the RoboCommander II has a lot of things to solve most of the complaints i.e. low light (night mode settings)
Jones