Adafruit has a new LED tutorial for people wanting to get started with electronics. It is full of useful diagrams, pictures, and quizzes to help make sure you are understanding the concepts. This is the real basic stuff here: LEDs, resistors, and the laws from Kirchhoff, and Ohm. It starts out explaining the parts of an LED. Then variations of LEDs: illumination versus indication, clear versus diffused, brightness, color, and size. The mass of the tutorial covers how and why an LED’s brightness can be changed by a resistor and why a resistor is needed to keep an LED from burning out. Such as how Kirchhoff’s Voltage Law works with Ohm’s Law to help you determine the proper resistor for an LED. If you found useful the other beginner concepts posts about Analog Circuits and Electronics basics from the Giz, you should find this tutorial to be useful.


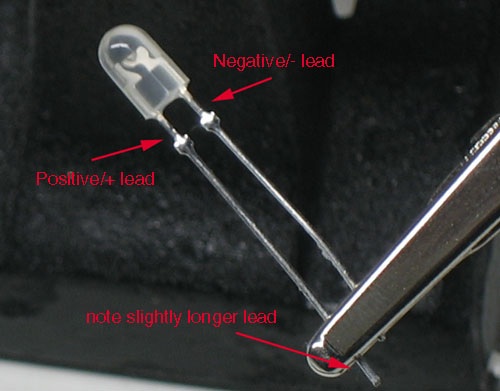
The positive side is longer, should you ever feel the need to bend it into a + sign :)
might be worth mentioning that the positive side is skinnier inside the led (left side in this picture) if for example the led’s leads were cut
That’s a bad LED example, many have a ridge at the base with a flat/missing side on the negative.
Also, the site states current flows from + to – I thought it was the opposite?
I don’t think the tutorial directly tells you how to pick a limiting resistor. It spends a lot of time tiptoeing around it, though, and you’d be able to figure it out.
A CR2016 button cell is a great way to find out the polariy of an LED because it delivers 3v with very low ampage, I go through a lot of them with my Micro PhotonLight keychain torches so I always have a few old ones kicking about, second to that if it’s clear I look at the insides.
When calculating resistor values for multiple LED arrays I find this calculator invaluable: http://led.linear1.org/led.wiz
@Haku – Or just use Ohms law :P
(Vsource – Vled)/Iled
As the title mentions about, this tutorial is just for the beginners. It spends a lot of time telling the basic information that you’d figure out yourself.
I’ve noticed that looking at the inside of the LED isn’t the best way of telling polarity. I have LEDs from Kingbright that are reversed on the inside, with the anvil being positive and the post being negative.
I know I’m not looking at it wrong, as I have red and green set up in an 8×8 array with negative all one way, and the red leds are clearly backwards on the inside. The LEDs in my girlfriends ARDX kit are the same way.
@bluewraith i totally agree.
Totally agree with Drew.
@Erik: electrons flow from negative to positive. however charge flows from positive to negative (as electrons have negative charge). but you rarely need to worry about this
“Conventional current flow” is positive to negative.
Current actually flows the opposite direction, but this wasn’t discovered for a few hundred years. So books stick with the “convention”.
junk china surplus led’s are NOT always that way.
I have 100 super bright blue ones that the longer is – and the flat is on the +
I realize this is an intro, but isn’t it a disservice to refer to it as ‘positive’ or ‘negative’ leads? I saw this article and thought I’d see a flood of comments on this, but nope – still labeling it ‘positive’ and ‘negative’ leads of an LED.
Cathode … Anode.
@kyle interesting, after a bit of reading “charge” cannot actually flow through metals (e.g. LED leads, solder, traces, wires, most battery terminals) thus all that’s possible is current. Am I understanding that right? Plus LEDs are current devices, though I don’t know if that’s relevant.
Has anyone mentioned using LEDS as light sensors yet?
@Funky Gibbon
When pluralizing acronyms please either use a lowercase s or an apostrophe ‘s (or no s at all if it’s clear from the context).
By using a capital S you create a new confusing acronym instead of pluralizing it.
But you are right the use as sensor is an interesting factoid about LED but perhaps not a basic thing in a tutorial for beginners that has subjects like ‘what is a switch?’ :)
I saw an interesting thing on a LED x-mas light, to make the light shine out more globular (I presume) they drilled a cone in the top of the LED so you also see it better from the side.
Thought I’d share that observation in this LED topic because somebody might be able to do something with it.
I have here some yellow LEDs from jameco which are actually backwards, having negative on the short lead inside the LED (usually positive is on the short end). The longer lead is correctly attached to the positive end, but I had always been determining positive versus negative by looking inside the LED glass itself.