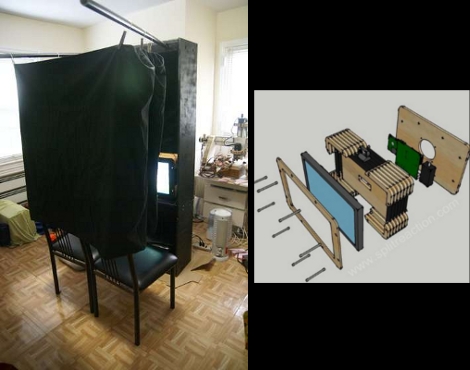
For his wedding [Dave] wanted to have a photo booth but the $1k rental price was really getting him down. Instead, he decided to build his own. This cost less money and he gets to keep the booth once the festivities have concluded. He started by designing the assembly in Sketchup, taking into consideration the portability requirements that allow this to fit through doorways. What he came up with is a unit made from one sheet of plywood that folds up via piano hinges and takes about eight minutes to set up (video after the break). But where the design really shines is the all-in-one electronics module seen modeled on the right. It houses the monitor and the computer in one compact and rugged package.
If you like this you should also check out the suitcase photo booth and one other wedding-prompted build.
[youtube=http://www.youtube.com/watch?v=jNGg821bC7c&w=470]


http://daid.mine.nu/instructabliss/?url=http://www.instructables.com/id/Designing-a-DIY-Talking-Twittering-etc-etc-Pho/
For you viewing pleasure. (Photo galleries are starting to worki on some instructables, but not all of them)
And about the hack, the button with sending ‘U’s with an 555 is quite clever, but it should be trival to monitor the DCD line and go with even less hardware.
I really like this build, but doing all that work and then using a webcam for pictures? why not go get a canon and run a custom firmware on it and at least get some pretty good quality photos instead of webcam stuff.
To mangle a joke from way back: you don’t pay them to let you use a photo booth; you pay them to take it away afterward.
To h_2_o
Yup , I definitely plan to use a canon in the long run. The only thing preventing me is cash. I tested some prints using the webcam, since the frames are so small, they don’t look too bad. The real reason I want the canon is because there is insufficient light inside the booth. I cheat and set the monitor to the brightest setting for now.
to macegr
Haha, so true, it’s the whole reason why I went with the modular shape. So far it takes 8 minutes to setup and four minutes to teardown. I got some ideas that should cut setup down another three minutes, but I doubt I will get it any faster.
Hopefully I will be able to get a friend to set it up for me the day off.
I like the Idea, and although custom photo booths have been done before, this is the first time that I am hearing about it.
I would have done a few things differently with regard to the setup, but very cool.
What I was going to state is that for speed of setup, sticking with wood is a good idea, but the joints should be designed to lock with pins to avoid needing to screw everything in.
The shower clips are not great, but I do understand the worry about someone pulling on the curtain; therefore, instead, you may want to design a back section, to stabilize the unit. (maybe even a middle stabilizing rod, or added rods for lamps)
curtain on pvc
o_._._._._._._._._.o
|| ||
|| _____ ||
w || | b | || w
o || | e | || o
o || ____| n |______|| o
d || | c | || d
|| |_h_| ||
|| ||
o|_._._._._._._._.o|
curtain on pvc
The booth needs to take into account the elements of photography and how best to achieve a good portrait shot.
Soft Pink flood light + main light on a slightly downward angle toward your subject should make everyone look a little better. Try to reduce harsh light and over exposure, and keep in mind taking the shot from above reduces the amount of lines on the face and the amount of jowl that is shown.
You may also want some space between where the person sits, and the back of the booth, because if you get rid of shadow on the background (maybe a lamp to the side of the subject), while at the same time having a green/blue screen, you could easily make it so the user can choose a backdrop.
well … what kind of hacking site is this? when you can’t leave a text based diagram in a blog post?
@Daid thanks for the link. hate instructables.