You Wouldn’t Download A House

Shelter is one of the most basic of human needs, so it shouldn’t be a surprise that we continually come up with new ways to build homes. Most building systems are open source to an extent, and the WikiHouse project tries to update the process for the internet age. 

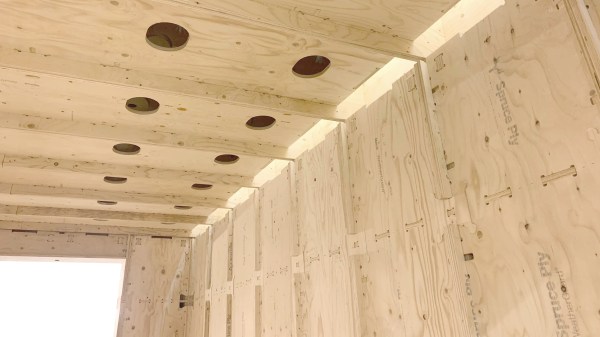
WikiHouse is a modular building system similar to structural insulated panels (SIPs) but designed to be made on a CNC and insulated in the shop before heading to the site. Using this system, you can get the advantages of a manufactured home, but in a more distributed manner. Plywood or oriented strand board (OSB) can be used to make up the chassis of the blocks which can then be assembled very quickly on site versus traditional wooden construction.

One of the more interesting aspects of WikiHouse is that it takes design for disassembly seriously. How many houses have parts that are still good when they’re demolished to make way for something new? In most places, the good is hauled to the dump along with the bad because it isn’t economical to separate the two. Building with end of life in mind makes it so much easier to recover those materials and not waste them. There are certainly examples of careful material recovery, but they’re few and far between.

If you’re looking for some other ways to quickly build a house from wood, checkout the PlyPad or Brikawood.

Continue reading “You Wouldn’t Download A House”

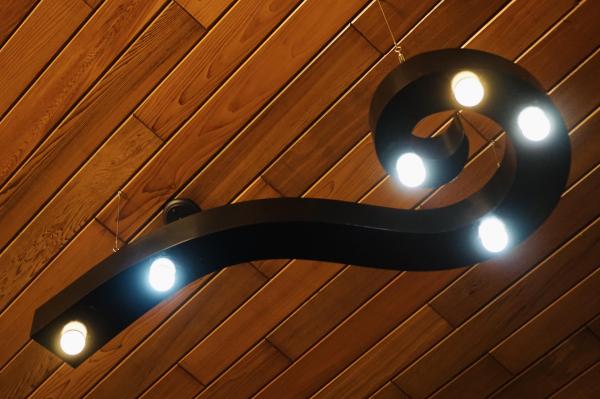
A black chandelier that looks somewhat like a fern frond. It has four lights arranged roughly in a circle around the curly end and two clustered near the tail. It is mounted on a dark wood panel ceiling.

Put A Constellation In Your Dining Room

We love lamps here at Hackaday, especially if they imitate natural light sources. [Scott McIndoe] used his love of lamps to fashion a chandelier replicating his favorite constellation, the Southern Cross.

Starting with the Southern Cross’s four major stars and the pointers of Alpha and Beta Centauri, [McIndoe] sketched out a breaking wave form between the six stars to form the spine of this light source. By using smart bulbs for each of the six star positions, he was able to set a scene that replicates the color and relative brightness of each star for that extra astronomical touch.

The top and bottom of the chandelier is laser cut from 3 mm plywood and fitted together using glue and finger joints while the sides are a wood veneer. The entire piece was sanded and coated with a bit of filler before painting. Mounting is accomplished using three eye hooks mounted on the top side of the chandelier.

If you want more celestial lamps, check out [McIndoe]’s previously-featured analemma chandelier or this lithophane moon lamp.

Standing Desk With A Clever Flair

Standing desks (also known as sit-stand desks) are somewhat polarizing. The height is adjustable, but the idea is that you move between sitting and standing while you work. Hundreds of manufacturers are out there, but they’re all the same. Two metal legs that extend and one or more motors to move the legs up and down. [JAR Made] tried to make something slightly different for their standing desk with an extending curved surface.

The build started with some gorgeous alder that was milled into square with a track saw and a planer — no jointer was required. However, he wanted long boards and was debating how to butt join the pieces together and decided on pocket holes with dowels to try and clamp the boards together while the glue dried. The resulting product was one that [JAR Made] was unhappy with. He pivoted on his feet by switching Baltic birch plywood for the main desk surface. Which was bent using a kerf-cutting technique (though just using a track saw rather than a CNC bit).

Here is where you can see him learn from his earlier mistakes. He routed a half lap in the plywood for the butt joint to give it more strength and devised a clever clamping mechanism using CA glue and painter’s tape to get good clamping pressure. The alder from earlier came in use to serve as a front edge for the plywood and a groove to hold the sliding piece of plywood that extends and retracts as the desk goes up and down.

Regular old standing desk legs screw into the underside of the desk and allow it to move up and down. Overall, it’s a wonderful build of a gorgeous desk. We love seeing people make mistakes and then pivot and learn from them. Perhaps the next step is to automate the desk to move on its own.

Continue reading “Standing Desk With A Clever Flair”

Carving Terrain Maps Into Plywood With Software Help

CNC machines are incredibly versatile tools. At a machine shop, they can machine all kinds of metal and plastic parts. Beyond that, they can engrave various materials including glass, and even create PCBs. [Steve] has a CNC machine of his own creation in his shop, and while he might be employing it for those common uses, his artistic creations are on the showcase for today with these 3D topographic relief maps.

The key to creating a good topographic relief map is good material stock. [Steve] is working with plywood because the natural layering in the material mimics topographic lines very well, especially with the high-quality marine-grade birch plywood he is using. Making sure to select pieces without knots improves the final product substantially, as does taking the time to fill any voids. Selecting good stock is only part of the process though. [Steve] is using TouchTerrain, an open source project helmed by [Dr. Chris Harding] of Iowa State University, to create the model which gets fed to the CNC machine. Originally intended for 3D printing applications, the web-based tool lets you easily select an area on the globe and export its topographical data to a standard STL or OBJ file.

With good stock and the ability to easily create 3D topographic maps, anyone with a CNC machine like this could easily reproduce their terrain of choice. We imagine the process might be easily ported to other tools like 3D printers, provided the resolution is high enough. We have also seen similar builds using laser cutters, although the method used is a little different.

Chevron Desk Takes Advantage Of Plywood For Patterning

Buying a desk is all well and good, but [WoodCraftly] found that the options they found online were too pricey for what was being offered. Buying the table frame from scratch was much cheaper, and just required crafting a top to match. That provided the opportunity to create this beautiful herringbone-finish desk created with some simple woodworking techniques.

Plenty of clamps were needed for the glue-up.

The build starts with a motorized corner desk frame that can be bought from amazon for just $550. To create the chevron-finish top, [WoodCraftly] grabbed some plywood sheets, and cut them into a series of 1-inch strips. These were then flipped 90-degrees onto their side, and glued together to create a panel that showed off the individual layers of the plywood. This panel was then cut into 3-inch wide strips at a 45-degree angle, and these strips were then placed back to back and once again glued up to create the attractive herringbone design.

From there, it was a simple matter of gluing up panels into the L-shape required for the desk, adding mounting holes, and rounding off the corners for a nice finish. The desk was also given a thick coat of epoxy on the bottom which soaked into the wood and helped give the desk some strength, and a top coat that was sanded back to a natural-look finish.

Overall, the final desk is just the product of some smart cutting and gluing steps combined to create a fun pattern in the end. It’s always fun to build your own furniture because you can express your own style in your creations. Video after the break.

Continue reading “Chevron Desk Takes Advantage Of Plywood For Patterning”

A segmented lamp made of circular slices of plywood. They are arranged as shutters around a long, skinny LED bulb in the center that gives off an incadescent-looking glow. A cord trails off to the left against the grey background.

Plywood Lamp Has Customizable Light Output

There’s something about light fixtures that attracts makers like moths to a flame. [danthemakerman] wanted something with a more configurable light output and built this Sculptural and Customizable Plywood Lamp.

In his detailed build log, [danthemakerman] describes how he wanted something “sort of like an analog dimmable light.” By using a stack of split plywood donuts hinged on a brass rod, he can vary the output and shape of the lamp. These shutters allow the lamp to go from bright to nightlight without using any electrical dimming components.

The plywood was rough cut on a bandsaw before being turned on a lathe. The light cover sections were then hollowed out with a Forstner bit and split in half. The tricky bit is the overlap of the cut on the hinge side of the shutters. Cutting the piece exactly in half would’ve required a lot more hardware to make this lamp work than what was achieved by patient woodworking.

If you’d like to see more ways to make light fixtures with plywood, check out this Hexagonal Lamp, these Upcycled Plywood and Glass Lamps, or this Laser-cut Sphere Lampshade that Packs Flat.

Building An Old Guitar From A New One

Anyone who’s ever played guitar to at least the skill level required to form a terrible garage band knows the names of the most legendary guitars. The driving sound of the Gibson Les Paul played by Jimmy Page, the upside-down and smooth Fender Stratocaster from Jimi Hendrix, or the twangy Rickenbacker made famous by George Harrison are all lusted-after models. The guitar that [Frank] really wanted was a Danelectro DC59 and since they’ve been steadily creeping up in price, he decided to build his own.

The body of the clone guitar is hollow and made from effectively scrap wood, in this case plywood. As the original guitars were in fact famous for using the least expensive materials possible, this makes it a great choice for a clone. [Frank] made the guitar using almost exclusively hand tools and glued everything together, but did use a few donor parts from a modern Stratocaster-type guitar. With most of the rough shape of the guitar finished, it was time to add the parts that make the guitar sound the way that a real Danelectro should: the lipstick-style pickups. He purchased these completely separately as they are the most important part to get right to emulate the tone and feel of the original.

With everything finally soldered and assembled, [Frank] got right to work recording a sample audio track which is included at the end of the video. It certainly sounds like the original to our untrained ears, and for around $100 it’s not a bad value either. If you’d like to see a guitar built from the ground up without using another as a clone, take a look at this build which brings a completely original guitar into existence, entirely from scratch.

Continue reading “Building An Old Guitar From A New One”