We here at Hack A Day love LED’s, and all things LED related, but one of the biggest problems with LED’s are the small size. We want bigger and brighter, matrices the size of our TV, seven segments as big as a wall and a single white led the size of a baseball, and brighter than the sun!
I was recently commissioned to make a device which uses a pretty large number display, and I went out shopping. The seven segment we liked best was still quite pricey, and would not fit our enclosure correctly anyway. We ended up going a different route, but it really got me thinking… What if you wanted to make something with a fairly large display? And how could one go about doing it cheaply at home?
I first thought about acrylic rods, but no one near me had any of small diameter, or at a decent price. Never mind that I don’t have that many tools on hand, and I could just see me trying to drill out the end of a thin plastic rod using a electric hand drill, and my knees as a clamp. Looking around the HQ I found my stash of glue-sticks. I thought would make an interesting display and it is easy to work with.
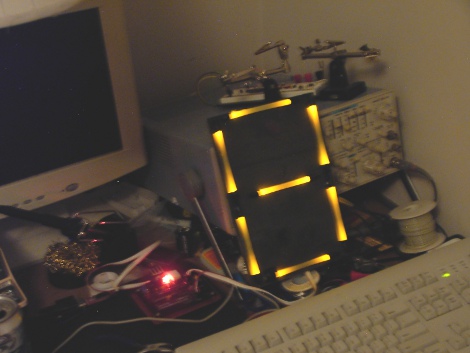
Before I knew it I had a working (serial and expandable) 9 inch tall 6 inch wide 7 segment display. I will be the fist to admit, its not spectacular in quality, or brightness, though the display itself did only cost four dollars in material. A quick and easy project, especially if you need a quick scoreboard or large clock.
Join us after the break to see how the display and the controller circuit are made.
Supplies:
14 LEDs, as bright as you can get without generating heat. I am using 3mm Amber LED’s that run at 30 milliamp each, and are pretty bright. The glue-sticks will absorb a lot of light, which is a bummer.
7 Hot melt glue-sticks, big enough that your LEDs can stick in each end, pointing to middle. You will also use a lot of hot glue so keep some extra around.
7 NPN transistors, I am using 2222’s
7 1k ohm resistors
7 22 ohm resistors, this is for my LED’s and is letting 30 milliamp of current pass though 2 LEDs in series, use an online led calculator to get the correct value for your LEDs
1 74HC595 Shift Register
Electrical Tape
Cellophane Tape
Something to mount the display on. In my case some quickly painted cardboard.
Thin Wire (lots)
Perforated circuit board
Solder
Tools:
Soldering Iron
Hot Glue Gun
Wire Wrap tool (makes life easier but not required)
Wire cutters
Helping Hands
Utility Knife
Awl (a tool for piercing holes)
Marker
Making the Display:
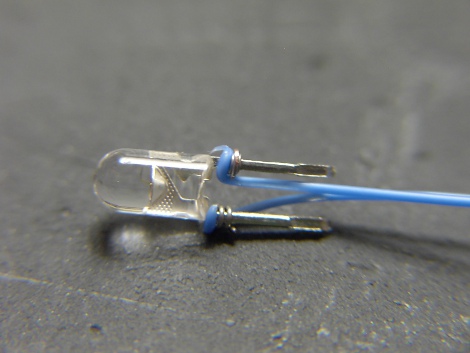
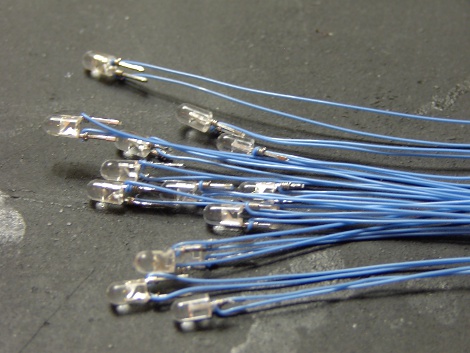
In my opinion the most tedious part is wiring up the LED’s. I connected a loop of wirewrap wire to each lead of each LED and soldered. The wirewrap tool makes this an easy process but if you do not have one do not worry. Just get some wire from a ribbon cable and strip a little off the end, tin the end of the wire with some solder, and get a small amount of solder to stick to your component lead.
Once the two ends are tinned its just a matter of melting the 2 together. I find that using tweezers really helps. You want about 4-5 inches of wire running off of each LED lead. This will give you more than enough slack to work with later on. Once you have 28 wires soldered to 14 LEDs you can set them aside for now and start heating up the glue gun.
I want the LED’s to be inside each end of the glue-sticks pointing to the middle. Originally I thought I could use a drill bit and by hand bore out a little divot in to the ends of the glue-sticks. This worked really well for the first couple holes, but it was not long before the drill bit was doing more melting than cutting. I also learned that freezing a glue stick, even for a little bit, makes it really brittle.
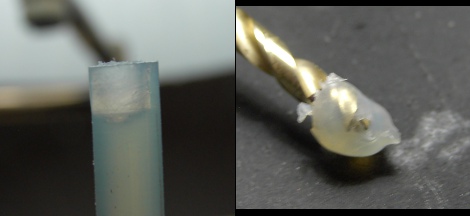
It finally dawned on me that I was working with glue-sticks, and that it would just be easier to use the nozzle of the glue gun to make the divot, then quickly bury the LED before the glue set back up. When using the hot glue nozzle, you do not need to go down very far or else it might blow out the side of the glue stick your trying to work with. If you do mess up, its just glue-sticks, they can be easily fixed with hot glue. I managed to mess each and every single one of these up in a special way and they all came out about equal.
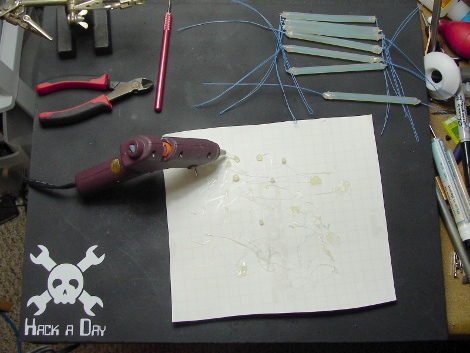
After the sticks cool down I wrapped the ends in electrical tape, this does a few things: first it keeps light from leaking out of the ends, second it is wrapped around where the LED’s are to prevent a bright spot on each end, and Third it helps me even up the visible segment sections. After you get all the glue-stick LED tubes taped up its a good Idea to test each led to ensure you did not accidentally break a wire or short something out while twisting up that tape. I used a 9 volt battery with a 500ohm resistor in series with the LED’s to test quickly.
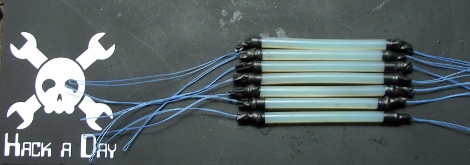
Now that all the segments are ready to go, I lay them out on the cardboard and mark each end of the glue-sticks, and where the wire pokes out with a marker. I then used my awl to punch holes though the cardboard so that the wires can pass though. Finally I used hot glue to mount each segment in its proper place, and on the back side put a dab of glue where each wire comes though.
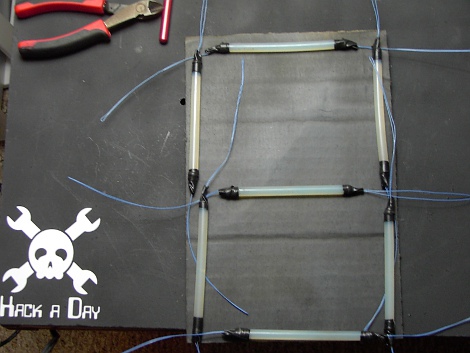
All that is left for the display is wiring up the LED’s and their current limiting resistors. Each side of the glue-stick is wired in series with each other. Current flows into the anode of one LED, out of its cathode, into the anode of the second LED, out of its cathode though the resistor to ground. (yes I know its backwards but its easier to explain) In order to do this I grabbed my 9 volt and resistor and found the anode and cathode of both LED’s in a segment, twisted the appropriate wire leads together and soldered.
I solder the current limiting resistor to the negative side of the LED series pair and use a bit of cellophane tape to hold down the wires once I am done. From here you should be able to connect each segment up and control the display. But that means you need 7 leads running to your micro controller, and if you wanted another display, well that’s 7 more leads. In order to make this thing easily controlled and easily expanded I will add some simple circuitry.
Making the Controller:
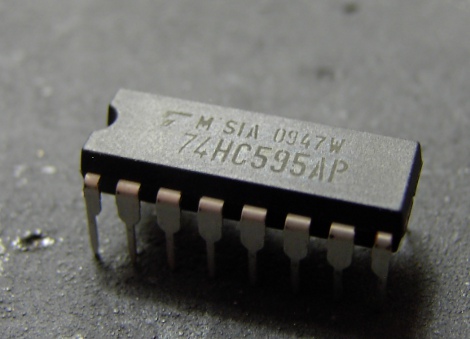
The heart of the circuit is the 74HC595 serial to parallel shift register. This handy little device lets us control the display using a total of 5 wires, and we can chain as many displays as we want without increasing wire count. Shift registers are pretty simple devices to operate, in the case of the 595 you have to worry about three things.
Storage or Latch:
The 74HC595 contains an extra register called the storage register. This feature means you can wait until all the bits have shuffled in before letting them go to output, it also means once the output is in storage, you do not have to update it again until you need to change it. Before you can send data you must lower (ground) the Storage clock or Latch pin. Once you are done sending data you then raise it (+5v) to set the storage register and show output.
Serial Data:
you are going to be sending data 1 bit at a time from your micro controller to the shift register though this input. Have your MCU set a pin high or low then toggle the serial clock.
Serial Clock:
Once your bit is set, a transition from low to high on this input sends the data into the shift register.
As data comes in serially it is sent though a chain of filp-flop circuits, which among other uses forms a basic memory. The 74HC595 is an 8 bit device, so if you lower the latch, send 8 bits to it serially then raise the latch, you would see all 8 bits at once on the chip’s output. This converts serial data to parallel data.
One has to keep the shift register’s absolute max values in mind. Typically this chip will let you pass about 20 milliamps per out put pin, which sounds great for driving LED’s. The catch though is that the entire device can only handle about 70 milliamps before going out of spec. Each one of my segments is going to be drawing about 30 milliamps each. Though these chips can put up with some abuse, this is way out of spec.
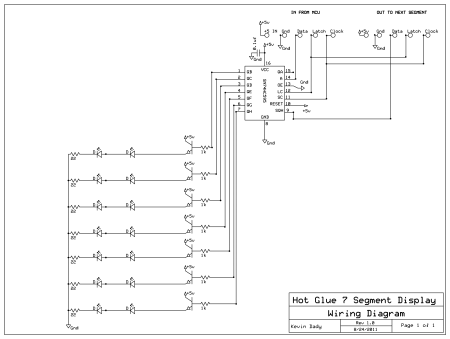
To deal with the current required by the LED’s you could use a proper LED driver/sink. There a ton of them out there, but I do not have any. I do have a pile of transistors that can handle 10x that current and more with no issue. This setup is an improper version of transistor as a switch, but will work for a small display and saves the headache of inverted data. More importantly it will let my shift register control each segment with a fraction of the current while the transistor does the heavy lifting.
(click for large version of schematic)
From here everything just needs to be wired up. This could be done pretty easily on a piece of perforated circuit board. If you are like me, or just out of perfboard, and the closest radio shack is an hour away, and you already have the wire wrap out … well you could “dead bug “and solder it. Components are secured into place, and connections are insulated with hot glue and tape.
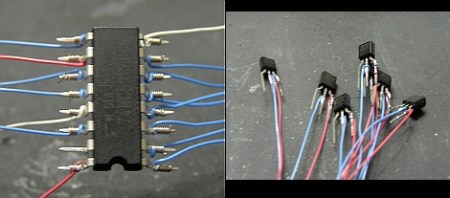
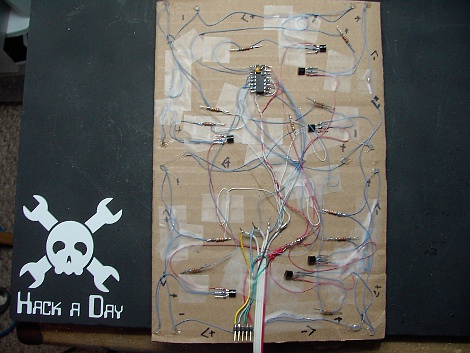
In order for the display to communicate to your MCU I used a section of 5 conductor ribbon cable. The wires are in the following order. +5, Ground, Data, Latch, Clock. For the display to connect to another display I wired up a little header with +5, Gound, Data, Latch, and Clock, BUT the data is no longer coming from the MCU. It is now being sent by pin 9 of the shift register. Since the shift register is 8 bits if I have 2 of them chained in this way I can then send 16 bits of data, 8 of which will “spill out” of the first register on pin 9 and into the input of a second or third or fourth register.
Since the 74HC595 is one of the most popular shift registers out there, you will be able to find additional documentation for whatever micro controller you are using. I happen to have my arduino near buy as usual so I just whipped up some simple copy n paste software that uses the shift out function.
// hot glue seven segment display test

// define pins used
#define dataPin 2
#define latchPin 3
#define clockPin 4

// define light patterns
byte one = B01100000;
byte two = B11011010;
byte three = B11110010;
byte four = B11100100;
byte five = B10110110;
byte six = B10111110;
byte seven = B01100010;
byte eight = B11111110;
byte nine = B11100110;
byte zero = B01111110;

void setup()
{
	pinMode(dataPin, OUTPUT);
	pinMode(latchPin, OUTPUT);
	pinMode(clockPin, OUTPUT);
}

void loop()
{
	digitalWrite(latchPin, LOW);
	shiftOut(dataPin, clockPin, MSBFIRST, one);
	digitalWrite(latchPin, HIGH);
	delay(2000);
	digitalWrite(latchPin, LOW);
	shiftOut(dataPin, clockPin, MSBFIRST, two);
	digitalWrite(latchPin, HIGH);
	delay(2000);
	digitalWrite(latchPin, LOW);
	shiftOut(dataPin, clockPin, MSBFIRST, three);
	digitalWrite(latchPin, HIGH);
	delay(2000);
	digitalWrite(latchPin, LOW);
	shiftOut(dataPin, clockPin, MSBFIRST, four);
	digitalWrite(latchPin, HIGH);
	delay(2000);
	digitalWrite(latchPin, LOW);
	shiftOut(dataPin, clockPin, MSBFIRST, five);
	digitalWrite(latchPin, HIGH);
	delay(2000);
	digitalWrite(latchPin, LOW);
	shiftOut(dataPin, clockPin, MSBFIRST, six);
	digitalWrite(latchPin, HIGH);
	delay(2000);
	digitalWrite(latchPin, LOW);
	shiftOut(dataPin, clockPin, MSBFIRST, seven);
	digitalWrite(latchPin, HIGH);
	delay(2000);
	digitalWrite(latchPin, LOW);
	shiftOut(dataPin, clockPin, MSBFIRST, eight);
	digitalWrite(latchPin, HIGH);
	delay(2000);
	digitalWrite(latchPin, LOW);
	shiftOut(dataPin, clockPin, MSBFIRST, nine);
	digitalWrite(latchPin, HIGH);
	delay(2000);
	digitalWrite(latchPin, LOW);
	shiftOut(dataPin, clockPin, MSBFIRST, zero);
	digitalWrite(latchPin, HIGH);
	delay(2000);
}
I define a bunch of bytes, each one of those bits is a segment on (1) or off (0). Since we are only using 7 out of 8 bits, bit 0 is always going to be 0, though this could be a decimal point or otherwise. When I wired the segments I started at the top and wired it to bit 1 of the shift registers output, and went in a clockwise motion leaving bit 7 as the center segment. Of course when I flipped the display around I quickly noticed that I had actually wired it counter clockwise (oops). This does not really matter, you just need to know which segment is wired to each bit.
In the setup function I just make my micro controller pins as outputs
and In the loop function I:
Lower the latch
use shift out to send 1 byte (8 bits of data) to the shift register
Raise the latch to see the results
Pause for 2 seconds and go to the next number
And there you go! A giant 7 segment display made out of glue sticks, easy to control, easy to chain, and while not the most awesome thing ever, I hope it inspires you in your future projects.
[youtube=http://www.youtube.com/watch?v=ZIWa28KRmW4&w=450]



Very nice… looks like a third LED in the center of each segment might be worth trying… Hmm… and RGB LED’s! Nice hack, it’s definitely food for thought.
This is so wrong to use transistors that way!
If LED’s voltage drop would be more than 2V this circuit would not work at all!
You should’ve connected all emitters to GND, and LEDs with current limiting resistors between +5V and collectors.
It worked, didn’t it?
Sort of, if the temperature is not too low.
If you need high side switching, then use PNP transistors.
Hello! Can you explain this a little better for the beginners among us? You are saying that the LED and resistors should be on the positive side of the transistors? As I see it from my admittedly-inexperienced perspective, this is like putting a switch in a different place.. it still interrupts the current, so what’s the problem?
Perhaps your answer could help some people. Thanks.
Good way to put it – moving the switch to a different place, but it does not stop there – you are actually using a slightly different (better switch).
Every transistor requires certain voltage between base (B) and emiter (E) to start conducting current between collector (C) and E. For silicon NPN transistors, B has to be (depending on type) at least 0.6 more positive then E, regardless of the voltage applied to C.
Based on above, if you apply 5V on C (mostly irelevant here) and 5V to B (from the driving circuit), current will start flowing between CE and E, and potential on E will rise to the level that provides enough voltage between B and E to sustain the current (probably close to 0.7V between B and E).
On the other side, if you connect E to gnd and apply 5V throigh resitor to the B, you eill get to the state where Ib (base current) is so large comparing to Ic that traanistor wil go into so called “Saturation” -this will “produce effect where “tunne” throuh transistor (between C and E) is “wide open”, and voltage drop is minimum (usually 0.2V) regardless of current (till you get to Imax for that transistor).
This is teh switching mode of the transistor, this is the way the are supposed to be used for switching.
In the configuration shown in diagram above (when C and B are on the same potential), transistor stays in the linear mode, oltage drop between C and E is the same as between B and E, transistor “eats” (disipates) more voltage (and more power=heat).
All this is overly simplified, but gives you a picture that’s mostly accurate :)
True, but your transistor is much faster if not in saturation. So if you want to modulate your LED in the high MHz range then saturation would be a bad idea.
Which is of course not the point in this application. :-)
Miroslav is correct. You want to runt the transistors saturated (about 0.2V drop). The easiest way to do this is to replace the NPN transistors with PNP (something like a 2N3906) with the emitter connected to +5 and the collector to the resistor and LED string. The base goes to the output of the shift register through the 1K resistors. The logic is inverted (when the shift register output is low the LED is let) so you need to invert the data input pin. What happens is that when the SR output is low the transistor is saturated (as long as the LED current is less than the transistor beta – about 100 — times the 4 mA or so of base current). This means there is only a 0.2 volt drop or so emitter to collector. When the SR output goes high, the transistor switches off.
In this case – with single (double) LEDs with no internal common anode/cathode connection I would use low side switching.
I swear HAD featured a full clock which was installed in a church or something. Sparkfun has an alternate method of creating giant 7 segment displays using styrofoam http://www.sparkfun.com/tutorials/47
I have an idea; if you combine this hack with another hack you’ve posted few days ago; the custom color DIY clue sticks; you can do a really cool display.
My idea is to make custom glue sticks with UV luminiscent paint and then, switch the regular leds for uv leds.
Why don’t you give it a try, It would be cool.
Well done, if you make the glue stick a bit shorter, the LEDs provide a more even glow through the segments
Even doing it copy-paste, writing the code out that way had to have taken longer than it would have to look up the right way to do it:
http://pastebin.com/FmvYWrmk
(Untested code)
Your code works, if you want to flash the number 1, 9 times…
In fact, you’re already IN a loop… You could just use that and reset once you reach the highest number.
There’s no 1 right way to code, and saying someone was too lazy to look up the right way is pointless. It works fine.
It won’t even flash the number 1, since this code is using the “one” variable, except he converted the digit variables to a digits[] array. This isn’t coding lesson; it’s an example.
Maybe instead of rushing to tell people how wrong they are, Azdle, you could take the time to ensure you’ve at least gotten your correction right.
Holy crap, when I read the initial description of using glue sticks I thought you melted them into a shape, I didn’t realise you just stuck LEDs into the ends!
Glue stick glue isn’t the first thing I’d think of as a light conductor, I’d have tried using some acrylic sheeting instead, chopped up into segments (just score with a knife and snap on a hard edge) and lit with LEDs at each end like the glue sticks, then scratched the surface of the acrylic with some sandpaper for dispersing the light.
That idea is taken from the edge-lit christmas card from a few years ago. I made some of those once, USB powered, worked really well.
I like it. Has a lot of interesting applications.
One of the interesting features of hot glue sticks is that they are fluorescent with UV light. So, a UV LED might be interesting to try and it may get around the dead spot in the middle of the stick.
Nice! Props for a ‘using only things I have right now’ approach. I actually quite like the dimmed effect in the middle of the gluestick.
Also that 15″ CRT took me back to the nineties =)
its a 15 inch LCD, you cant really tell but its pushed against the wall =)
I agree with Haku : Acrylic Sheeting (Plexiglas). Recently I have found a good way to easily cut Plexiglas (1/4″ & smaller). I use a tile saw with a diamond cutting blade. Smooth straight cuts every time. You can easily make consistent size small strips. Although I haven’t tried it yet, my approach would be to use 1/4″ Plexiglas, 1/2″ plywood and cut dadoes and grooves to accommodate LED placement. I know you had limited resources but I think you did great with what you had. I happen to be cutting both 1/4″ Acrylic and 1/2″ plywood this evening. I would be happy to cut you up some to your specs. Just drop me an email.
smoketester
an even better way to cut acrylic is with a laser cutter. Not a machine that is on everybodies workbench (yet!), but that are plenty of web services that will cut one piece to your design.
Nice. As I work with adhesives every day, I can agree about some of the glue sticks being brittle when they’re cold. We’ve had some show up in wintertime straight from the UPS truck in shards. 25 pounds of glue sticks that are fractured are pretty much useless for our customers.
I have thought of using paraffin blocks for a project like this. They’re very easy to drill. They only problem is that they don’t hold up to outside use in the summer heat.
Try some clear acrylic rods from window blinds. Most home improvement stores provide replacement rods.
29 In. Clear PVC Wand
Model # 10793478025879
Internet # 100115595
Store SKU # 551038
found at Home Depot would work as well
Thanks Oimmuk for the info. Wish we had a Home Depot nearby. Only Lowes.
I ren into a hardware store for some brass fittings, and a stack of source parts cought my intereste that relates to this project. Some of the toilet plunger handles seem to be made from clear ‘plastics’ material. the handle has a few nubs, as in grip handle, and other end is threaded. but cutting it off at both ends would leave nice solid ~1/2 inch diameter rods, maybe about 1 foot long.
Close but no cigar.
Buy the LED strips. you can get a 5M reel for dirt.
cut a glue stick in 1/2.
Lay it over the strip of led’s
enjoy brighter, and more even light big 7 segment display.
Do happy happy joy joy dance.
Maybe I’m weird, but I really like the way he attached the various wires to the components. The way they are wound on there and everything.. Just seems so clean and orderly.
I cant tell though, did he soldier them on too? or just wound them really good?
they are soldered as well, this cheap 5$ radio shack tool does not do all that well wrapping to component leads and they can slip of pretty easy
wire wrap’s one of those things from the 80s that no one actually knows how to use properly anymore. luckily, one of my instructors is old and still likes using wire wrap for everything in lab.
so it turns out that a properly done wire wrap joint can actually be lower resistance than solder joints. instead of soldering all those LEDs, you could actually have just wire wrapped ~10 turns for a proper wire wrap joint which would have held without solder. makes life a lot easier with LEDs. the way to think about it is that you’ve got a high pressure crimp joint on every corner that the wire wrap wire contacts the square LED pin. Think nice crimp joint, and then 40 of them in parallel, since you have 10 turns and 4 corners of the square pin on every turn. wire wrap makes life really easy without solder; unfortunately, very few things happen to just work out that easily for wire wrap. header pins (which is what wire wrap is normally designed for) and LEDS are really the only two terminals they’re good for.
Wire wrap is more secure than solder in high-vibration applications. In its hay day, it was used to build avionics gear and was totally reliable, no solder in sight.
Awsome writeup and way to think outside the box a bit. A few years back I used glue sticks to make light sticks for night fishing. Just took some small hearing aid batteries, 3mm LED’s and the small glue sticks and basically did the same thing. You just took the battery and placed it between the leads to get the light through the night.
Up sides, its cheap (compared to almost $5 a night for throw away lights these got you 5 weekends for <$10), easy to replace, and quick to do anywhere.
Down sides, you loose a LOT of light to the glue (fine in dark situations). Would love to see more things like this on HAD :)
– JD
Try this again, it didn’t like my name or something the first time (sorry if this double posts)
Awsome writeup and way to think outside the box a bit. A few years back I used glue sticks to make light sticks for night fishing. Just took some small hearing aid batteries, 3mm LED’s and the small glue sticks and basically did the same thing. Melted the end of the glue sticks with a solder iron, lighter, fire, whatever, and then you just took the battery and placed it between the leads to get the light through the night.
Up sides, its cheap (compared to almost $5 a night for throw away lights these got you 5 weekends for <$10), easy to replace, and quick to do anywhere.
I found the low temp rubbery glue sticks to work best in most temps outdoors.
Down sides, you loose a LOT of light to the glue (fine in dark situations). Would love to see more things like this on HAD :)
– JD
They sorta look like bones.
Now that is how a hack a day post should look like, great tutorial!
Neat idea…the execution is a bit off and I’m not sure what (if any) real world applications it serves better than the many alternatives, but still a neat idea.
I think (at the very least) that he should add a third LED to the center of each stick so that they glow somewhat evenly.
I like this…
Glue sticks as diffusers is something that I just hadn’t thought of, bookmarking this for some inspiration for a future project. (I don’t have any current ideas needing huge 7 segment displays, but I’ll think of one now!)
Transistors are the wrong way round. Suggest you check a book for correct configuration.
Oh, now that’s snazzy! Liked the wire-wrap idea too.
The transistors aren’t used as switches but they are configured as emitter followers. With a 5V supply and 5V from his logic chip he will be putting 5V across the LEDs with enough current capability. Don’t really see some peoples problem with it…
…or I could be being very silly and missing something obvious. Let me know.
Tom
PS. Good article
@Tom (and some other contributors above),
This configuration will actully deliver only
Vcc-Vbe=5-0.7=4.3V to LEDs.
Silicon transistor requires 0.7V (give or take) between base and emiter to get Ib going (like a diode), and then Ib gets “amplified” into Ic and Ie.
So, under assumption that the logic circuit outputs 5V (usually not quite that high, especially not with TTL), emiter will never go higher then 4.3V.
An easy change would be what one reply mentioned above, connect emiter to ground, LEDs to collector and Vcc, that will give voltage drop on transistor of arround 0.2V (saturation voltage)
Thanks for your clear explanations here and above.
Tom
Why not just use these LEDs, just as they are…in series: http://martybugs.net/electronics/images/leds_keyboard_leds.jpg
I have 350 of these types of LEDs, every single one free of charge, my company replaced their whole server systems, in doing so; I removed every led.
simple, I only had one rectangular led on hand
Anyone know how well this would work with EL wire in place of the glue sticks and LEDs? I haven’t had a chance to play with EL wire yet.
“White” LED’s could be interesting with this, since there’s no such thing as a white LED. They’re blue/uv with a bit of yellow phosphor over them.
A LOT of UV still emits from them through the phosphor (more as they age), and glue sticks being UV fluorescent… could end up a lot brighter.
Though whites tend to run quite warm.
Buddy of mine was working on something similar, but he was slicing up the back-light diffuser from a display.
PEX tubing now used extensively for plumbing comes in a translucent form (not the colored version) and is quite economical. It’s available in several sizes up to 3/4 and even (maybe) one inch diameter for LARGE displays.
Being hollow PEX would behave more like a light stick in spreading light further along the tube. You will need a special, cheap,(like $5) PEX cutter otherwise it is the devil to cut.
Heat from high power white LEDs will not easily melt PEX (before self destructing, that is). Maybe an aluminum back plate for the display could double as a heat sink and mounting base for the LEDs.
really nice work. I am with the guy about the 5M led ribbon from ebay suppliers in China. Delivered they are about $15.00. Very Bright and no calculations they are all set to cut into 2″ strips. 2A for 16′ @12V.
You can make 4 13″ tall 7 segment digits from them. They are very visible from a distance except in direct sunlight, but led’s don’t do well in direct sunlight. Could you have used clear silicone instead of glue stick? Just an idea.
If you need a ready made way to power 4 digits let my know. Your idea has started me thinking about my own displays thanks.