A Practical Glue Stick Oscillator

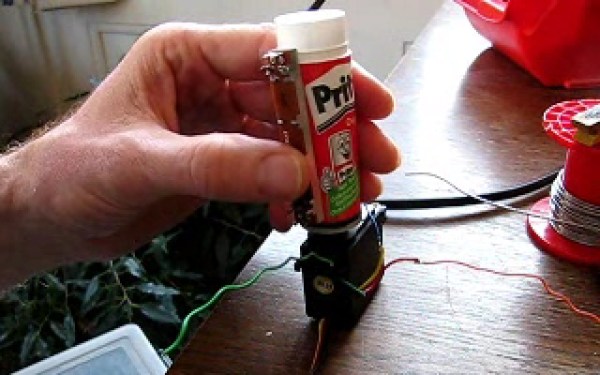
A few months ago we brought you some experiments from [Bill Meara, N2CQR], in which he investigated the use of a glue stick as the former for a permeability tuned inductor. His set-up was very much in the spirit of experimentation, and we’re very pleased to now see [Nick, M0NTV] has taken the idea and demonstrated it for the 7 MHz, or 40 meter, amateur radio band.

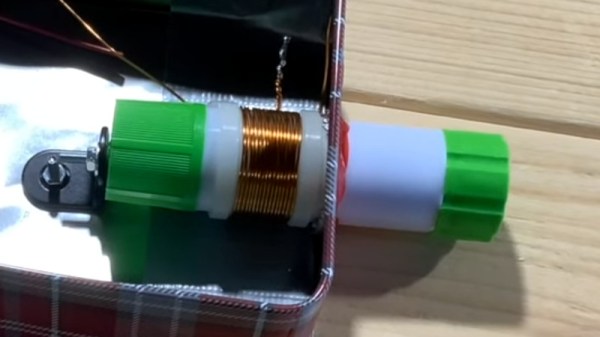
The result can be seen in the video below the break, and is housed in a tin enclosure that we’re guessing once contained toffees. The oscillator circuit comes courtesy of [Ashar Farhan VU2ESE] of BitX transceiver fame, but we’re most interested in the glue stick coil former which makes use of a small bracket for stability. With the glue removed, he’s mounted a ferrite ring in its glue carrier which is moved in and out of the coil. We’re guessing this could also be done with other permeability-altering materials, for example we’d follow [VU2ESE]’s lead and try a piece of brass.

The knurled glue feed knob protrudes through a hole in the tin, and we’re guessing there’s enough separation for an operator’s hand not to drag the frequency too much. All in all given that variable capacitors are now something of a rarity, it makes for a useful demonstration of a very cheap replacement. Meanwhile, you can read our notes on [N2CQR]’s work here.

Continue reading “A Practical Glue Stick Oscillator”

3D Printering: Printing Sticks For A PLA Hot Glue Gun

When is a hot glue stick not a hot glue stick? When it’s PLA, of course! A glue gun that dispenses molten PLA instead of hot glue turned out to be a handy tool for joining 3D-printed objects together, once I had figured out how to print my own “glue” sticks out of PLA. The result is a bit like a plus-sized 3D-printing pen, but much simpler and capable of much heavier extrusion. But it wasn’t quite as simple as shoving scrap PLA into a hot glue gun and mashing the trigger; a few glitches needed to be ironed out.

Why Use a Glue Gun for PLA?

Some solutions come from no more than looking at two dissimilar things while in the right mindset, and realizing they can be mashed together. In this case I had recently segmented a large, hollow, 3D model into smaller 3D-printer-sized pieces and printed them all out, but found myself with a problem. I now had a large number of curved, thin-walled pieces that needed to be connected flush with one another. These were essentially butt joints on all sides — the weakest kind of joint — offering very little surface for gluing. On top of it all, the curved surfaces meant clamping was impractical, and any movement of the pieces while gluing would result in other pieces not lining up.

An advantage was that only the outside of my hollow model was a presentation surface; the inside could be ugly. A hot glue gun is worth considering for a job like this. The idea would be to hold two pieces with the presentation sides lined up properly with each other, then anchor the seams together by applying melted glue on the inside (non-presentation) side of the joint. Let the hot glue cool and harden, and repeat. It’s a workable process, but I felt that hot glue just wasn’t the right thing to use in this case. Hot glue can be slow to cool completely, and will always have a bit of flexibility to it. I wanted to work fast, and I wanted the joints to be hard and stiff. What I really wanted was melted PLA instead of glue, but I had no way to do it. Friction welding the 3D-printed pieces was a possibility but I doubted how maneuverable my rotary tool would be in awkward orientations. I was considering ordering a 3D-printing pen to use as a small PLA spot welder when I laid eyes on my cheap desktop glue gun.

Continue reading “3D Printering: Printing Sticks For A PLA Hot Glue Gun”

glue stick linear actuator

Glue Stick + Servo = Linear Actuator

What do you get when you cross a glue stick with a hobby servo motor? A linear actuator, of course! Although this could be done with other household implements, the form factor of this glue stick seems perfectly suited to sit on top of a servo horn.

The servo, as you might have guessed, has to be converted to rotate fully instead of the 180 degrees or so that is typical of these types of motors. The trick to this, and what really makes it shine in our eyes, is that instead of attaching two resistors in a normal continuous rotation mod, the potentiometer is used on the glue stick allowing for position feedback.

The resulting force from this gear-reduced actuator is quite impressive, giving an “err” (over 3 Kilograms) on the scale used for testing. [Gareth] or [Chiprobot] gives a great tutorial of how to make one of these after the break, but if you’d rather just see it in action, skip to around 8:20! Continue reading “Glue Stick + Servo = Linear Actuator”

Large 7 Segment Display Made From Glue

We here at Hack A Day love LED’s, and all things LED related, but one of the biggest problems with LED’s are the small size. We want bigger and brighter, matrices the size of our TV, seven segments as big as a wall and a single white led the size of a baseball, and brighter than the sun!

I was recently commissioned to make a device which uses a pretty large number display, and I went out shopping. The seven segment we liked best was still quite pricey, and would not fit our enclosure correctly anyway. We ended up going a different route, but it really got me thinking… What if you wanted to make something with a fairly large display? And how could one go about doing it cheaply at home?

I first thought about acrylic rods, but no one near me had any of small diameter, or at a decent price. Never mind that I don’t have that many tools on hand, and I could just see me trying to drill out the end of a thin plastic rod using a electric hand drill, and my knees as a clamp. Looking around the HQ I found my stash of glue-sticks. I thought would make an interesting display and it is easy to work with.

Before I knew it I had a working (serial and expandable) 9 inch tall 6 inch wide 7 segment display. I will be the fist to admit, its not spectacular in quality, or brightness, though the display itself did only cost four dollars in material. A quick and easy project, especially if you need a quick scoreboard or large clock.

Join us after the break to see how the display and the controller circuit are made.

Continue reading “Large 7 Segment Display Made From Glue”