Large 7 Segment Display Made From Glue

We here at Hack A Day love LED’s, and all things LED related, but one of the biggest problems with LED’s are the small size. We want bigger and brighter, matrices the size of our TV, seven segments as big as a wall and a single white led the size of a baseball, and brighter than the sun!

I was recently commissioned to make a device which uses a pretty large number display, and I went out shopping. The seven segment we liked best was still quite pricey, and would not fit our enclosure correctly anyway. We ended up going a different route, but it really got me thinking… What if you wanted to make something with a fairly large display? And how could one go about doing it cheaply at home?

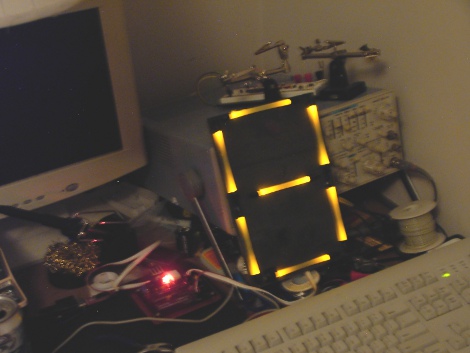
I first thought about acrylic rods, but no one near me had any of small diameter, or at a decent price. Never mind that I don’t have that many tools on hand, and I could just see me trying to drill out the end of a thin plastic rod using a electric hand drill, and my knees as a clamp. Looking around the HQ I found my stash of glue-sticks. I thought would make an interesting display and it is easy to work with.

Before I knew it I had a working (serial and expandable) 9 inch tall 6 inch wide 7 segment display. I will be the fist to admit, its not spectacular in quality, or brightness, though the display itself did only cost four dollars in material. A quick and easy project, especially if you need a quick scoreboard or large clock.

Join us after the break to see how the display and the controller circuit are made.

Continue reading “Large 7 Segment Display Made From Glue”

Paddle Controller For GPU Overclocking

[Fred] likes to squeeze every cycle possible out of his graphics card. But sometimes pushing the clock speed too high causes corruption. He figured out a way to turn a knob to adjust the clock speed while your applications are still running.

The actuator seen above is a Griffin Powermate 3.0. It’s a USB peripheral which is meant to be used for anything you can imagine. [Fred] uses an AutoHotKey script that he wrote to capture the input from the spinner, process that information, then adjust GPU clock speed in the background. Since the clock on his ATi Radeon 5800 can be adjusted using the AMD GPU clock tool, it’s an easy choice for this application. Now better graphics are at the tips of his fingers. See for yourself in the video after the break.

Of course if you don’t want to shell out for the fancy hardware you could always build your own paddle controller.

Continue reading “Paddle Controller For GPU Overclocking”

shadeydaves_lawnbot

How Not To Build A Robotic Lawnmower

[shadeydave] wanted to build his own Lawnbot, but he had no idea where to start. He purchased some DIY plans online which looked like they would get the job done, but then he strayed from the path in a big way and spent gobs of money in the process.

In his Instructable writeup, he details each misstep he made, explaining why his choices were bad as well as how much each mistake cost him. It sounds like pretty much everything that could go wrong did go wrong, from spending money on unnecessary microcontrollers to choosing the wrong wheels. Our favorite part is where he mentions that he couldn’t figure out how to create a “kill switch” for the Lawnbot in the event that his transmitter loses contact with the speedy whirling death machine.

[shadeydave] is well aware of how poorly his build went, and primarily wrote it up as a cautionary tale to others out there who might decide to take on a similar project. He says that the Lawnbot works for the most part, but with his newfound wisdom he will be revising the bot, having learned from his mistakes.

We actually like to see this kind of writeup as they can be quite beneficial to someone trying to put together a similar project. So if you have some major flubs under your belt, don’t be shy about digging them out and letting us know. As Thomas Edison said, “I have not failed. I have just found 10,000 ways that won’t work.”

Continue reading to see a quick video tour of [shadeydave’s] mostly working Lawnbot.

Continue reading “How Not To Build A Robotic Lawnmower”

Evalbot OS Set Free

[Theo] tipped us off about something that every TI Evalbot owner may be interested in, the The manual and source code for the uC/OS-III kernel is now available for download. UC/OS-III is what came with the evalbot, and it is a realtime operating system for that and many other chips. The problem with it for most hobby level people is that just the manual was 100$, and unless you already knew something about the system it did not sound very attractive.

But now micrium, the author of US/OS-III, has released the source code free to use in non commercial applications, and manuals for every chip supported it may drum up some more interest in this neat little RTOS. Though it does require a subscriber login.

Excerpt:

Dear Subscriber,

The ideal scenario for developers wishing to evaluate embedded software is to be granted easy access to the software’s full source code.  In the case of Micriµm’s celebrated real-time kernel, µC/OS-III, this ideal has become reality.  Last week, Micriµm announced a new policy for µC/OS-III: the kernel is now “source available.” µC/OS-III’s incomparably clean source code, as well as PDFs of the popular books describing the kernel, can be downloaded from Micriµm’s Web site at no cost, giving developers a refreshingly fast and simple means of beginning an evaluation

Burning Man: Pirate Ship Sports Arduino Powered Flame Sails

The 2011 Burning Man festival starts in just a few short days, and with that we have an excellent mutant vehicle accessory that no insane desert dweller should be without. An Arduino powered fire cannon sequencer! [Paul] was asked by Lostmachine’s [Andy] to spice up the flame effects on their Priate Ship mutant vehicle and provide a cool looking fire show that represented the ship’s sails.

[Paul] tossed together a hand full of arcade buttons, switches, and an LCD display to control eight 12V Solenoid valves tasked with switching on various regulated propane sources that throw some brutal looking flame effects. The controller combines a Teensy 2.0 with a custom board that contains eight P-channel MOSFET circuits. Flyback from the coils is handled through zener diodes, and the IRFR5305s are sized quite above and beyond what is needed for the 12v solenoids. With the heat, dust, and chaos of the desert one can’t be too careful. [Paul] even tosses in RC snubber circuits just to prevent things from getting too out of hand. Of the twelve arcade buttons eight are used for manual over rides, and the remaining four arcade buttons, knobs, switches, and the LCD display are all connected to the Teensy to handle the sequencing. [Paul], sadly, will not be able to make it out to Burning Man to troubleshoot the sequencer, which is a cause for some concern throughout the build.

It just so happens that I leave for Burning Man this Friday, and have an 18″ by 18″ Hackaday QR Code that will mark my area, see if you can find me out there! Also check out a video of the sequencer controlling what is easily a 6 foot flame bar after the jump!

Continue reading “Burning Man: Pirate Ship Sports Arduino Powered Flame Sails”

“Counting Box” Also Saves Calculators From Small Children

[Nathan]’s son really loves numbers and counting, and one of his favorite things to do is add 1 to a calculator over and over again. Being the awesome dad that he is, [Nathan] built his son a counting box that has a 10-digit rotary switch and two arcade buttons to add and subtract.

One goal of the project was to have the counting box retain memory of the display while being powered off. The easiest way to do this is to write the display data to the ATmega’s EEPROM. This EEPROM is only rated for 100,000 write cycles (although in practice it’s much higher), so [Nathan] included a 24LC256 in a little spasm of over-engineering. All the electronics are laid out on perf board, and the case is constructed from bamboo that was laser cut by Ponoko. The quality of the case itself is fairly remarkable – we’re really impressed with the finish and the magnetic battery access door.

From experience, we know that playing with an HP-15C eventually leads to a broken calculator and having our Nintendo taken away. We’re really happy for [Nathan]’s son, and wish we had our own counting box at his age.

Controlling Dioder Light Strips Wirelessly

dioder_universal_io

[SeBsZ] does a lot of work in home automation, using Xbee modules, LEDs, and other home lighting systems. Naturally, people look to him for help with different electronics projects, but one thing he has been asked time and time again is if he can make a simple mood lighting solution that can be easily installed.

He has always been interested in playing around with RGB LEDs, but he wasn’t looking to reinvent the wheel with this project. Instead he based his work off the Ikea Dioder product, an off-the-shelf set of adjustable LED strips. As we’ve seen before, the control module for these LEDs leaves a bit to be desired, so he removed the Dioder’s onboard PIC and wired up a controller of his own. His “Universal IO Board” uses an Atmega88 for control and has all the pins required to attach an Xbee wireless module. With everything wired up, he now has full wireless control of the Dioder light strips, without a ton of fuss.

Although he’s selling a few different hardware kits, the schematics for his IO board are freely available on his site, should you want to make your own. The only thing that we didn’t see was the code for the Atmega, but we’re guessing he has that posted somewhere as well.