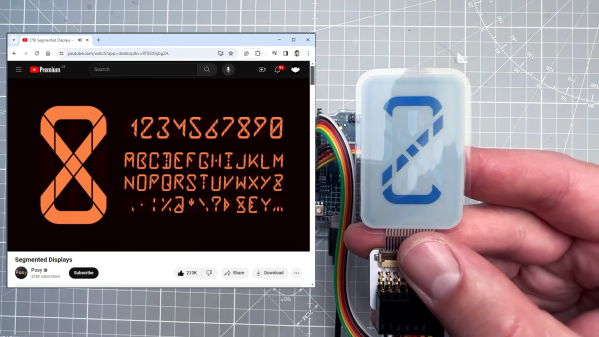
Custom Multi-Segment E-Ink Displays From Design To Driving

With multi-segment displays, what you see available online is pretty much what you get. LEDs, LCDs, VFDs; if you want to keep your BOM at a reasonable price, you’ve pretty much got to settle for whatever some designer thinks looks good. And if the manufacturer’s aesthetic doesn’t match yours, it’s tough luck for you.

Maybe not though. [upir] has a thing for custom displays, leading him to explore custom-made e-ink displays. The displays are made by a company called Ynvisible, and while they’re not exactly giving away the unique-looking flexible displays, they seem pretty reasonably priced. Since the displays are made with a screen printing process, most of the video below concerns getting [upir]’s preferred design into files suitable for printing. He uses Adobe Illustrator for that job, turning multi-segment design ideas by YouTuber [Posy] into chunky displays. There are some design restrictions, of course, chief of which is spacing between segments. [upir] shows off some Illustrator-fu that helps automate that process, as well as a host of general vector graphics design tips and tricks.

After sending off the design files to Ynvisible and getting the flexible displays back, [upir] walks us through the details of driving them. It’s not as simple as you’d think, at least in the Arduino world; the segments need +1.5 volts with reference to the common connection to turn on, and -1.5 volts to turn off. His clever solution is to use an Arduino Uno R4 and take advantage of the onboard DAC. To turn on a segment, he connects a segment to a GPIO pin set high while sending 3.5 volts out of the DAC output into the display’s common connection. The difference between the two pins is 1.5 volts, turning the segment on. To turn it off, he drops the DAC output to 1.5 volts and drives the common GPIO pin low. Pretty clever, and no extra circuitry is required.

This isn’t the first time we’ve seen [upir] trying to jazz things up in the display department. He’s played with masking LED matrix displays with SMD stencils before, and figured out how to send custom fonts to 16×2 displays too.

Continue reading “Custom Multi-Segment E-Ink Displays From Design To Driving”

Sailing On A Sea Of Seven-Segment Displays

The amount of information the humble seven-segment display can convey is surprising. There are the ten numerals, dead-ringers or reasonable approximations for about half the alphabet, and even a few not-quite-canonical symbols. But when you put 12,288 segments to work, you get all that and much more.

Behold Sea of Segments, an art piece by [Will Gallia] that really pushes what’s possible with seven-segment displays. The piece, which looks about the size of a decent flat-panel TV, is composed of an 8×6 array of PCBs, each of which holds an 8×4 array of white LED seven-segment displays; each board also holds two TLC5920 LED drivers. [Will] designed the PCBs to tile horizontally and vertically, making it possible to take data either from the top or right side and output to the bottom or left. Power is distributed to the modules through a series of steel bus bars, which also provide structural support for the display. The whole thing lives in an enclosure with a smoked acrylic front panel, and hangs from a pair of steel cables that also provide power.

Under the hood, a PocketBeagle does all the heavy lifting of talking to the display and translating images onto the display. [Will] came up with an encoding scheme that gives about five bits of grayscale, and built a program to figure out which segments should be lit to create an image. The result is a smooth and convincing reproduction of videos of waves on a beach, which is where the project gets its name. Check out the results in the video below.

[Will] says he drew inspiration for this build from the DigitGrid by [Skot9000]. That was a great project too, but Sea of Segments takes the concept to another level.

Continue reading “Sailing On A Sea Of Seven-Segment Displays”

The Seven-Segment Display That’s Also An Input Device

We’re used to seeing all manner of seven-segment displays, be they mechanical, electronic, or something in between. But what all these displays have in common is that they’re, you know, displays. Using them as inputs would just be crazy talk, right?

Perhaps, but we like where [Dave Ehnebuske] is going with “InSlide,” the seven-segment input device. The idea for this comes from the “DigiTag” display, which we covered back in October, and divides a standard seven-segment character into three vertical strips — two skinny ones for the outside vertical segments, and one wide strip holding the horizontal elements. By sliding these strips up and down relative to each other, the standard nine digits, plus a few other characters, can be composed.

[Dave]’s take on this theme started by building his display from laser-cut plywood pieces, which is a nice choice because of the good contrast between the white wood and the engraver segments. Next, he embedded rare earth magnets in the slides and installed seven Hall effect sensors in the frame. The sensors are connected to an Arduino Nano via a 74HC165 parallel-load shift register, which lets multiple modules be daisy-chained together. He also built an Arduino library to read the current state of the segments; it supports the full hexadecimal character set, or even duodecimal if you like.

[Dave] has shared the library, and it looks like you can get the build files for the mechanism from the original project. That’s good, because this looks ripe for hacking. It looks like it would be pretty easy to motorize a display like this by adding rack-and-pinion gearing and steppers — something like that could make an interesting clock.

Play DOOM On Seven-Segment Displays

Getting DOOM to run on a computer it was never meant to run on is a fun trope in the world of esoteric retro computers. By now we’ve seen it run on everything from old NES systems to microwaves, treadmills, and basically anything with a computer inside of it. What we don’t often see are the displays themselves being set up specifically to run the classic shooter. This build might run the game itself on ordinary hardware, but the impressive part is that it’s able to be displayed on this seven-segment display.

This build makes extensive use of multiplexers to drive enough seven-segment displays to use as a passable screen. There are 1152 seven segment digits arranged in a 48 by 24 array, powered by a network of daisy-chained MAX7219 chips. A Python script running on a Raspberry Pi correlates actual image data with the digit to be displayed on each of the segments, and the Raspberry Pi sends all of that information out to the screen. The final result is a display that’s fast enough and accurate enough to play DOOM in a truly unique way.

There is much more information available about this project on their project page, and they have made everything open source for those who wish to follow along as well. The project includes more than just the ability to play DOOM, too. There’s a built-in video player and a few arcade programs programmed specifically to make use of this display. Perhaps one day we will also see something like this ported to sixteen-segment displays instead of the more common seven-segment.

Flip-Segment Digital Clock Is A Miniature Mechanical Marvel

Clocks are such mundane objects that it’s sometimes hard for them to grab your attention. They’re there when you need them, but they don’t exactly invite you to watch them work. Unless, of course, you build something like this mechanical flip-segment clock with a captivating exposed mechanism

“Eptaora” is the name of this clock, according to its inventor [ekaggrat singh kalsi]. The goal here was to make a mechanical flip-segment display as small as possible, which meant starting with the smallest possible printable screw hole and scaling the design up from there. Each segment is controlled by a multi-lobed cam which bears on a spring-loaded cam follower. When the cam rotates against the follower, a segment is flipped up from the horizontal rest position to the vertical display position. A carryover mechanism connects two adjacent displays so that each pair of digits can be powered by a single stepper, and the finished clock is quite small — a little bit larger than the palm of a hand. The operation seems quite smooth, too, which is always a bonus with clocks such as these. Check out the mesmerizing mechanism in the video below.

We’d have sworn we covered a similar clock before — indeed [ekaggrat] says the inspiration for this clock came from one with a similar mechanism — but we couldn’t find it in the back catalog. Oh sure, there are flip-up digital clocks and all manner of mechanical seven-segment displays, but this one seems to be quite unique, and very pleasing.

Continue reading “Flip-Segment Digital Clock Is A Miniature Mechanical Marvel”

Electronic Dice Is Introduction To Microcontroller Programming

By now most of us are familiar with the Arduino platform. It’s an inexpensive and fairly easy way into the world of microcontrollers. For plenty of projects, there’s no need to go beyond that unless you have a desire to learn more of the inner workings of microcontrollers in general. [Cristiano] was interested in expanding some of his knowledge, so he decided to build this electronic dice using a PIC microcontroller instead of the Arduino platform he was more familiar with.

As a result, this project is set up as a how-to for others looking to dive further into the world of microcontrollers that don’t have the same hand-holding setup as the Arduino. To take care of the need for a random number for the dice, the PIC’s random number generator is used but with the added randomness of a seed from an internal timer. The timer is started when a mercury tilt switch signals the device that it has been rolled over, and after some computation a single digit number is displayed on a seven-segment display.

While it might seem simple on the surface, the project comes with an in-depth guide on programming the PIC family of microcontrollers, and has a polish not normally seen on beginner projects, including the use of the mercury tilt switch which gives it a retro vibe. For some other tips on how to build projects like this, take a look at this guide on how to build power supplies for your projects as well.

Continue reading “Electronic Dice Is Introduction To Microcontroller Programming”

One Stepper Plus A Whole Bunch Of Magnets Equals A Unique Seven-Segment Display

Sometimes the cost of simplicity is extra complexity. It seems counterintuitive, but it seems to be true. And this single-motor mechanical seven-segment display seems to be a perfect example of this paradox.

On second thought, [aeropic]’s mechanism isn’t really all that mechanically complicated, but there sure was a lot of planning and ingenuity that went into it. The front has a 3D-printed bezel with the familiar segment cutouts, each of which is fitted with a pivoting segment, black on one side and white on the other.

Behind the bezel is a vertical shaft with three wheels, one behind each horizontal segment, and a pair of horizontal shafts, each with two wheels behind each vertical segment. The three shafts are geared to turn together by a single stepper in the base. Each wheel has ten magnets embedded in the outer circumference, with the polarity oriented to flip the segment in front of it to the right orientation for the current digit. It’s probably something that’s most easily understood by watching the video below.

We’ve seen quite a few of these mechanical seven-segment displays lately — this cam-and-servo mechanism comes to mind. We love them all, of course, but the great thing about [aeropic]’s display is how quiet it is — the stepper is mostly silent, and the segments make only a gentle clunk when they flip. It’s very satisfying.

Continue reading “One Stepper Plus A Whole Bunch Of Magnets Equals A Unique Seven-Segment Display”