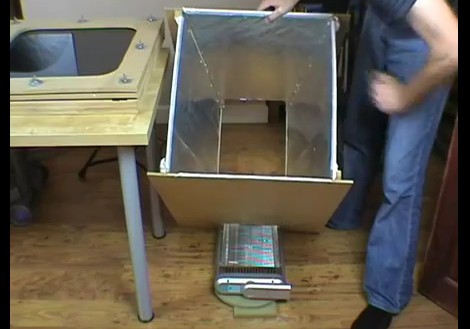
[James] builds all sorts of robots and superhero costume replicas at home, so he is always searching for a better way to get consistent results when using his vacuum table. A lot of people use their oven or exposed heating coils from electric frying pans to warm the plastic sheets, but [James] wasn’t really interested in going down that route. He cites that he would rather not heat plastic in the oven where he cooks his food, nor is he really keen on the idea of exposed heating elements.
Instead, he opted for a slightly pricier, though completely reasonable setup that produces consistent results every time. Most of the forming table was built using MDF sheeting, as you can see in the video below. His heating apparatus was the most expensive part of the rig, since it’s an off the shelf quartz-based room heater. He lays the heater on its back side, and directs the heat up through an MDF frame using aluminum foil as a reflector. The plastic sheeting mounted at the top heats evenly, and in no time, he has a perfectly vacuum formed prop that is ready to be painted.
Sure, it might cost a bit more than some other vacuum formers we’ve looked at before, but spending a bit more up front to get consistent results is well worth it if you ask us.
[youtube=http://www.youtube.com/watch?v=maH5Ech0wK8&w=470]


hmm surprising that works that well
i think he has done a great job. i could use one of those.
That works better than I ever expected. Such an elegant and simple solution.
I’m just going to leave this here.
http://tk560.com/vactable4.html
I’m a fan of that site and it’s definitely a go to source, however, it’s not cheap.
It’s something like $100 for the custom heater.
Some sort of alignment for both the heating and placement could be an improvement , i suggest just 5cm long L-shaped steel could do the job fine.
That is something I was thinking about as well. I know for me I would have a few really bad screw-ups before my first success.
Well, maybe not, my first PCB turned out much better than I expected.
That is pretty awesome. I have wanted to build a vacuum form, but haven’t been sure how to fit it into my daily life just yet. Maybe I could use this to make project cases or something…
Anyway, cool project
Nice. But he drilled all those holes? I wonder if he knows he can buy the tool hanger board that already comes that way.
Drilling 200 holes couldn’t take more than 20 minutes, trivial compared to the rest of the build time. It looks like he used 1/2″ MDF which is WAY stronger than pegboard.
Holes on the tool hanger board are too wide.
When I build my vac former (about 2/3rds the size he has) I found that the peg board ~4mm holes were too big, they draw too much material into them.
I ended up drilling a grid of holes around 5mm apart 1.5mm in size plenty of air can come through the top to provide a vacuum without ruining the plastic.
The first vac former I used in school had an expanded steel mesh, that too drew too much of the plastic for my liking into the grid. -if means that you can’t for instance make smooth topped draw dividers/stationary sorters.
Each to their own, I guess it did take a couple of hours to drill the near thousand holes. but it was worth it to get the versatility in the tool.
as for heating, I usually do mine in the oven, (that’s why it’s 2/3rds the size, so it’ll actually fit in the oven, I’ve been thinking about pulling apart a toaster, but I like this method more.
@Aeros Peg Board? Good idea, if the hardboard doesn’t flex under the atmospheric pressure. Not that I know if it would.
I thought about that too, but if te moulds are too heavy and there isn’t any support underneath that material will sag. :/
In the states you will have to bypass the “I cannot be held responsible for my own actions so the manufacturer has placed this tip over switch here to keep me from suing them” switch…or use a milkhouse heater
@Hacksaw Even the “milk house heaters” have the tip over safety switch. Everyone I have purchased since 1986 has. I but new one annually for my water well pit, rather than rely on a year(s) old heater making it through one more season.
Most likely the insurance industry had the most to do with their(reasonable) inclusion. Accident, and fires are bad for the insurance companies bottom line, and are a major driving force behind changes for safety’s sake. Of course they don’t care if the general public doesn’t realize that, and erroneously blame others.
Cool!
Had the old Mattel Vac-u-form and this brought back a lot of good memories.
Wonder if a flip assembly would help him like they used with that device… Other wise this is great!
The trouble for me would be making the wooden positive moulds…
If you see this done ‘professionally’ say in a fridge manufacturer
the whole process takes less than 15 seconds.
However there is a number of interesting variations, not least is the fact that they blow hot air into the plastic sheet so that it ‘domes’ up then they bring that down over the mold before vacuuming.
It ensures that the plastic is more uniform and not prone to thin out too much where it contacts the edge of the mold when the vacuum pulls the sheet down causing thinning in the contact locations.
Shees- constructing the vacuum forming equipment is the easy part. Constructing the molds is the tedious time consuming part. I guess that’s one reason to have CNC router or mill in the shop. I’d think a full one thermostatically control oven, would give you set it, and forget way to heat the plastic. build the oven against an exterior wall, you could vent the fumes to the outside. I understand that the household current us 240 in the UK, but I surprised at the number of persons overly cautious about working with it, even here in the US. The home shop ovens that use custom(home shop custom) nichrome wire aren’t really anymore dangerous the retail electric heater that use the same construction methods
Did I here you say that you are going to suck air thru R2D2 bottom!
Something I would never admit to doing.
all those holes are a waste. One hole about 2 inches in diameter and a thick piece of felt as a wick are all you need.
and, did he really place a wood box on a wood floor and then stick a heater in it? Sounds like a bit of a fire hazard. Take it to the concrete floor in the garage.
a convection oven is still the best plastic cooker I’ve ever used for projects this size.
Not everyone has a garage, champ.
James has done an update about all the questions raised.
http://youtu.be/5fJOhrt001c
Hey Mate.
Does it need to be a Quartz Patio heater or could you get away with a cheaper Halogen electric heater or any of the other cheaper electric patio heater’s on the market? Only quartz heater I have seen here in Oz was $160 compared to a similar looking electric one for $20. Thanks heaps for the great idea though I am now a fan of you work mate. keep it up.
Hi,
First off, nice work on your vac formings and foam costumes.
Have you measured the oven’s maximum temperature? I’d like to know if it would be suitable for forming lexan/polycarbonate sheets for making R/C car bodies.
Thanks and keep-up the good work!
Thats a good job on foaming box what size is it .thanks
What’s the black strip that goes around the vacuum board? I can’t seem to figure that out? Is it felt or something? What is it’s purpose. Thanks a lot. I’m planning on doing this to make some replacement boat instrument panels.