Wooden You Like To Hear A CNC-Cut Phonograph Record?

Say what you will about [Thomas Edison], but it’s hard to deny the genius of his self-proclaimed personal favorite invention: the phonograph. Capturing sound as physical patterns on a malleable medium was truly revolutionary, and the basic technology that served as the primary medium of recorded sound for more than a century and built several major industries is still alive and kicking today.

With so much technological history behind it, what’s the aspiring inventor to do when the urge to spin your own phonograph records strikes? Easy — cut them from wood with a CNC router. At least that’s how [alnwlsn] rolled after the “one-percent inspiration” hit him while cutting a PCB with his router. Reasoning that the tracks on the copper were probably about as fine as the groove on a record, he came up with some math to describe a fine-pitch spiral groove and overlay data from a sound file, and turn the whole thing into G-code.

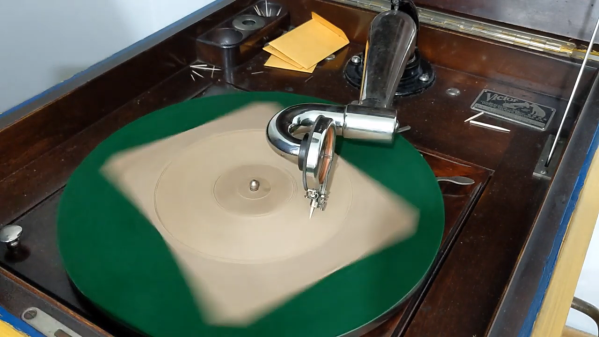
For a suitable medium, he turned to the MDF spoil board used to ship PCB stencils, which after about three hours of milling resulted in a rather hairy-looking 78-RPM record. Surprisingly, the record worked fairly well on a wind-up Victrola. The spring-powered motor was a little weak for the heavy wooden record and needed a manual assist, but you can more or less clearly hear the 40-second recording. Even more surprising was how much better the recording sounded when the steel needle was replaced with a chunk of toothpick. You can check out the whole thing in the video below, and you’ll find the G-code generation scripts over on GitHub.

Is all this talk about reproducing music using wiggly lines confusing you? Woah, there, whippersnapper — check out [Jenny]’s primer for the MP3 generation for the background you need.

Continue reading “Wooden You Like To Hear A CNC-Cut Phonograph Record?”

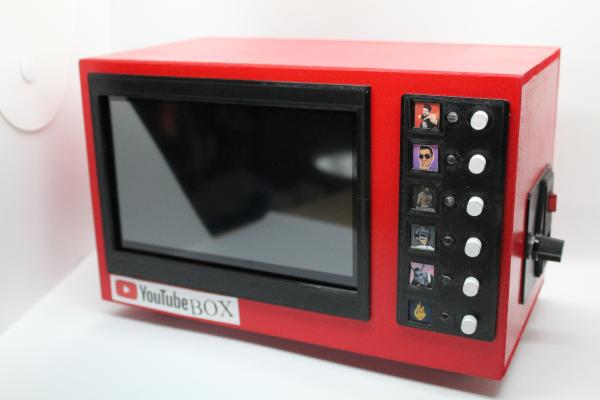
Dedicated box to play new videos from a handful of content creators.

Dedicated Box Makes YouTube More TV-Like

[Exposed Wire] is a huge fan of YouTube and consumes a lot of content. If that sounds familiar, maybe you should build a dedicated YouTube box, too. You get to push buttons, there’s LEDs, and you can take a break from other screens to look at this one for a while. [Exposed Wire] wanted to make it easier to watch the latest videos from their favorite creators, but we would argue that this is more fun, too.

The Rasberry Pi 4 inside checks every five minutes for new videos by keeping track of the creator’s total number of videos in a text file and doing a comparison. If one of the channels has a new video, then the corresponding LED lights up and the new video’s URL is linked to the button. Press the button and the Raspi opens the browser, goes the the URL, maximizes the video, turns off the LED, and updates the video count in the text file.

We like the construction job here. The 1/4″ MDF walls are connected by 3D-printed L-brackets in PETG. At first, [Exposed Wire] mounted the LEDs and buttons to a PCB, but that was really fiddly so they printed panels instead. Combined with the bracket around the screen, the finished build looks good. Check out the build montage after the break.

Regular old YouTube videos not doing it for you anymore? Try watching them at low resolution on an LED matrix.

Continue reading “Dedicated Box Makes YouTube More TV-Like”

Workshop Tools Are Available In First-Class

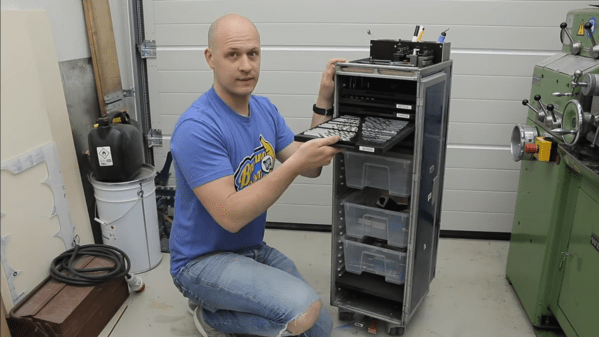
Most of dream of having a fully-stocked shop with all of the tools needed to build our projects, at least if we don’t already have such a shop. In the meantime, a lot of us are hacking together our own tools and working on whatever bench space might be available to us. While [Emiel] aka [The Practical Engineer] has an envious shop to work from, his latest project goes to show how repurposing some aircraft-grade equipment can result in a high-quality toolbox for himself, without shelling out for any consumer-level solution. (Video, embedded below.)

The core of his workshop cart build is actually a recycled food service cart from an airline. While the original probably only housed some soft drinks and ice, this one has been kitted out to be much more functional. Since [Emiel] is using this to wheel around his machine shop, he used a CNC machine to cut out slots in black MDF sheets which would hold his drill bits, taps, and other tools. Working with MDF on a CNC machine turned out to not be as simple as he thought, since the MDF would separate and break away unless the CNC tool heads were operated in a specific way.

The build also includes several buckets for other tools, and a custom enclosure for the top of the cart specifically built for his machine tools’ tools to sit while he is working. It’s certainly a more cost-effective solution to a wheeled shop toolbox than buying something off-the-shelf, and a clever repurposing of something which would have otherwise ended up in a landfill. [Emiel] is no stranger to building any tools that he might need, including this custom belt sander built completely from the ground up.

Continue reading “Workshop Tools Are Available In First-Class”

DIY PECS Board Uses Pictures To Communicate

One way of communicating with autistic and non-verbal people is through the use of a Picture Exchange Communication System or PECS board, which they can use to point out what they need or want throughout the day. However, the commercial versions of these boards have their share of problems — they’re expensive, and they’re fairly rigid as far as the pictures go. [Alain Mauer] has created an open-source PECS board that is far more personalized, and has audio to boot.

The number one requisite here is sturdiness, as [Alain]’s son [Scott] has already smashed two smartphones and a tablet. [Alain] went with a laser-cut MDF enclosure that should last quite a while. Inside is an Arduino Pro Mini and a DF Player Mini that plays corresponding clips from a micro SD card whenever [Scott] presses a button on the 16-key copper foil capacitive keypad. This PECS board is smart, too — it will sound a turn-me-off reminder after a few minutes of inactivity, and issue audible low battery warnings.

So far, [Scott] is responding better to photographs of objects than to drawings. Watch him interact with the board after the break.

This is far from the first thing [Alain] has built to help [Scott]. Be sure to check out this Pi-based media player built to engage and not enrage. Continue reading “DIY PECS Board Uses Pictures To Communicate”

Toddler Arcade Cabinet Is A Stand-Up Job

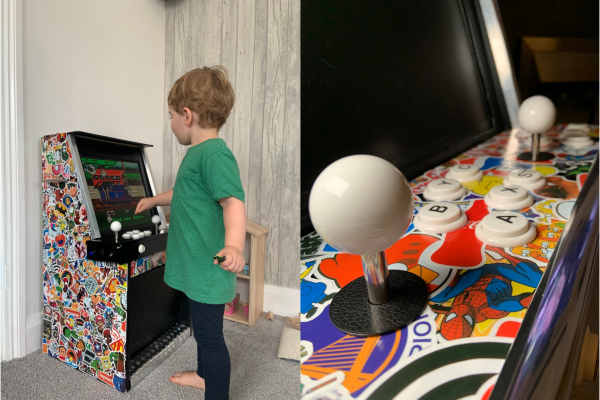
A few years ago, [Mark] built an arcade cabinet into a low table. But once his new gaming buddy [Grayson] came along and started crawling, it wasn’t practical to have a low, pointy table around. Trouble is, [Mark] had already given [Grayson] his first taste with a Thomas the Tank Engine game. Since the kid was hooked, [Mark] rebuilt the table arcade into a toddler-sized arcade cabinet that they can both use.

The brain — a Raspberry Pi running RetroPie — should be familiar to most of our readers. [Mark] found the perfect crappy old monitor when they were upgrading at his office, and found some nice speakers to give it good bass. We love the details like the chrome edging, and especially the kick bar/footrest along the bottom. It can be difficult to decide how to decorate a multi-arcade cabinet, so [Mark] went the sticker bomb route with 700 of them randomly distributed and safe from toddler wear and tear under five coats of clear wood varnish.

We think this looks great, especially since [Mark] doesn’t have a workshop and cut all that MDF by hand on a jigsaw in the kitchen. Check out the happy train engineer after the break.

Maybe once [Grayson] is old enough to break tablets, [Mark] can build a gaming tab-inet out of it. Just sayin’.

Continue reading “Toddler Arcade Cabinet Is A Stand-Up Job”

This MDF Sound Bar Sounds Great

Everyone should build a speaker cabinet at least once in their life, if only so they can realize how much thought goes into building a simple box. [John] of ibuildit.ca wanted a sound bar for his home theater setup, and that means building a sound bar. The result is beautiful, and a demonstration of how much you can do with just a router and a table saw.

[John] built this sound bar almost entirely out of MDF, which isn’t the best material but it works well enough for a speaker cab that’s meant to be mounted to a wall. The sides were constructed first, with a rabbet holding the front and back on. Both the woofer and tweeter are inset into the front, and a standard piece of plumbing pipe serves as the bass port. Slap a round over bit into the router and do some light sanding, and everything looks great with a coat of black paint.

As with any speaker enclosure, the design is effectively parametric, designed entirely around the drivers being used. In this case, [John] is using a spreadsheet named ‘Unibox’ that gives you all the formulas and graphs for designing a speaker enclosure.

With the box built and the speakers installed, the only matter left were a few aesthetic choices. [John] went with a standard black finish with a very nice wooden grille held onto the front with magnets. It’s a design that pops, but the true test of a speaker is how it sounds. That’s a bit hard to convey over the Internet, but [John] included a few sound samples at the end of the build video, available below.

Continue reading “This MDF Sound Bar Sounds Great”

An Improved Bed And Custom Wasteboard For A CNC Router

[Adam Haile] has been spending some time improving his CNC router and his latest change is a custom wasteboard with improved bed support. Not only does the MDF wasteboard have plenty of threaded inserts to make for easy clamping solutions, but [Adam] replaced the frame underneath the board with a new set of aluminum extrusions to provide better support. Originally, there was only support for the edges of the wasteboard, which allowed the middle to sag. While researching the machine’s specs, he was able to recognize and order the exact extrusions he needed from Misumi and construct an improved bed to go with the new board. Should you wish to make your own version, [Adam] provides all the part numbers and CAD files required.

Embedded below is a video showing the machine drilling the holes, followed by surfacing the entire board so that it is flat. Since the bolt heads are well below the surface of the board, and the threaded inserts for the holes are on the bottom, there’s no worry of the tool hitting anything it shouldn’t during this process.

Continue reading “An Improved Bed And Custom Wasteboard For A CNC Router”