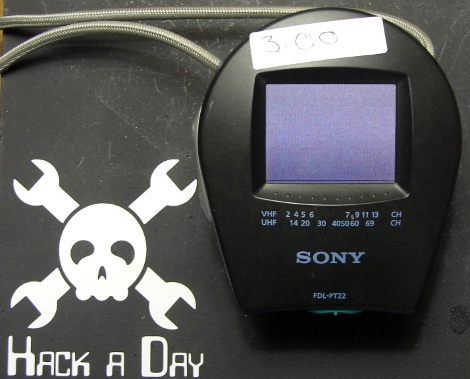
I have been on the hunt in our local thrift and random junk stores lately for a small TV to hopefully modify into a decent enough computer monitor for my Apple //C and Trash80. While there are TONS of TV’s out there, none were really striking me in tube size or picture quality. Roaming around the last resource I happened to find this tiny Sony Watchman Color LCD TV.
Of course this thing is way too tiny for a computer monitor. I thought it would be a great thing to have around the bench for when I am repairing a video game system, or messing about with the TV out Arduino library (the 3 buck price tag on half off day didn’t help either). Directly out of the store this thing is totally useless as there are no inputs and its tuner is for analog “over the air” stations which no longer exist.
Join me after the break to see how I turned this buck fifty paperweight into a functional bench tool!
The idea here is that the carrier radio signal being picked up by the TV’s tuner at some point is stripped away and you’re left with a normal composite TV signal. Find that place and you can simply inject a signal from wherever you like, such as a video game system.
Doing some looking around on the internet I was quickly able to find a service manual for this exact device which contains everything form calibration to schematics, which did help a little, but mainly in confirming my notes as I poked and probed around the board.
The first order of business is to get the silly thing open, which the service manual was the most help with. Full of plastic clips, I managed to carefully poke and squeeze at the seam of the enclosure eventually popping it open (while only breaking one clip). Once opened there are three boards inside, each connected to each other and each individually clipped into the case.
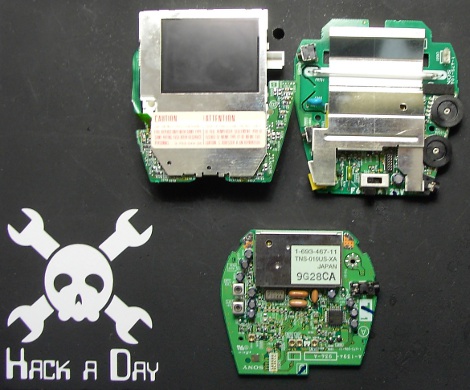
The top most board contains the passive matrix 2.2 inch LCD screen along with some final controller circuitry. The second / middle board is the power supply board, this contains voltage regulation and a nice step-up up circuit to drive the fluorescent back light tube contained on this board (+30v). It also contains op amps for audio, contrast control and the external controls and jacks. The third and final board is all TV tuner and since the schematics do not have a giant red arrow saying “HACK HERE!!!” that is where I decided to start.
At first I thought I needed to keep this third tuner board and disable the tuner. After checking the schematics for a suitable point I soldered a wire to a test point, cut a lead on the board and gave it a whirl, with no results. The tuner was still sending its signal on up to the LCD, so I went about trying more points (this thing is designed pretty redundantly). After getting nothing but the tuner signal along with its on screen display I thought to myself, why not just unplug the tuner board .. maybe it will still work, and yes it does.
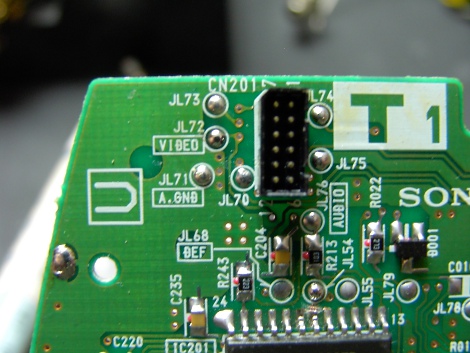
The three boards are connected by pin headers. Most importantly, the tuner board has three very useful test points marked AGND, VIDEO and AUDIO, where as the other boards are unmarked. Using those marked test points I was quickly able to find out what pins on the headers were the analog ground, video, and audio and translated those positions on to the receptacle on the middle power board (which then passes up to the LCD board). I was able to then probe those female pins onto three test positions on the middle board which made great pads to solder to. Audio is on the left, video is on the right in my picture.
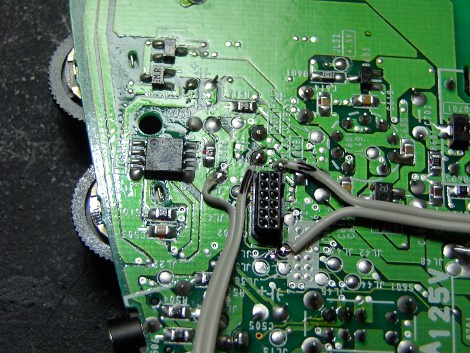
Checking the schematics again I was sure this is what I was looking for, from this point on the audio signal just goes to an opamp to drive the tiny internal speaker or headphones . The video signal gets sent up to one of the few non house branded chips in the entire thing, a M52042FP which converts the composite signal into a RGB signal and a separate composite sync signal which is sent to the LCD controller.
After wiring my connections I had a picture but the sync was totally wrong. Following the schematic to the LCD controller I found that way back at the tuner the horizontal sync is split off and sent directly to this chip, where as the composite sync is sent to everything then to the LCD controller.
Going on a total guess based on where I read somewhere that some video doo-dad would take a composite sync if it was sent to both Hsync and Vsync I soldered the two pins together on the LCD controller and tried it again.
Works like a charm.
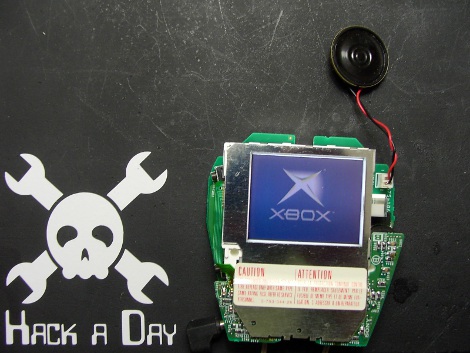
At this point I would normally call this a successful hack, but since I removed an entire board from the TV I now had some room to play around. Using the TV tuner board as a stencil I traced its outline to some perf board. I then took a hacksaw and cut out the perfboard and drilled some holes for some PCB mount RCA jacks.
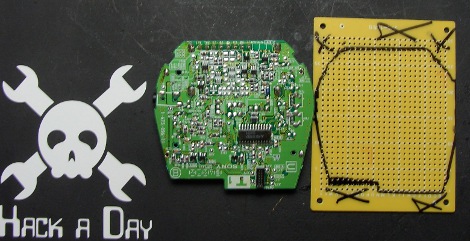
Since I did it half assed, there was not a whole bunch holding the jacks in place so I reinforced it with some putty epoxy. The positions of the RCA jacks are such that they poke out of where the original “straptenna” came out of the case so I did not have to add any holes.
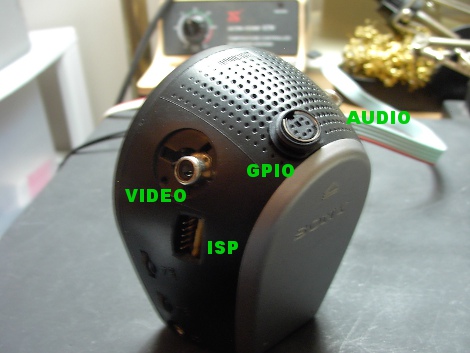
From there I plopped in an ATMEGA328P, and wired it up for use with the TV out library. I also added a header for ISP programming and cut a small rectangle in the side of the case for access. For future control I also added a panel mount 6 pin mini din to the top of the case. This is the same style plug used for PS/2 keyboards and mice, so I wired it up that power and ground are in the proper places for PS/2 devices.
The other pins were wired to the 328P’s pins, and the two pins typically not connected in a PS/2 port are connected to the serial port of the 328. This gives me 4 GPIO pins, and if I really wanted to make a breakout cable I could have both the serial port and a PS/2 keyboard hooked up at the same time for a pocket serial terminal. Though its mostly going to be used with an NES controller.
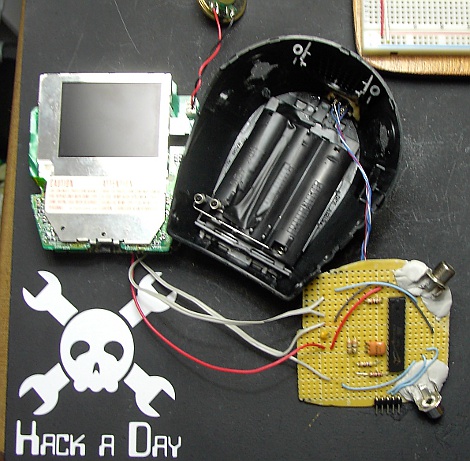
Power is controlled by the switch that came with the TV. When I flip it to what was the VHF tuner selection the TV powers up but the AVR does not. allowing me to connect an external source. When I flip it to the UHF selection power is applied to the AVR. The TV still runs from batteries and keeps its “about three hour lifespan” though 99% of that drain is in the florescent back-lighting.
And that’s about it, 1.50$ useless pocket TV that runs on batteries now can get external signals from anything made in the last 20 or so years, and I have been having a blast with my new all in one TV out development platform … though none of this helps my computer monitor situation I originally started out with. I have that figured out with a NEC multisync monitor I have owned since 1990, but that’s a totally different hack.
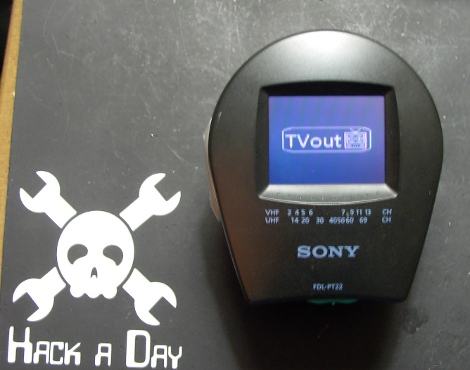


looks awesome but totally wanna see some video of this thing in action!
+1 for Videos!! :-)
you should replace the backlight with white LEDs. Benheck does this a lot. It will give you much longer battery life.
I have one of these exact TVs sitting around doing nothing. HACKTIME!
I got excited for the xbox screen. I need some vids of this in action!
the next step might be to replace the fluorescent backlight with LEDs! It looks doable on there…
cool hack for sure. i’ll keep my eyes peeled for one of these
Nice work! You’ve got a knack for getting gut feelings to work out…. makes me envious.
Awesome, I have a set of two of these things and I was going to do the exact same hack. Thanks for the great writeup and for saving me the effort!
I used to use the RF output of devices or an RF modulator and just wire it into the antenna. The power passing through the system is pretty low, so even though the impedances were probably way off the thing worked fine since there was never really enough power passing through to damage any parts.
That’s how I used one of these for an N64 “portable” (ok, maybe an N64 stuffed into a cardboard box with buttons attached and a few batteries may not be considered a true portable console but I could hold it…. sort of haha)
-Jimmy
With ya Jimmy! That is what I was kinda thinking the entire time I read the article. The antenna port has always been useful with a simple coax impedance check. The ole “plug X into Video In on the VCR and it pipes it thru coax into the old beast tv with antenna converter connector slug. All in all he learned a crap ton more than I would have lol. The moment I saw that header with the V and A+ A- and done up a TRS connector and called it a day. He really went the extra mile with the tracing and research. The circuit bending end of me is more shoot from the hip-especially at a 1.50 :)
Glad you brought up that point :)
Neato, great hack!
I miss NTSC! :(
Anyone have any suggestions about making it wireless, perhaps through bluetooth? :3
Cool hack. A bit backwards from the direction that I reverse engineer these things. Usually I first look for the video decoder IC and see if I can find a datasheet. Then I probe out the chip to find a good place to inject video in.
Of course, you started with the assumption that you had to disable the tuner, too. That’s pretty cool how they designed it modular.
+1 for replacing the flourescent with LEDs. You would get a ton more play time, especially if you used pwm for the leds.
Damn I want one of these! Great hack!
You guys have no idea how hard it is to get my old dumpy camera to record this thing, I tried a bunch of times but most I can get out of it is a dark blur
Its picture quality is pretty decent, though it could use a boost in contrast, color is good and motion blur is minimal
This is a cool hack to talk about and its really not that hard to pull off. I grew up (luckily) with a dad that liked to modify/hack household appliances especially when they started to lose function in the house.
He would take an old VHF/UHF black and white portable TV with no inputs and hack it for cable to be a nice little kitchen TV. I learned how to do this at a young age so seeing this reminded me of those fun times.
Easy and fun to do. Great article.
That’s a good Hack!
You probably don’t see it with the LCD, but black and white TV sets usually have a much better resolution than color. Processing the NTSC color subcarrier always truncates the video bandwidth.
I needed a benchtop display so I found a cheap LCD display for a backup camera that has dual composite inputs for about $20 from Hong Kong.
Have you considered the Sony lawsuit coming your way due to modifying they’re precious hardware?
Boy, modifying Sony kit these days is a dangerous art.
To solve your original problem – finding a monitor for use with old computers, just get a TV set which has a composite video input or a color NTSC monitor – I’ve got one of each in my junk closet.
I’ve also got a 5″ B&W portable TV which has a composite input jack which I used to use as a portable field monitor before small LCD TVs became common. As another person noted B&W will give you better resolution – up to 80 columns width.
It is possible to read 80 column text on a 5″ B&W display, but only if you’ve got great eyesight.
Just bought one.
have you considered linking this up to the raspberry pi, since that’l have ivdoe output….
id love to do a project ike this
This reminds me of 10-year-old me playing Mortal Kombat 4 on a 3 inch black-and-white portable TV
Does anyone know which two pins the author is referring to when he states:
“Going on a total guess based on where I read somewhere that some video doo-dad would take a composite sync if it was sent to both Hsync and Vsync I soldered the two pins together on the LCD controller and tried it again.”
Or if anyone knows a way to contact Kevin Dady, that would be great!
Hi,
I can’t figure out which two pins that should be soldered on the LCD controller as well
Can someone please help?
WOW I actually had this exact model TV when I was younger
Hi,
I can’t figure out which two pins that should be soldered on the LCD controller as well
Can someone please help?
I found the schematics and pinout described.
I created a Github to see the details for anyone interested.
https://github.com/RetroBrosMods/SonyWatchmanAV