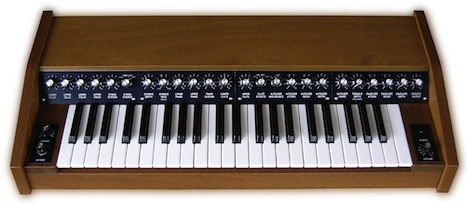
The 1970s were the glory days for analog synthesizers, and for [Stefan] listening to huge modular Moogs and ARPs resulted in a wondrous seething jealousy. In 2009, wanting to relive just a little bit of his childhood, [Stefan] picked up a PAiA Stringz’n’Things from eBay. It’s a great little keyboard, but [Stefan] his new purchase to look little classier than a tolex-covered flight case. After getting rid of the old tolex case, [Stefan] made a new enclosure and added some extra circuitry to expand the capabilities of this classic synth.
After replacing the electrolytic capacitors and fixing a voltage regulator issue, [Stefan] made a new enclosure for his keyboard out of beautifully lacquered mahogany. A new key bed stolen from an old Yamaha organ was brought in, and new control panels above the keys provide a more sensible organization than the keyboard’s previous incarnation.
The original Stringz’n’Things was laid out more like an organ than a synthesizer, a reflection of its polyphonic nature. This meant there wasn’t a very diverse tonal palette, but [Stefan] remedied that with a wave folder to generate extra harmonics, a tremolo, and an envelope generator to provide attack and decay for each note.
Now [Stefan] has a lovely polyphonic synth that has found its place on top of an old Hammond organ. As a bonus, the synth sounds really good. Not bad for an instrument generally regarded as being very limited.


Nicely done Stefan! Looks great and totally agree with the signal layout :)
I am re-casing an old Bontempi Maestro I got for a dollar after I get the parts in for the mods/bends to complete. So far it is shaping up (not having a proper shop/ work area makes progress slower than I’d want) and having to use hand tools takes more time and aggravation than otherwise, but it should be pretty cool in the end. So far, I’m going with Mars red for the metal and just staining the wooden bits. I have no idea about how to get info properly stenciled onto the panels but that will be another adventure lol.
Thanks for inspiring me to get it finished and enjoy your beautiful creation :)
There are printer-able decal sheets available. We do custom dated decals on piano soundboards. The printer is an odd one, it uses ribbons of colour media including gold and silver.
Then spray over with good clear laquer or overlay a headlight cover guality film. Then there is good ‘ol transfer lettering and a rubbing tool.
Thanks for the tips :) I especially like the headlight film-gonna have to look into that :) I’m going to look into the print transferables as I tried finding a local place, but man it was expensive. Maybe I can finally call in a favor to the local hackerspace, they kinda owe me for a bunch of circuit bent donations :) Either way, thanks for the tips :)
/side note: if you ever get short on your print clients ed, apparently the new thing for frats and sororities is to have the red solo cup stenciled with their Greek on it. Apparently our local shops are backlogged with em. and “kill wealthy dowager” ;)
This is excellent. Not only was the design and layout great, but the sheer amount of patience required to wire up an entirely new keyboard assembly is huge. Very inspiring project!