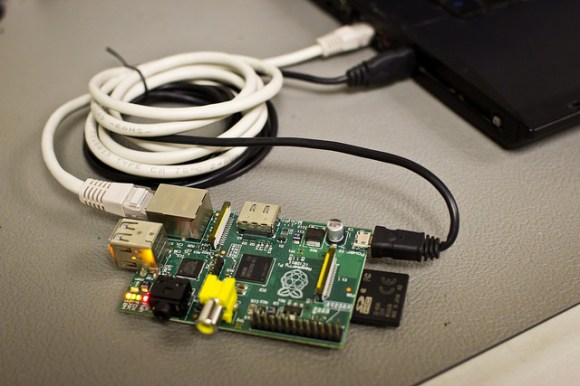
If you’re lacking useful equipment for your Raspberry Pi hacking adventure, such as an HDMI monitor or power supply, this handy write-up will show you how to continue your hacking. All you’ll need is a laptop, the Raspberry Pi itself, an SD card, and an Ethernet and micro-USB cable. As noted in the article, it’s not really recommended to power the ‘Pi off of USB only, so this could potentially be a source of problems.
This hack begins by installing Linux on an SD card per this setup page, then using a Virtual Network Computing [VNC] setup to work with your Raspberry Pi. There are a few steps in between being able to do this, like setting up network sharing, and sleuthing out the IP address of the new processor, but everything is explained in detail for Mac and Linux. Windows users will have to do a bit of “sleuthing” of their own, but if you have some more information on this process, we’d love to hear about it in the comments!


Huh? Nowhere does it say that the network cable is a crossover cable ? How can it work without using a crossover cable. Does the Pi auto reconfigure it’s NIC’s hardware to support a straight through cat-5/cat-6 cable ?
I can’t speak for the Pi, but most interfaces are auto MDI/MDI-X these days.
Thanks, I learned something new today. time to store away my crossover cables. Sounds like I’ll never need them again (until i do). :)
Thanks to your question, I’ve learned it too!
The laptops used are gigabit ethernet, so no need for crossover. The Pi is only 100Mbit and not auto MDI/MDI-X so if you use a laptop with a similar 100MBit interface, you’ll definitely need a crossover cable.
I’m not so sure.
I never really though about it, but I connect my Pi straight to my (very old, 100M) laptop via patch cable. It works just fine, so I guess even very old hardware has this auto MDI stuff?
Do you really need BOTH interfaces to be automdix, or only one?
You only one side to have auto mdix. It didn’t work for me with an ASUS EEE PC, so I assumed the RPi didn’t have it, but apparently, it does according to the chip spec…
Wow – I found the answer to my own question at wikipedia
http://en.wikipedia.org/wiki/Ethernet_crossover_cable
“Owing to the inclusion of Auto-MDIX capability, modern implementations of the Ethernet over twisted pair standards usually no longer require the use of crossover cables.”
Only one side needs to auto-sense, and I’m sure Jeremy was betting that the laptop you use would support this. I have no idea if the RPi has an auto-sensing nic.
The Pi end has it, so the laptop doesn’t need to.
“10/100Mb Ethernet (Auto-MDIX)”
http://elinux.org/RPi_Hardware
I believe some network hardware in today’s technology has the ability to “reconfigure” its port to use a patch cable as a crossover cable. I’ve noticed that a lot of laptops support this feature for the sake of on the go networking without routers.
There was a thread on this on the Raspberry Pi Forum:
http://www.raspberrypi.org/phpBB3/viewtopic.php?p=177584#p177584
The two variations are the sidekick mode:
http://raspberry-python.blogspot.com/2012/09/sidekick.html
and the sidecar-sidekick:
http://blog.kugelfish.com/2012/09/raspberry-pi-tethering.html
The above uses IPV6 too.
ssh -X is better than VNC, most of the time. It is faster (just run scribes or geany over VNC vs over ssh, you’ll see).
The sidekick article has some information for windows users, and the last part of the follow up sidekick article also has a section on moving files around with windows:
http://raspberry-python.blogspot.com/2012/09/sidekick-2.html
And of course it covers Unix, OS/X and Linux.
As to the original article, on Raspberry Pi v.2 boards (don’t do it on v1 or v1.1), you can power the Pi from the USB port instead of the microusb port, if that makes it easier (using an A/A male/male adapter instead of a cable, for example).
Having said that, USB ports on laptops are probably limited to 500mA. That is ok if you are not doing anything with the USB ports (like a webcam) or the GPIOs, but connect a servo or motor or a USB device, and the Pi will likely loose its network connection, while your program continues merrily doing its thing… It will appear to be frozen. You then have to power cycle it. It is best to use an external supply if you do GPIO hacking.
At PYPTUG workshops ( http://www.pyptug.org ) we tend to use the sidekick mode, but since we do Python code, another option is to use an RPi.GPIO faker library:
http://www.pyptug.org/2012/12/a-python-module-for-workshops.html
+1 for the X11 forwarding
SSH forwarding is WAY slower than VNC unless you have a low-latency, high bandwidth connection (like this). I tried X forwarding from my dorm to my parents’ home, and it had a 10-second delay on most everything I did. VNC was significantly faster.
What have you done to the site?! I feel like I should be sipping a latte adjusting my crotch because my skinny jeans are riding up. What happened to the beautiful underground look we used to have? Are we now corporately sponsored?
Haven’t been on HaD for a long time have you?
It’s only been about 2 months. WTF?
It’s not that bad, in that they mostly left it alone.
— Not a fan either. Biggest gripe is the “<> arrows …. Don’t know why that drives me nuts, but am I the only one?
Apparently I need to escape greater than symbols above… Post was supposed to be “– Not a fan either. Biggest gripe is the “<< Older Posts” at the bottom of the page being backwards…. Older/further into history should be on the right side of older/newer navigation paring and have >> arrows …. Don’t know why that drives me nuts, but am I the only one?”
I use this setup on my Mac all the time (except most of the time I power it off of my USB battery pack or my cellphone charger). I just share my WiFi to Ethernet via the control panel -> sharing and SSH to the little board. I’m mostly working outside of X so the terminal is my home. I’m working on the openFrameworks for RaspberryPi project (https://github.com/openFrameworks-RaspberryPi/openFrameworks) which is moving along quite nicely with openGLES2 support, audio playback, sound output, etc. I use a USB Digital Video Converter to grab the video and dump that input my notebook when I’m on the go to check the output of the display.
Sorry, but this really isn’t a hack. It’s using a headless Linux box as a headless Linux box. Just because it has the buzzphrase of “Raspberry Pi” doesn’t make it big, clever or new.
+1
+1
you’re new here… apparently SEO matters more than credibility… But some pearls slip through the hippstergram filters.
I’ve been doing this since I got my Pi. It woulden’t work properly with my TV, so I just installed tightVNC and fiddled the network settings on my PC. Personally, I thought this was pretty standard.
Wait, wait, wait. So you’re trying to say that this isn’t how most people work with the thing in the first place?
People seriously connect their Pi’s up to a full monitor and keyboard, rather than just controlling it remotely?
Yes. Some of us are still learning… Until 6 mo. ago, I had never SSH’d before. I am working my way into it, but unless you know the exact syntax the GUI can still be faster. I use putty and ssh over a network, but have never hooked mine up directly without a router in the middle.
This may not be a “hack” to some, but I still enjoy reading the article. Ones like this can still give people a new way to look at problems. Think of it more as a hacking tool.
I connect my Pi to a wireless router (via ethernet cable) and then use Putty to SSH into it from my laptop.
So I can login anywhere in the house or could even do it completely remotely.
My biggest problem ATM is my lack of an SD card reader.
I have a few tutorials on my Blog on the Raspberry Pi
http://hertaville.com/raspberry-pi/
Everything from setting up a Kubuntu Virtual Environment on your PC,
http://hertaville.com/2012/09/27/kubuntu-vmware-player/
How to setup the raspberry Pi and remotely access it via SSH and VNC
http://hertaville.com/2012/09/27/raspbian-raspberry-pi/
How to setup a Eclipse based development environment for the raspberry Pi (Cross-compilation) — a part 2 on remote debugging is coming soon
http://hertaville.com/2012/09/28/development-environment-raspberry-pi-cross-compiler/
and Finally accessing RPi’s GPIO using C++ (SYSFS)
http://hertaville.com/2012/11/18/introduction-to-accessing-the-raspberry-pis-gpio-in-c/
I hope you guys find these useful!
Thought this was going to be about hacking the rPi without underwear. Was disappointed.
+1 internets for you, good sir
1. Don’t ever power the pi off of your USB port. I know that they mention this here and in the article, but they did it anyway. Don’t do it! Use a minimum 1 amp power supply. Better yet, 2 amp, of decent quality.
2. Ping “raspberrypi”, which is the default hostname if you installed the suggested base distribution (as they did). No convoluted “MacGuyver” IP sleuthing, or whatever they think it is.
3. Use RDP instead of VNC. I like VNC, but RDP makes more sense for many users and Vinagre has support for it as well as VNC. “sudo apt-get install xrdp”. No Additional configuration or starting sessions. It just works aside for perhaps rebooting to easily start the service automatically. Windows clients have support for this out of the box, as do Ubuntu installs and most all distributions.
link is dead, that’s proper one: https://www.interlockroc.org/blog/raspberry-pi-macgyver.html