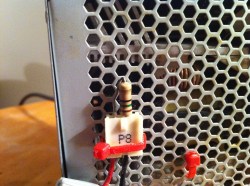
[Lee] wrote in to share the work he’s done in building a controller for his soldering iron. The idea started when he was working with an ATX power supply. He figured if it works as a makeshift bench supply perhaps he could use it as the source for an adjustable iron. To get around the built-in short-circuit protection he needed a potentiometer to limit the current while allowing for adjustments. His first circuit used a resistor salvaged from an AT supply and a trimpot from some computer speakers. That melted rather quickly as the pot was not power rated.
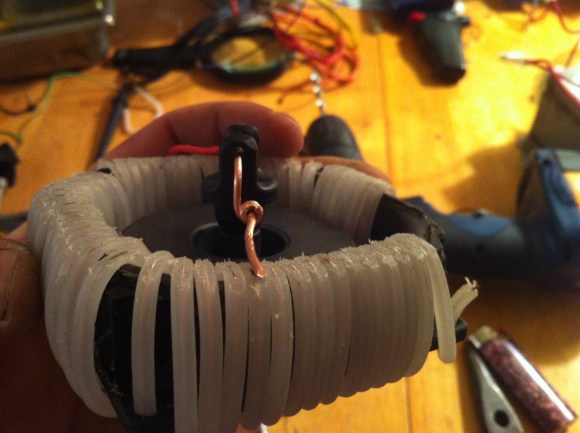
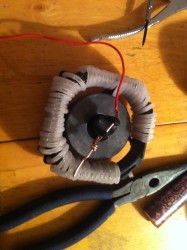
This is a picture of his next attempt. He built his own potentiometer. It uses the center conductor from some coaxial cable wrapped around the plastic frame of an old cooling fan. Once the wire was in place he sanded down the insulation on top to expose the conductor. The sweeper is a piece of solid core wire which pivots to connect to the coil in different places. It works, and so far he’s managed to adjust a 5V rail between 5A and 20A.
How would you make this system more robust? Short of buying a trimpot with a higher power rating, do you think this is the easy way to build a soldering iron controller? Let us know by leaving your thoughts in the comments.


More robust? How about just less terrifying?
Not every hack has to look pretty to work.
I think he means terrifying as in lethal, not ugly.
Well the potential in those wires is just 5V, it has nothing of scary. That sweeper though it could be improved.. Over 4 amps the contact between the sweeper and the coil must be fairly good otherwise the joint might start heating up..
I’m pretty new to all of this stuff so I’m probably just talking out of my ass, but why not use something like PWM or PID? Wouldn’t that be more efficient than just varying the resistance?
Yes, PWM/PID is way better. This is why most of the supercool superexpensive Weller soldering stations have it.
I don’t know why he didn’t go that route, since he’s using a computer PSU his max voltage is 12v and that’s a pretty simple circuit.
Yeah… I was like it seems almost too obvious to go that route, so there has to be a good reason that a newbie like me isn’t aware of lol.
Though, I think he should be capable of 24V if he uses -12V as ground.
Don’t use the -12v rail for this, it is only rated for about 300 mA. This depends on the atx power supply of course, but check it before hand, as frying the -12v line killed a PSU I previously used for a project.
On the PSU I own the -12V rail can handle *far* less current than the +12V rail (0.5 vs 12 amps), so this would limit the overall power a lot.
yeah, the one in mine is 700mA, but that’s fine for my purposes (powering an opamp or two)
But building a PID needs a working soldering iron… :P Maybe next revision?
Why not just buy a professional soldering iron? You get multiple types of tips, precise temperature control and safety.
If you must build it yourself, put a thermocouple near the tip (drill a hole from the rear of the tip, down the center line and epoxy it in), use that to control the power to the heater. You’ll need an amplifier and control circuit and a solid state relay. By the time you finish, the commercial version will look even more attractive.
A rheostat is the wrong way to do this.
You can buy Soldering iron handle for something like $10 and just provide power and PID.
You need feedback for PID. Most generic handles do not have a temp sensor. I suppose you could momentarily cut the power and measure the heaters resistance to determine temp.
While you need feedback for a proper PID system, you might be able to get by with open loop control.
Before I shelled out real money for my Hakko, I used an old adjustable iron that used a dimmer circuit. Had settings for 10, 20, and 30W, and it worked relatively well.
Consider the Soldering Iron Driver by Arhi. The design is open source, it works with many different models of irons, and you can get a PCB for $7 at Seeed.
http://dangerousprototypes.com/2012/10/22/soldering-iron-driver-v1-5-pcbs-are-available-at-seeed/
You can get a soldering iron handle with heating element, temp sensor, and tip from ebay for ~$10 delivered. Depending on the parts you have on hand, you can build a temperature controlled soldering iron for not too much. Works as well as my Haako 936, handles and tips are interchangeable.
I think the small resistor on the first picture is not in-line with the Pot.
It is a load for the 12V (i think) rail. It is needed, since PC-PSUs often have problems with unloaded supply rails.
What he wants to do is build an adjustable current source.
To do that from an ATX supply, he needs to change the supply’s original feedback circuit so it regulates the output current rather than the voltage. If you look at the supply schematic, you will see a voltage divider connected to the output voltage rail, which connects to a regulator IC. You need to change this circuit so the regulator IC measures the voltage across a low-value resistor, connected in SERIES with the output lead. This voltage will be proportional to the amount of current being drawn from the supply. You can then use this voltage as an input to the original regulator circuit, which will now act to keep a constant current flowing through that resistor. Next step is to find a place in the regulator circuit where you can input a voltage which represents the DESIRED current output. Add a small pot to adjust this reference voltage and the regulator circuit will increase or decrease the output current to match your reference input.
That’s the right way to build somehting like this: don’t try to adjust the high current, it’s expensive and failures will be dramatic. Adjust the reference and let the regulator do the work.
I’ve used a dimmer switch.
I dont know what kind of iron he has, but if it is just a generic resistive one that plugs into the wall you can use a variac. Simple and very handy to have around the shop.
FWIW, the term for the part of a variable resistor that contacts the element is a wiper, not a sweeper.
Like Phrewfuf says, the little resistor is probably just a load resistor to keep it alive. The red wire would be the +5v line, that is the one that usually needs to see a load. 5v into a 150ohm resistor is only .166 watts and that looks like about a half watt resistor.
Using a rheostat to adjust a soldering iron’s power, let alone making one out of wires scraping together, is exactly the approach I would take if I were attempting to demonstrate things you should never do. Fun hack for puttering around in the garage, sure, but not a useful approach.
Also, that coaxial conductor’s insulation will emit phosgene gas when it overheats and starts to decompose, which it certainly will when dissipating 75 watts. My honest opinion is that this is some kind of joke/troll by the Hackaday authors.
That does not look like teflon insulation, I think the stuff he has is polypropylene.
Teflon emits phosgene when it’s hot!? Thank gods nobody puts it on frying pans!
There have been cases of birds dying from decomposition of teflon at around 160C. But it really does not do anything till about 350C.
INstead of hacking a PSU, you could just use a regular household dimmer switch inline. Better yet, build a box that has a dimmer switch and an outlet so even your “single speed” Dremmel can become adjustable.
That wouldn’t work on this low-voltage soldering iron. Putting a dimmer in front of a PC PSU won’t do much helpful, it’ll still try putting out 12v and 5v as well as it can. And aren’t dimmers sort-of-PWM? I imagine that wouldn’t mix well with a SMPSU.
It works fine if you have either a) a soldering iron that is rated for line voltage or b) a transformer to convert from line voltage to whatever the iron expects.
Just buy a lamp dimmer. I did this and made a faceplate with 0 – 10 markings just for reference. http://www.dansworkshop.com/2013/01/soldering-iron-controller/
A few things to note about the dimmer approach before I get flamed. a) control is “precise enough” — I realize it’s not getting thermocouple precision. b) yes the dimmer can control a soldering iron, even though it’s not a light bulb. c) modern lamp dimmers have phase-angle switched triacs as a control method, not resistors that dissipate the excess
Cheap regulated soldering stations use this approach too. Since switching on sine phase angle wastes very little power, it’s possible to control a whole toaster reflow oven (obviously using adequately rated triacs). Don’t try to control inductive or capacitive loads though, because they really don’t like the chopped sine.
That’s exactly the aproach I have taken. I mounted my dimmer in a case with a power jack on the back to plug a normal, non temperature controled iron into. I bolted a soldering iron holder to the top of the case so I have a place to set it.
Sure, I don’t know the exact temperature of my iron but I don’t care. With just a little practice it is easy to know where to set the dial to solder normal sized components to a normal pcb. Then you can still turn it up if you are soldering someting larger that acts as a heat sink.
I have heard some people recommend against this before as the dimmer can generate RF which might interfere with the project you are working on. I haven’t really experienced this yet but if I do I have a simple solution… when testing… turn the iron off. Big deal!
Enamled wire set with epoxy would work better. Then carve out a pencil lead tip for the wiper. Follow the picture of a variable transformer by using household parts.
You can get a fully usable temperature regulated chinese iron on ebay for a few tens of dollars, please do that instead of building fire bombs :P
The build in this article would be a power regulated iron, they are fairly hard to use since the temperature varies with load. The iron will be too hot when soldering starts and too cold when finished.
That is: you just can use a light dimmer of 100 watts.
Ah, I always look forward to reading all the scathing criticism when a true hacker makes something work MacGyver-style. No, it’s not “safe,” and no, it’s not efficient, and no, it doesn’t work all that well, but darn-it, it DOES work.
In the end, that’s what most of us are here for — the blinking LED that says that mess of junk on your bench is doing what you wanted it to do.
Seriously? just look at it. Of course we’re going to bash it. Imagine trying to adjust that thing, what an intermittent pain it must be. Our time is worth more than that.. A reliable temperature regulated iron is a must-have tool.
i mean, if I had to solder MacGyver style, I’d probably just use a flame as a heatsource, either to heat up something metal with an insulated handle, or perhaps just applying the flame directly
you’ll probably vaporise the top layer of solder applying the flame directly.
However heating up a “poker” with a flame is how tinmen used to create soldered mechanical joints in pretty thick metal – If there’s a large mass of metal connected to the bit it’ll have a decent thermal inertia and so will hold a reasonably stable temperature for a minute or two working time. Just have a holder for heating a few up in a flame, and when the temperature begins to drop too much change iron. -“strike while the iron’s hot”
http://www.afrotechmods.com/cheap/iron/iron.htm
You and I think alike. Are you the same Liam as the one on Comics Curmudgeon?
Wtf, you could hack the pc psu to a variable psu by varying the voltage deviders in the switchmode circuit. Instead of building something like that :(
One could just insert potentiometer (regular, not so scary) to feedback circuit of ATX power supply instead of resistor, using this modification one could achieve regulating of output voltage, and, by Ohm law, power dissipation of soldering iron.
I see standing halogen lamps like the following:
http://www.walmart.com/ip/20690771?wmlspartner=wlpa&adid=22222222227000000000&wl0=&wl1=g&wl2=&wl3=21486607510&wl4=&wl5=pla&veh=sem
almost every week in the garbage.
I thought that the variable dimmer in the lamp could be repurposed to control something, like a soldering iron.
Ya just beat me to it eddie lol :)
Ikea dimmer switch for lamps. Simple rheostat incased in safe plastic that has AC plugs on either end. I think mine was $5.00. Used it as a speed control for a grinder that was fixed speed. ymmv with a soldering iron. Then again I end up using my lil $30 cheapo adjustable temp for most things. It does the jerb.
I’ve got a cheap $8 ‘adjustable’ soldering station. I once took it apart: the base has got a hefty iron weight to stop it from toppling over, and a circuit with half a dozen components with a TRIAC as the main switching element (so same thing as a dimmer switch).
If you want to do the same thing on 12V DC: just use PWM. A microcontroller with an analog input and a timer can be had for $1, a regular potentiometer is less than $1, mosfet that can switch 20A is $1 or $2, thats it,
or a 555 timer
Isn’t a 555 timer circuit a microcontroller with an analog input and a timer that can be had for $1? I know, not for the nerds that try to pass for geeks today it isn’t. I’m still waiting for the Arduino and Raspberry PI posts to pop up in this thread.
…. you could use an arduino!!!!
… or a rasberry pi!!!
… or a launchpad, which would be my first choice…… cheaper!!
It doesn’t seem like this should be enough resistance to work. I wonder if the output of the supply is somehow pulsing rather than DC and this acts like a variable inductor rather than a resistor.
or.. simpler solution. it’s just fake.
Couldn’t you use a LM317 to act as a variable regulated current source off the 5V rail?
show me an lm317 that can hold 5-20A…..
Here you go http://www.eleccircuit.com/wp-content/uploads/2007/08/20a_reg_voed.gif
Sorry, that’s just an awful cludge
For a simple hacked soldering iron you don’t need a constant current source. You can use a small potentiometer connected to the base of a decently sized transistor. Run it in linear mode, and you will have decent temperature control. Its simple, it works, and the parts are easy to salvage.
Grab a 115 or 230 volt soldering iron (depends on your location) and a light dimmer for good ol’ incandescent lightbulbs.
Sometimes the simpler solution IS the better one, even though initially it costs a little bit more.
rectification, mosfe,t pwm. quite simple and i bet you have most the stuff on hand;
How about a good old saturated reactor?
I think using uranium might create too much heat for a soldering iron.
Uranium? http://en.wikipedia.org/wiki/Saturable_reactor
Basically, a way to control a large alternating current by saturating an inductor around an iron core by using a relatively small direct current in a control winding.
What is the obsession in the hacker community with re-inventing the wheel, but squarer and vastly less reliable/safe/simple, especially when you can buy exactly what you want for a pittance from ebay or wherever. I’m not even sure you need a temperature controlled iron for blobbing a few LED’s onto an arduino or whatever rough through-hole work people are doing, you could use a screwdriver heated with a blowlamp for 99% of the stuff that these people are making. You’re not soldering 0201 SMT components on a nuclear warhead or anything.
Additionally, why do people get all antsy when those who know what they’re doing point out that this is not the way to do it, and start going on about how McGuyver it is… yeah, but you’re not building a soldering iron in a barn surrounded by terrorists with nothing else available, you’re making a dumb kludge, without thinking, whilst sitting next to a PC with access to Google to find out how you should do it, eBay to buy something that just works for $10, and probably surrounded by enough other stuff to do the job far better if only you engaged your damn brain.
There is always a better way to accomplish personal projects. One can always do something cheaper or more effectively or more elegantly. Comments on hackaday often point out many of these improvements, and that’s very positive.
The “obsession” isn’t with reinvention, it’s with accomplishing a task with available tools and materials. Most people don’t learn by typing their credit card info into ebay, they learn by actually doing stuff — the goal here is to learn what’s possible, not to make a particularly reliable, safe or simple soldering iron.
Interestingly, it is entirely possible to suggest improvements to an obvious kludge job without making condescending comments disparaging the impressively widespread Arduino platform and anybody who touches them. Perhaps the world would be a better place if only those who “know what they’re doing” touch electronics. Maybe we’d all benefit if nobody used a microcontroller when there’s a perfectly good analog circuit to do the same job cheaper and faster.
Then again, maybe a growing community of hackers that understand an increasingly complex subset of electronics isn’t so bad. Some of these people will focus on elegant designs, and some will challenge themselves to make cheap firestarters out of sanded wire wrapped around a fan — you get all kinds in a broad community!
I get that you feel the need to insult a circuit you could personally design in 2 minutes on the toilet, for a tenth the cost, and using actual safety standards. That’s fair, but I’m confused about what you’re doing reading hackaday.
Forget the obligatory HAD trolls. Nice job [Lee]!!