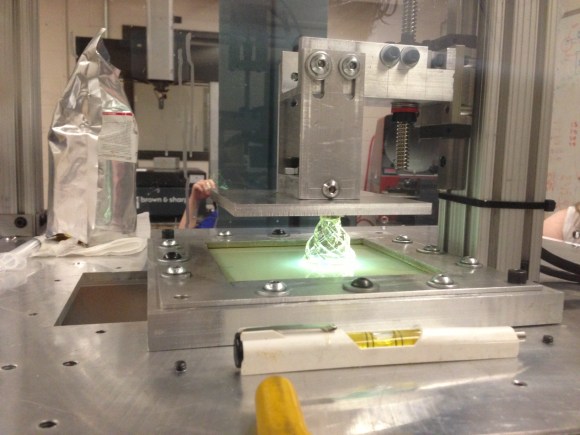
[Rachel Levine] was one of the mechanical engineers on the team at the Rochester Institute of Technology who built this resin-based 3D printer. She wrote in to show off the fantastic work they’ve been doing. Their project website is daunting to take in at first, which shouldn’t be all that surprising since the concepts used here are fairly advanced. But give yourself a few minutes of blind clicking and you’ll begin to grasp the scope of this fantastic piece of engineering. The bad news is you’re not going to whip the thing together in a weekend. The good news is that if you’re determined to build one this should give you the lion’s share of the background you’ll need to make it happen.
The rig pulls a printed object up from the ooze on the build platform. They’re using resin that is cured with visible light. That’s why you see the level in the foreground; the bath needs to be a uniformed thickness so that it solidifies correctly when the light hits it from the underside. The build table is made of glass sandwiched between gaskets where it comes in contact with the frame, keeping the liquid in place while letting the DLP projector shine through. Check out the fast-motion build video after the break to see how each layer is exposed to light, then pulled upward to make room for the next. We estimate the build was around two hours of real-time and you can see that a technician replaces the extracted resin at regular intervals during the process.
DLP Projector based printers have been gaining in popularity. Check out this roundup of several offerings from last year.


I don’t have time to read this this morning, so I’ll just ask; isn’t getting/making the resin for a reasonable price still the primary obstacle to this method on a hobbyist? If that weren’t an issue, oh man…
I mean, hell, I have what I’d need to make the printer RIGHT NOW, even the projector!
*on a hobbyist scale
Blurgh. Need caffeine…or sleep.
Yes. But not if you buy raw materials in 55 gallon drums and custom formulate yourself.
If you happen to live in the EU, try: http://spotamaterials.com/
Getting resin is pretty easy, but yes, it is expensive so that’s a barrier. The cheapest stuff smells terrible and is high-VOC, which isn’t very good for you.
We tried some resin from bucktown and you are right, terrible smell and high viscosity. The Hexanediol Diacrylate/phenylbis mix we used hardly smelled in comparison. We wanted to try some resins from Spot materials too but ran out of time
If you are in the USA try http://buy3dink.com/p/59/uv-resin
This technology is awesome, but the price of entry is still beyond practical use for the hobbyist. Specifically, the current price of projectors and resin.
I’m curious as to why they say the printer has a low resolution when the testing data seems to say it has a layer height of only 63 microns, nearly twice as good as the makerbot 2.
Please don’t use the Makerbot as a measure of precision. Their marketing is fantastic, the printers… eh, they’re ok.
I’m 6′ 3″ tall and used to work with a man that was less than 5′ tall. Comparing our height sets no standard,nether does comparing anything to the makerbot sets the maker bot the standard. While I can’t attest to the accuracy of the comparison, it was just a comparison, nothing more.
Why is comparions to layer height even a thing? Pretty much all extruded plastic printers with 0.4mm nozzles can pull off between 270 to 60 micron printing reasonably.
People act like it’s a set number that can’t be adjusted.
HC: I imagine it is their process, or perhaps it is the anti-stick coating diffusing the curing light. As for cost — this seems entirely practical. I bought a linear stage w/ stepper for $150. Add some resin, a projector, and some electronics and you’re done. I can’t imagine it costing over 1k.
I agree. To me this looks like it could be a really easy, really cheap build. Maybe minus the resin, though. The interesting part to me would be that you’d have to figure out how to light-isolate the build area all while being able to see what you’re doing there.
While we had a amber tinted glass protecting the resin, in the end is was unnecessary for the Hexanediol Diacrylate/phenylbis mix we used because the light of the room was not intense enough to cause any significant reaction (at least this is what we found from testing with the door open and leaving resin out)
Is that a disembodied hand in the background?
That was my first thought as well…
Things day job. The Addams are in hard times.
Assuming this actually took 2 hours, and the video is (as shown in the corner) running at 2000x its original speed, the video should only be 1.8 seconds long.
The video overlay says 2000X, but the video description text says 2000%, or 20X. Which is correct?
Build took around 1.5-2 hours. With our settings it took 3 seconds to cure. The up/down motion is what took the majority of the time.
I don’t understand how they got that high XY resolution with such a low resolution projector.
Because the majority of my needs generally require metal or wood, I just can’t get that enthused over 3D printing of plastic. In that that’s subject to change, is why I read articles on the technology. The strength of the printed items depends on the adhesion between the layers of construction material I wonder if there’s a big difference in the mater selected. While it’s not relative to the subject I was presented an ad the has ties to here in Kansas, about Kansas politics. Most likely one that would be prohibited, if the legislation the ad addresses was about passes, in Topeka.
Uhh, what?
Working with metal, huh? How about something like this: http://opensourceecology.org/wiki/CNC_Torch_Table
Costs upwards of $2000 US, but I see how it could drastically be brought down to something much more manageable, perhaps $1000 or less.
They counted a crappy Linux desktop with a parallel port as $300, and went much higher spec on other parts. Buying used would also bring cost down.
uv curing low melt point materials similar to jewelers wax is where i see the most appeal. To turn “i made a flimsy little plastic something” into “I made a wax positive and turned it into a metal object” is a nice point to reach.
Natural PLA has a nice and clean burnoff. You can cast a piece printed in that, and then bake the plaster mold. There are a few reprappers doing just that.
Source: Josef Prusa on IRC
Did you waterjet the machine’s frame?