This Maglite Is A BB Gun

Maglite BB Gun

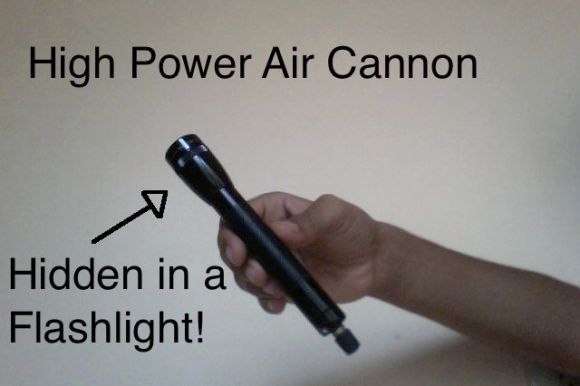
This innocent looking Maglite houses a piston and barrel, making it into a functional pneumatic BB gun. A Maglite was chosen due to its high durability, and easy access to the internals. A schrader valve sticks out of the battery cap, which allows the gun to be charged using a standard fitting. A brass tube is used as the barrel, and a piston controls firing.

Firing the gun is simple. First, the whole thing is charged up to the desired pressure. Then the ammunition is inserted into the barrel. At this point, the rubber piston is held against the end of the barrel by the pressure in the gun. By pushing the pin of the valve in, the piston is able to move back slightly. This acts as the trigger, and causes air to rush into the barrel, firing the BB.

The results are fairly impressive. Using a chronograph, the speed of the BB was measured at 850 feet per second. Using the Gas Gun Design Tool simulator, it was estimated that the gun could fire at over 1000 feet per second, and maybe even break the sound barrier.

A Real Thermal Imaging Camera For $300

If you want to check your house for hot air leaks, take pictures of the heat coming off a rack of equipment, or just chase the most dangerous animal, [Arnie], through the jungles of central america, a thermal imaging camera is your friend. These devices normally cost a few thousand dollars, but the team behind the Mu Thermal Camera managed to get the price down to about $300.

The basic idea behind the Mu Thermal Camera is overlaying the output of an infrared thermopile – basically, an infrared camera – on top of the video feed of a smart phone’s camera. This is an approach we’ve seen before and something that has even been turned into a successful Kickstarter. These previous incarnations suffered from terrible resolution, though; just 16×4 pixels for the infrared camera. The Mu thermal camera, on the other hand, has 160×120 pixels of resolution. That’s the same resolution as this $2500 Fluke IR camera. After the indiegogo campaign is over, the Mu camera will eventually sell for $325.

We have no idea how the folks behind the Mu camera were able to create a thermal imaging with such exceptional resolution at this price point. The good news is the team will be open sourcing the Mu camera after their indiegogo run is over. W’e’d love to see those docs now, if only to figure out how a thousand dollars of infrared sensor is crammed into a $300 device.

Beautiful Replica Team Fortress 2 Weapons

gun

We’ve seen our share of replica props, but [Nathan]’s replica of the spy’s sidearm from Team Fortress 2 is the bee’s knees.

The build began as an off-the-shelf Airsoft gun. After removing the barrel and cylinder, [Nathan] used Apoxie Sculpt and a whole lot of sanding to turn a stock piece of metal and plastic into something that came straight from the Mann Co. store. The in-game version of the Ambassador also includes an engraving of the object of the spy’s affection, replicated by [Nathan] with some very careful Dremel work. Once the prop was done, [Nathan] built a mold box out of plywood and filled it with silicone rubber. This allowed him to make several castings of his prop weapon

This isn’t [Nathan]’s only TF2 replica prop; he also made a replica of the stock sniper gun and scout’s scattergun and a megaphone from Borderlands. In an effort to out do himself, [Nathan] is gearing to build a gun that fires two hundred-dollar, custom-tooled cartridges at ten thousand rounds per minute. He has yet to craft any hats.

Dynamic Bicycle Headlight Uses The Open Road As A Display

This thing is so cool it almost looks fake. But [Matt Richardson] isn’t a hoaxster. He actually built what might be called a heads-down display for your bicycle. He refers to it as a headlight because it borrows a similar function. It mounts on the handlebars and shoots light off the front of the bike. But it’s more than just a battery and a bulb, this uses a pico-projector to give that light some meaning. In the video after the break he shows it off on the streets of NYC.

So far he’s only displaying information that has to do with the speed of travel, but the proof is there just waiting for a brilliant new use. Feeding the projector is a Raspberry Pi board. For this prototype [Matt] mounted it, along with the portable cellphone charger which plays the role of the power source, on a hunk of hardboard strapped inside the bike frame.

If you’re thinking of doing this one yourself beware of the BOM price tag. That projector he’s using runs upwards of $400. We wonder if you could hack together a rudimentary replacement with an old cellphone screen and this diy film projector?

Continue reading “Dynamic Bicycle Headlight Uses The Open Road As A Display”

POV Pong Game Uses All Kinds Of Smart Design

pov-pong-game-uses-smart-design

This little device lets you play some head-to-head pong using a spinning LED display. We’re really in love with the design. You get a pretty good idea of the Persistence of Vision aspect of the build by looking at this picture. But hearing [Dennis] explain the entire design in the video after the break has us really loving its features.

He’s using the head from a VCR as the spinning motor. The display itself uses a vertical row of LEDs with a bit of wax paper as a diffuser. These are current limited by a 1k resistor for each of the eight pixels. They’re driven by a PIC 16F690 but you may have already noticed that there’s no battery on the spinning part of the board. It gets voltage and ground from a pair of brushes which he fabricated himself. To avoid having to do the same thing to map the control buttons in the base to the spinning board he came up with something special. There’s a downward facing phototransisor which registers LED signals from the base to move the paddles up or down.

If you love this project check out the POV Death Star.

Continue reading “POV Pong Game Uses All Kinds Of Smart Design”

Print Your Own Adjustable Lenses

[Christopher] is really going the distance with his liquid-filled 3D printed lens project. The idea is to create a bladder out of two pieces of clear plastic. It can then be filled with liquid at a variable level of pressure to curve the plastic and create an adjustable lens. He was inspired by the TED talk (which we swear we already covered but couldn’t find the post) given by [Josh Silver] on adjustable eyeglass lenses.

Don’t miss the video after the break. [Christopher] shows off the assembly process for one lens. Two 3D printed frames are pressure fit together to hold one piece of plastic wrap. Two of those assemblies are then joined with JB weld and some 3D printed clips that help to hold it. A piece of shrink tubing is used as a hose to connect a syringe to the bladder. By filling the lens assembly with water he’s able to adjust how it refracts light.

Continue reading “Print Your Own Adjustable Lenses”

Everything You Need To Build A Light-cured Resin 3D Printer

dlp-projector-resin-printer

[Rachel Levine] was one of the mechanical engineers on the team at the Rochester Institute of Technology who built this resin-based 3D printer. She wrote in to show off the fantastic work they’ve been doing. Their project website is daunting to take in at first, which shouldn’t be all that surprising since the concepts used here are fairly advanced. But give yourself a few minutes of blind clicking and you’ll begin to grasp the scope of this fantastic piece of engineering. The bad news is you’re not going to whip the thing together in a weekend. The good news is that if you’re determined to build one this should give you the lion’s share of the background you’ll need to make it happen.

The rig pulls a printed object up from the ooze on the build platform. They’re using resin that is cured with visible light. That’s why you see the level in the foreground; the bath needs to be a uniformed thickness so that it solidifies correctly when the light hits it from the underside. The build table is made of glass sandwiched between gaskets where it comes in contact with the frame, keeping the liquid in place while letting the DLP projector shine through. Check out the fast-motion build video after the break to see how each layer is exposed to light, then pulled upward to make room for the next. We estimate the build was around two hours of real-time and you can see that a technician replaces the extracted resin at regular intervals during the process.

DLP Projector based printers have been gaining in popularity. Check out this roundup of several offerings from last year.

Continue reading “Everything You Need To Build A Light-cured Resin 3D Printer”