We were skeptical about Keurig machines when we first heard about them. Although we still scoff at the added waste of throwing away a plastic container of used grounds for each cup of coffee made, we tried one at the in-laws and it does brew a great cup of Joe. One of the draws of the machine is that it does it pretty much automatically as long as you fill it with water first. [Joseph Collins] is even taking the work out of that by adding a water supply line to his Keurig.
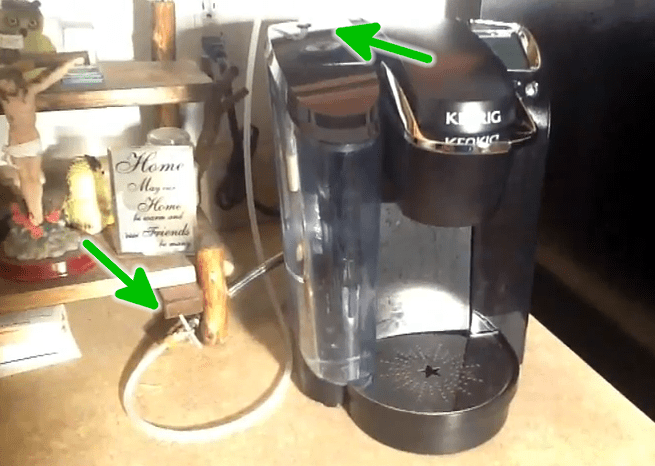
His coffee maker sits right next to the fridge, which has its own water supply. So one day he thought, why not run a line to the coffee maker as well? As far as plumbing projects go it’s very simple. He pulled out the refrigerator and added a T-fitting to split the water supply line. From there he ran an extension next to the coffee maker that terminates with a valve being pointed to by the arrow in the lower left. The plastic supply line leaving the valve passes through a rubber grommet in the lid of the water reservoir pointed to by the other arrow.
[Joseph] figures the whole project came in at under $30 and shows how he did it in the clip after the break.


Neat! Now he just needs a food-grade solenoid valve and a capacitive sensor to make it automatically refill :D
Just what I was going to say. Just add micro of choice and automate.
Arduino. First!
Why the micro? My Keurig already has a LED to indicate it needs water added, Just use that to trigger the water solenoid.
Sure, but what will you use to make it stop filling the tank up with water?
well said led would probably turn off when enough water is added, only concern i can see with using it is the sound, if it is a digital zero one scenario it would probably turn off and on at a relatively high frequency, depending on flow rate.
Float valve, done.
see my comment below:
http://hackaday.com/2013/04/25/run-a-water-supply-line-to-your-coffee-maker/comment-page-1/#comment-2314811
Ditto. And I bet a micro-controller could piggyback off of the existing “add water” sensor.
The sensor in that Keurig relies on a magnet inside a float in the reservoir. There’s probably enough gap between the tank and the machine to tape on a deadbugged SMT Hall effect sensor, so you don’t need to even open the machine. Or use a photodiode to watch for the blinking blue LED from the back of the tank.
Microcontroller? Hall effect sensor? Photodiode??? Why not just solder a wire to where the led goes…
Because those kids take over complication to a whole new level these days.
Agreed, why do we need a micro? We already have a control signal, no processing required…. Maybe a transistor to drive a solenoid, but that’d be about it…
That would void the warranty.
Just using the add water LED to drive the solenoid would only add a small bit of water to the reservoir (enough to make the sensor turn off). What you really want to do, is to use the add water sensor to start adding water, and stop adding water when the reservoir is almost full. So you need some kind of “full” sensor to shut off the water. Or you could use a timer, but that’s less accurate. And if eithe rone of them fails, you would want some kind of safety shutoff, so you don’t come home and find your kitchen turned into a wading pool…
How about you measure the flowrate of the water, and then toss in a timer so that the solenoid is only open for that amount of time?
Why? just find one of the float valves from a chilled water option in a commercial fridge. 100% automatic even if power goes out. Why use an electronic setup when a mechanical setup is always far superior.
yeah, i LOVE my mechanical calculator
Been there. Done that
http://www.amazon.com/gp/product/B007N0DN3Q/ref=oh_details_o06_s00_i00?ie=UTF8&psc=1
http://www.amazon.com/gp/product/B008BXED3I/ref=oh_details_o07_s00_i00?ie=UTF8&psc=1
Plus a 12 volt wall wart.
Everything else exactly as shown
I created an automated refilling solution using 1/4″ Ice maker water line , a couple of 1/4″ solenoids, and some eTape 8″ sensors. Take a look here: https://www.circuitlab.com/circuit/98v68x/flowcontroller/ and the source code is here: https://github.com/Lcstyle/waterFlow_controller
It’s a bit of overkill with the eTape sensor, since really all you need is an on/ off valve, but the solution is automated. I prefer my approach because I’d rather have the reservoir refilled when the water level reaches the bottom of the reservoir rather than refilling the reservoir every time the level drops after a single cup of coffee. With the eTape, you decide how empty or how full the reservoir gets every time. I also designed some fail safes into the system. For example, using an inline flow meter, I am able to set a hard max for how much water should actually flow. By knowing the capacity of the reservoir you are trying to fill, and using the flow meter to measure how much water has flowed, you are able to add hard outer limits to the sometimes finicky eTape readings. If any measurement is off, the logic goes into an error loop to prevent any flooding. Of course, as a third level of flood protection, you could add a water flood sensor, but my solution works and I’ve never flooded anything during actual production runtime (did have some controlled floods a few times during my testing and development phase).
Part of my research was also how to refill a gravity fed humidifier reservoir, turns out you have to pull a vacuum on the reservoir before starting the fill or you just overflow the ultrasonic transducer’s “well”. See the adafruit thread linked to in the github project’s description page for details.
Hope this helps, enjoy.
Your two links are no good. Really like your idea and wold like to see the write up since I’m not familiar with the solenoid and sensor hook ups.
Oh man, I know of four houses and 5 floors of an apartment that have been heavily damaged by trouble with water lines like these. (Leaks, failed valves, always seemingly during vacation.) Anything that’s plugged to the city water supply should have some failsafe redundancy in it. I’d probably split it off the kitchen sink’s spray hose so that had that extra valve there. (The downside is it would only fill when the kitchen sink faucet was open.)
(I admit I only skimmed the video. It’s super long, but at least plumbed it properly instead of using a saddle valve. I’m probably needlessly paranoid.)
LeakFrogs are your friend. Your cheap loud annoying friend.
I wouldn’t tap into the sprayer. Then you might as well just fill it manually. Tap into the the water line, have a float as mentioned by another commenter and add an overflow hose leading to the drain line so you are covered if the float ever malfunctions.
Absolutely. A fill line with no overflow drain is just a disaster that hasn’t happened yet.
Arduino + flow meter + solenoid valve. Too much flow = leak = turn off water + send alert.
It needs a float valve. http://www.bulkreefsupply.com/reverse-osmosis-float-valve.html
float valve seems perfect because then anybody with an idea of how to setup basic plumbing can do this and it’s more cost effective
Or keep the unit close enough to sink you can reach the sprayer hose in and refill from there…
I do like this a lot though. When ours does kick the bucket, we’ll be getting an electric kettle to replace it (we use it mostly just for quick hot water source for tea, oatmeal, etc).
I want to do something similar, but I want to T it off after the filter, might as well get filtered water in that beast.
simple flasher just like in toilet should do all work with automatic refilling.
I did the same, but tapped into the filtered water on my refrigerator. I bought a refrigerator door water solenoid and hose and simply put a 120v switch inside an enclosure to power it. I was going to try to tap into the sensor inside, but the case proved too much work to mess with. I’ve been happy just flipping the switch to fill every few brews.
Not sure if this will share but:
https://www.facebook.com/photo.php?v=10103167191564531
I want someone to hook mine up like that.
I want to tap into my post-filtered water from my fridge like you did.
Question concerning the solenoid…. are you using it as a fancy on/off switch, or is this a solenoid pump?
I’m curious because I don’t know if the ambient pressure of post-filtered water is high enough to push water to the coffee maker.
How is this any different than installing a water filter system with a simple T connector? Or running a hose from a different faucet? Or running a water line to a refrigerator? This hack is quite trivial, I don’t even understand why it requires 15 minute of instructions. Clearly I am missing something, or expecting an average Hackaday user to know basic plumbing.
Not just you brother.
Keuirg and similar only produce passable coffee IMHO, if you really want good coffe it has to be bean to cup… and of course bean to cup, much less waste (I HATE waste) all your doing is throwing out coffee grounds and the bag the beans came in..
I have been thinking of doing this kind of mod to my bean-to-cup machine, I drink so much I empty the water reservoir very quickly!
First of all Im sorry if my english isnt that good, Im no native speaker. Now my thoughts and concerns:
Instead of placing a supply line through my whole ktichen Id rather take that tank, pour out the remaining water in the sink, clean it and fill it up manually. That takes only about half a minute, there is no danger of a little flooding in your kitchen (guess what your insurance says if you tell them you had a leakage in the supply line you built yourself) and the best part: you have fresh water. The way he does, a small part of the water inside his tank gets old and there are germs spreading inside the tank.
As far as I know, the water tank is the most unhygienic part of those coffee machines.
He certainly did a nice job, but I think under those circumstances he should think about removing the water supply and go back to the old school manually way ;-)
“Although we still scoff at the added waste of throwing away a plastic container of used grounds for each cup of coffee made, ”
They do make user refillable containers….
One thing about those little plastic cups that makes the whole idea a no-go for me… plastic+heat+water=BPA+water.
A shame, too, because there are some very good Keurig coffees… But I drink tea now.
All of the Keurig machines and K-cups are BPA free. They have tea K-cups too.
Bad coffee with less effort! America!
you know there’s a “hack” to allow you to not rely on disposable cups right? Uses whatever canned or freshly ground beans you want. No more waste than a standard pot. Not as tasty as a good french press/hot water type setup but less hassle when youre in a hurry.
5 dollar float valve and a drill bit. nuff’ said
I’m surprised………..
no one else saw the real hack in this post….
his left hand!
It is terrible that the old K-cups made so much waste. I am glad I waited for the Vue to come-out and I make sure to recycle each cup I use.
Even better, replace the water pump in the machine with a metered ice machine water valve and bingo, no tank of standing water going rancid. There are complete diagrams available online detailing how these machines work. Bonus points for routing the overflow hose over to the sink.
have you ever seen the inside of the tank that holds the permanent water? There is bacteria and mold inside the tank. check it out…http://eatlocalgrown.com/article/13707-kicked-my-keurig-to-the-curb.html?fb_ref=elgSbr
LOL no there’s not. The internal tank is held at 187-195 degrees, depending on the model and set preferences. That is hot enough to keep the water in the tank sterile. Contrary to popular belief, water does not need to be “boiled” to sterilize, it needs to hit 185. “Boiling” is just the most commonly accepted indicator of temperature. That article was written by some whacko who is probably an anti-vaxor with no qualms about turning her walking health hazards loose in public schools. I betcha she also crusades against GMO wheat and cow hormones.
Keurig makes a direct waterlone plumbed in option on the B130 and the K130. Why not just buty the right machine in the first place?
Instead of wasting 30 dollars on plumbing supplies, and destroying the lid to the coffee pot, wouldn’t it be easier to buy a 3 dollar pitcher?
After all its only a tank that holds 3 or 4 cups of water.
i did it.. thanks for sharing video
Being an instrument tech, I know the bells and whistles that can turn something simple into a nightmare when they fail and I have to call Servicemaster when I get home from work. I ran mine from my under sink carbon filter, up behind the backsplash and mounted a Swagelok fitting and stainless bracket gizmos with a ball valve to the wall. Came out of the valve with one of their SS flex tubes thru the grommet into the tank. Will fit any coffee maker from now on and never fail without my presence. Tank refills in 30 secs. or less while I’m waiting with super quality water. Not automatic, just Japanese reliable.
Micro float valve shuts the water off when full. No electronic parts needed.
Micro float valve works like a charm
I was hoping somebody tried taking it apart and direct feeding it into where the removable water tank feeds the water into the machine. There must be some kind of internal value that stops the flow from the tank, then somehow bypass the low water sensor.
Keurig k150p just hook up water line and plug it in and your all set