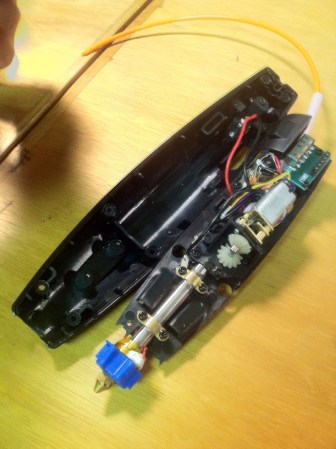
Remember the Kickstarter for the 3Doodler? Well they have just started shipping, and a hackerspace called Open Garage in Belgium just got theirs! Like any good hackerspace after playing with it they took it apart and posted pictures.
This is great because in our original coverage on the 3Doodler, we wondered what it looked on the inside, and whether it could be adapted to use with a CNC machine to make a giant 3D printer. Garage Lab delivered on both.
Stick around after the break to see the innards, and the first test print using a CNC mill!

Nothing too surprising on the inside, but as [Anthony] notes on their blog, it comes with 3 external contacts that are not yet documented. Upon further investigation, one is a ground, and the other two control the fast and slow settings of the extrusion — but with a 3 second delay.
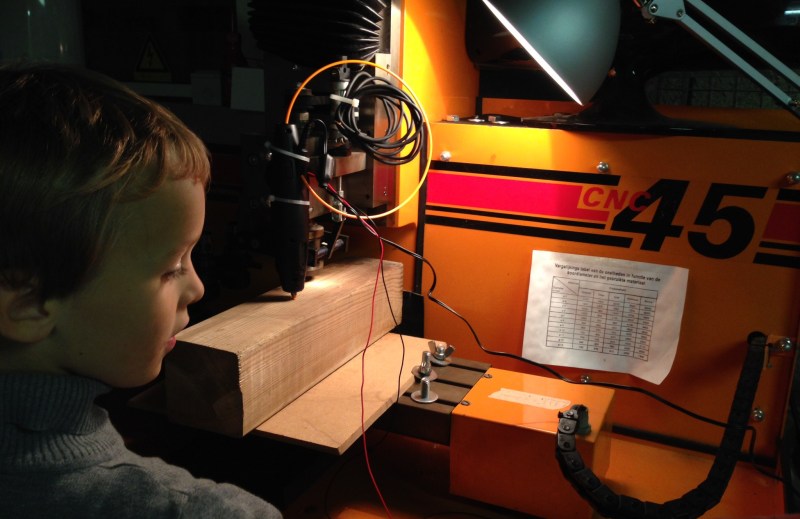
Satisfied with the tear down, they did the next most logical thing — they zip-tied it to their resident CNC mill and attempted 3D printing! They only made it one layer so far, but it’s a good start.
http://www.youtube.com/watch?v=UnA73HvsnbI
The funny thing is, we’re in Germany right now and will be travelling to Belgium tomorrow, but unfortunately we won’t have time to check out the Garage Lab in person. For those of you wondering what we’re talking about, Hack a Day is midway through a tour of western Europe, visiting and profiling hackerspaces! Read all about it here.


So let me get this straight , buy a pen based extruder, who’s purpose is scratch work in 3d space. Then mount it to a robot? Makes no sense. That being said i am quite curious about how it preforms as intended.
It’s a self-contained plastic extruder, making converting an existing CNC machine to a 3D printer super simple.
Seems like a good idea to me
agreed!
the thing is that there are cheaper, and better ways to do this, i am not saying that it isn’t a hack, i am saying it is defeating the purpose of the thing. The way i look at this is that the product a extruder and made it work in hand, and it gave up a lot to do so, now you are making all of the consessions that they made. Build a purpose built extruder for cnc it will be better
A typical hotend without motor, heater, thermistor, and control circuitry can cost at least $60. Considering they’re offering a complete solution for only $100 seems pretty cheap
Isnt that the hole point of hacking though. You take something and make it do something that it wasnt designed/intended to do. I fail to see why you dont get the point as to why you would do this. You are visiting hack a day after all ;)
I agree, but the thing is the product was a hack originally, take something that requires a CNC and building into a handheld device. So effectively this is undoing a hack. i know it is still a hack, but still it is pointless.
Congrats Anthony getting on hackaday with Open Garage w00t w00t!
@camerin it makes a lot of sense the doodler is just a portable extruder as seen on most open source 3d printers (hence I thought the non-sence part for me was the creators being able to patent the 3doodler …). If you have a 3doodler and get tired of drawing all night long to create something. You could attach it to a solidoodle or other cheapo homebuilt cnc if you have that lying around… It’ll be slower and less precise as a modern extruder but it will work as shown and it’s your first step to a proper 3d printer…
Incidently that huge cnc was broken and donated (electronics broken but not the stepper controllers). It was revived using a simple arduino and the grbl firmware https://github.com/grbl/grbl/wiki
I understand you’ll be visiting Void Warranties? We’re just 1km away from them. Maybe I’ll drop by (unfortunately without 3Doodler) to have a little chat.
Dunno about the pins being totally undocumented, or the need to ziptie it to their CNC, they mention adding those things (and a silicone tip) in one of their updates: http://www.kickstarter.com/projects/1351910088/3doodler-the-worlds-first-3d-printing-pen/posts/608370
Sweet! Hook it up to the PVCNC machine featured in http://hackaday.com/2013/10/17/unorthodox-home-made-cnc-machine and have a sub-$500 3D printer.
The processor is an 80C51. The number is N79E8132AS16. You can find the data sheet on the Nuvoton site. Short link . I found it by looking through the processor families on the web site looking for N79 prefixes (usually the first few digits / number define the “family”) and SOP/SOIC packages.
Even with not very high quality this tool can be used to print a parts in common shapes with small additional thickness, which later can be milled, like here – http://youtu.be/l5n-jm8L22k . This can make CNC milling tools more effective with less material wasting.
I haven’t looked at their info, ( I’m slack)
but what is the duty cycle of this thing?
The opened case pic looks like it’s not built for more than (as marketed ? )
hand held usage with only intermittent heating.
I agree that taking one thing and using it for another is a hallmark of the maker movement, and I congratulate Open Garage on taking that step. This reminds me of the evolution of the Plasma CAM (machine controlling a handheld tool for precise cuts), in reverse.
One thing necessary for a good conversion from handheld to fixed, however, is to breakout speed control on the pen, even if it’s to PWM a DC motor. One of the key factors that separated good from great 3d printers is the ability to slow down, and even reverse, the filament feed. Reading their page, it seems like this is their next step, so it looks to be an awesome conversion.
I’m looking forward to getting mine, in part to use as a much better hot glue gun in terms of repairing cracked plastic cases and/or weld assembling more complex prints.
BTW here is a good concept for improving filament driver with worm gear – http://3dprintingindustry.com/2013/08/08/werner-berrys-worm-gear-extruder-concept/
Still waiting mine :/
3Doodler is great parts to excellent value
hi everyone!
I am doing a project with 3doodler and i need to read intenal signals from the 3doodler in order to execute a program C++ based. For example i need to read when the blue color led turns on in order to start to move my robot, and then begin the print (i think that i can controll the pen with 3 small holes)…. Anyone can help me please? thank you!!