
In the continuing battle against 3D printers used exclusively for fabricating plastic octopodes and useless trinkets, here’s yet another installment of a Making A Thing tutorial. If you’ve ever wanted to make one single object in multiple 3D design softwares, this is for you.
Previously, we’ve built a ‘thing’ in a few different 3D modeling programs, including:
See that ‘Read more…’ link below? You might want to click that.
Our Thing
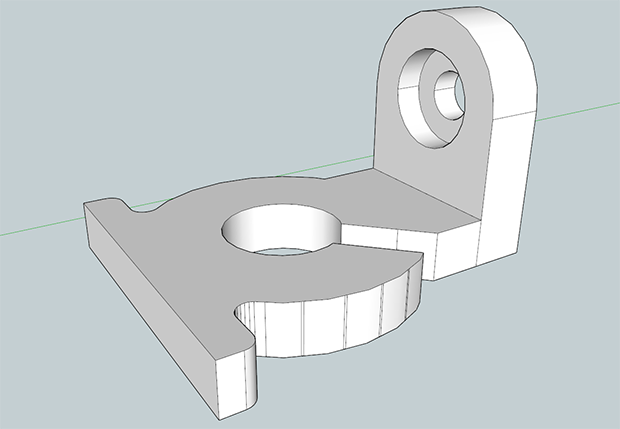
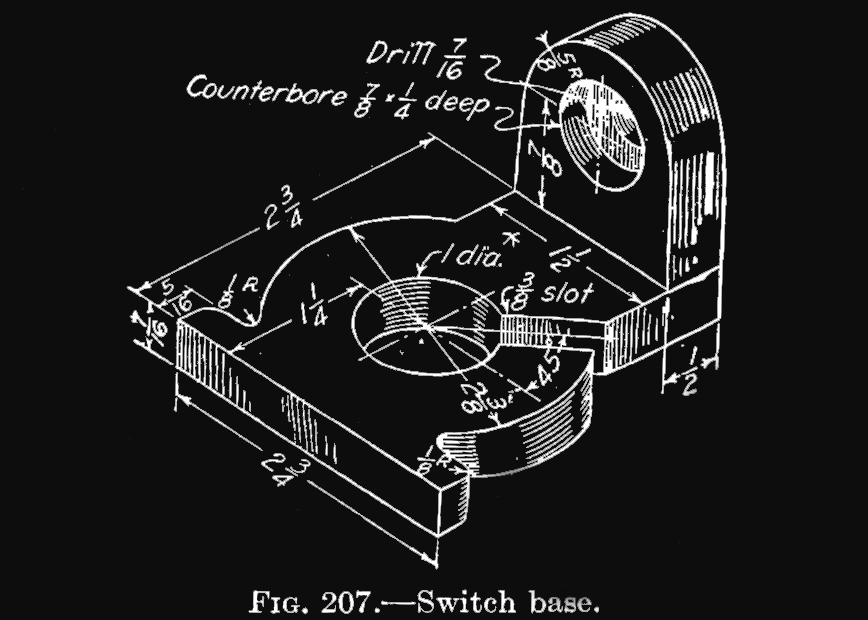 Like all of these Making A Thing tutorials, we’re using this switch base, torn from the pages of an 85-year-old textbook on Engineering Drawing.
Thanks to me being an idiot, we’re not making an exact copy of this switch base. In the graphic to the right, there’s a slight taper to the vertical flange on this switch base. I’m not one to change these tutorials in mid-stream though, and the finished product will be close enough.
Starting Up, or, Holy Crap, What’s With All These 123D Products?
If you head on over to the Autodesk 123D page, you’ll see a ton of related products in Autodesk’s line of freeware modeling and design softwares. The Make app is basically a slicer that turns 3D objects into something akin to those die-cut plywood dinosaur models you built as a kid. Catch turns a camera into a 3D scanner. Sculpt is an iDevice app that’s probably far less useful than it is cool. Design is what we’re after. It’s a full-featured piece of 3D design software that allows you to create objects for your 3D printer.
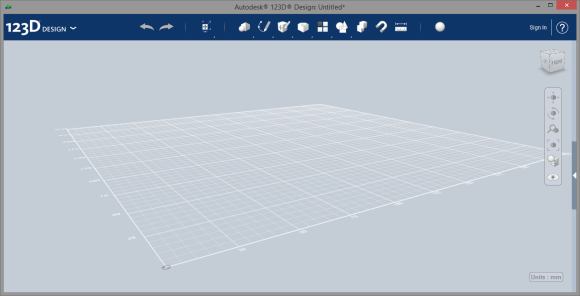
123D Design is available as a web app, an iDevice app, or as a free download for Mac and PC. I’m using the PC version, so if you’re following along, go here and download your copy. Install it, and you’ll end up with the screen below:
First things first. Since our ‘thing’ was designed in fractional inches, we’ll need to change 123D’s units to inches. Do that by clicking on the Units button in the bottom right hand corner.
If you’ve used AutoCAD before, you’ll find the UI for 123D Design is extremely similar. On the right side of the screen, there are buttons for pan, orbit, zoom, and fit, just like in AutoCAD. Also, in the top right hand corner is the ‘view cube’, allowing you to rotate the window around and fix it to a top, bottom, front, back, left, or right view. Double click on the top of the cube and 123D will orient the window so we can make our thing in two dimensions first, then extrude them into the Z dimension.
Making A Thing
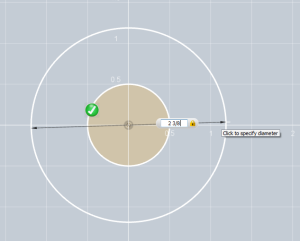 At the top toolbar, you’ll see the Sketch tool. From there, select Circle and draw a 1-inch circle. Then, draw a 2 3/8″ circle on the same center. Just as in AutoCAD, you can simply type a number on your keypad and 123D will make the circle that size. Unlike AutoCAD – and just about every other drafting program ever – the number you type in 123D will be the diameter, not the radius. I find this a little more user friendly than typing in a radius, and if anyone has some insight into that UX decision, I’d love to hear it.
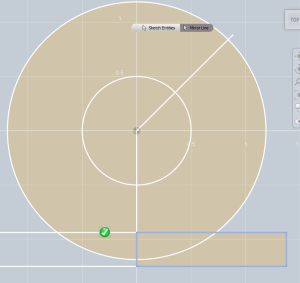
Now for another tool. From the Sketch menu, select Polyline. Draw two lines starting from the centers of the circle, both 1.25″ long, one at 0 degrees, and another at 135 degrees. From the bottom of the 0 degree line, sketch a rectangle 1 3/8″ by 5/16″. Using the mirror tool, mirror this rectangle along the 0 degree line.
The fillet and trim lines work just like they do in AutoCAD. Put a 1/8″ radius fillet on the outer corners of the rectangles we just laid down.
Now For The Slot
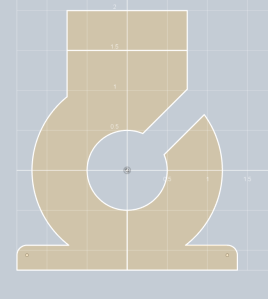
We already have a line going through the center of where the slot on our thing should go. Under the Sketch menu, there’s an Offset tool. Select the Offset tool, click the slots center line, and offset it 3/16″. Just like in AutoCAD, we can use the Trim command to clean everything up. Adding the other flange, you should have something that looks like the pic to the right.
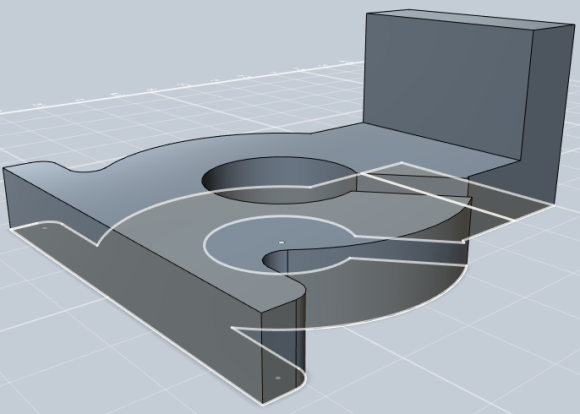
Under the Modify tab on the top toolbar, select Extrude. Pull the main part of our switch base up 7/16″, and the other weird flange part up 21/16″. Once you’re in 3D-land, you can use the Fillet command under the Modify tab to put our inside fillets in. Just select the inside corner between the ‘washer’ and ‘wide flange’ parts, and set a fillet radius of 0.125″ By now, your part should look something like this:
Putting A Top On It
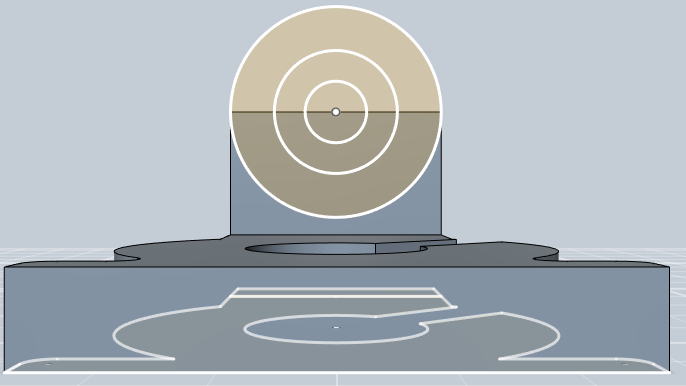 After clicking on the ‘Front’ of the ‘view cube’, put a series of concentric circles on the top of the flange. After that, play with the view cube until you’re in some sort of comfortable isometric or orthographic view and extrude those circles until you have something resembling our ‘thing.
Note the Extrude tool has pseudo-Boolean operations for it in a drop-down menu to the right of where you input your dimensions. 123D is a little weird in how it decides to extrude parts into other parts; my advice is just to play around with this option until you get something approximately right.
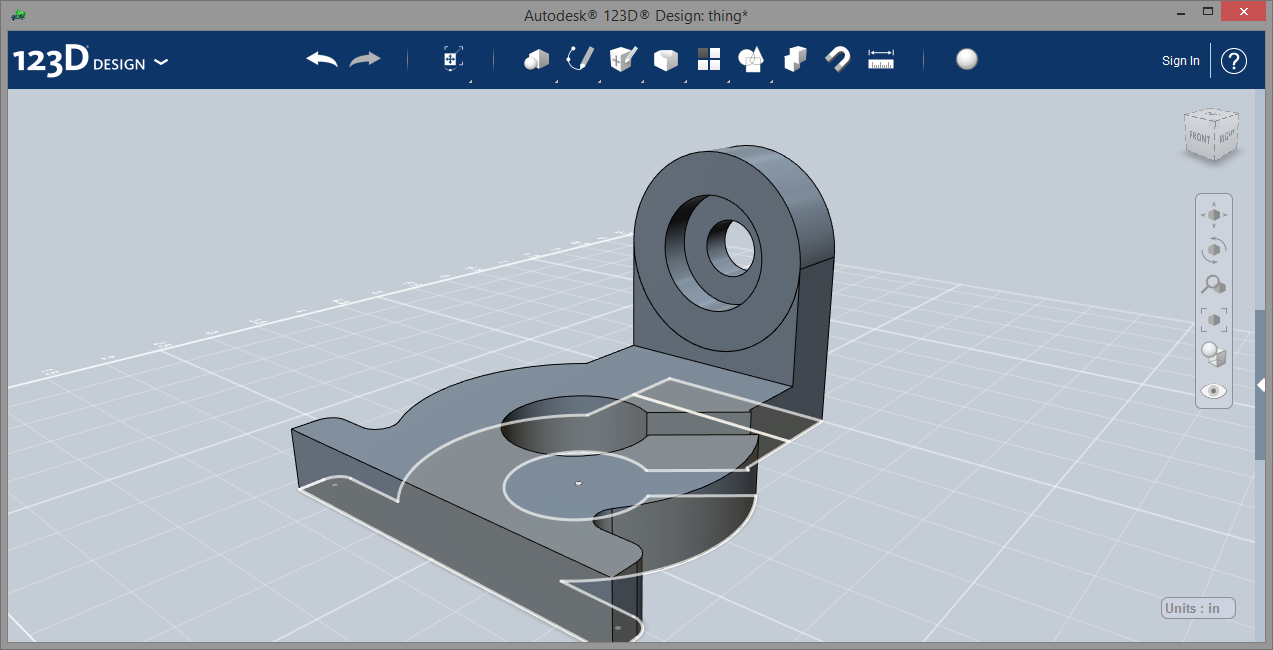
When you’re done, you’ll have this, our thing, ready to be exported to an .STL file and sent to a 3D printer:
That’s it for Autodesk 123D. If you have a suggestion on what software to cover next in this tutorial series, I’m all ears.
I’d also like to thank [tarasbot] for taking it upon himself to suggest the 123D tutorial, and for doing a write-up which this tutorial was heavily based on. Also, he made this thing! With the right taper!


FreeCAD, FreeCAD or FreeCAD would be my suggestions!
Noted.
FreeCad, I 2nd that vote.
If i need to log in from another location,. and 3rd that vote, i will. ._.
haha, we need a freecad tutorial here
Another vote for FreeCAD :-)
Maybe even use the 0.14 DEV version and not the quite old 0.13 stable version.
– Nikolaj
After FreeCAD, perhaps some coverage on FreeCAD’s Python scripting would be in order. Such skills would also largely carry over to Rhino, if you ever want to do a tutorial on that package.
Toss in CadQuery, which depends on FreeCAD, and you’ve got a good alternative to OpenSCAD too.
CATIA or SolidWorks is my suggestion.
A $20k CAD suite might not be what typical 3D printer users have available – plus, if they do use such an expensive tool, I’d suspect they would have received or invested in some adequate training with it. You don’t just own software that expensive and don’t know how to use it.
Many universities have CATIA and solidworks and I believe dassault systeme offer student licenses for both pieces of software if you have a .ac.uk email address I believe. Loads of training vids for both on line. CATIA is superior to solidworks.
SolidEdge. It has a free student edition. How many professional CAD suites can say that?
Nearly all of them.
Unless it’s changed since I used it in Uni it is not the nicest thing to model with. I distinctly remember it doing strange things when you started dimensioning things in drawing mode.
Tinkercad, Free and web based.
+1 for tinkercad – i love that tool :)
FreeCAD! Also, DesignSpark Mechanical.
I’d also like to see the OpenSCAD installment revisited, as the object there doesn’t even have the fillets.
If I’m remembering right all Autodesk programs have free full versions for students.
I really like 123D as a simple get it done 3d program. Its too easy to get lost in features for other 3d programs and spend more time learning how to use it then actually creating the items you want to make. I don’t like however that the program has been semi unstable for me and there is no linux support
I also really like Autodesk 123D, because it is free 3D modeling software combined with services for making physical objects directly from designs.
creo Direkt from PTC. There is a free Version http://www.ptc.com/products/creo-elements-direct/modeling-express/
Another vote for DesignSpark Mechanical (based on SpaceClaim software). It uses direct modelling (like 123d I believe), as opposed to parametric modelling so it took a little getting used to having previously used parametric modelling. Well worth it though as I could now recommend it to others (as cost = free).
Obviously its no good if you are militantly open source.
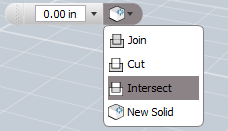
123D Design’s booleans aren’t really weird.
– Join will act like a boss / extrude feature, joining the solid you made to any existing solids it comes in contact with, if it would make a watertight, manifold solid. It’s equivalent to a boolean union.
– Cut will act like an hole or an extruded cut feature. Self-explanatory. It’s equivalent to a boolean difference.
– Intersect will give you a solid based on the geometry of the overlapping solids (which is really handy if you want to make weird shapes like a Reuleaux tetrahedron). It’s literally a boolean intersection. In the case of 123D, the original geometry is deleted when the intersection is performed.
– New Solid will just leave two solid bodies occupying the same space. It’s equivalent to no boolean at all.
Siemens NX works in a similar fashion, as far as extrusions go. There aren’t separate features for an extrusion and an extruded cut like you might find in SolidWorks or Creo, but rather, there’s just one extrude feature with a drop-down list of different boolean options.
This article sort of assumes I’m familiar with AutoCAD, doesn’t it? (It does.) I briefly fiddled with 123D but had trouble with it, so I was looking forward to a mild “How to make this widget in 123D”.
Unfortunately stuff like “The fillet and trim lines work just like they do in AutoCAD, [so do it just like you would in AutoCAD]” isn’t really useful.
But, but….; your supposed to know that by osmosis.
Actually, the fillet and trim tools don’t work all that much like AutoCAD. The program automatically identifies areas where two curves intersect, so you can add fillets or trim/extend curves with less fuss. In a program like AutoCAD or Rhino, you have to start the trim function, select the curves to trim, select the curves to trim against, and then select the segments to delete.
The tradeoff is sketches. Those make a lot of sense in a feature-based modeler like SolidWorks, to segregate groups of related curves for building different features, so your head doesn’t explode as your model becomes more complex. But here, it’s just a frustrating gimmick used to enable a questionably useful shortcut.
I’m willing to bet money that the part of 123D Design that gives you the most trouble is its approach to sketches. Basically, when you go to draw lines and curves, you need to click on the sketch you were already working on. If you click on your working plane instead, the program will create a new sketch, which can’t interact with your previous sketch.
Yeah, I know. Annoying as all hell. There’s also the lack of ability to set your working plane, except on objects you already made, the incredibly crude sweep and loft features, and the utter lack of surfaces…
But anyway, it’s not really that comparable to AutoCAD. It’s worse, and not just because its tools are crude. It’s just all around a poorly designed app.
i have been using autocad full version for decades…. i cant figure out how to draw a freaking “line” in 123d!!!!… i was trying this product to pass on to intro my students to 3d printing and am scraping this app after 1 trial…
Autodesk claiming “Use the 123D Design web app on any computer with access to the internet.” is a bit disingenuous, since clicking on that leads me to a page claiming I need a Mac or Windows machine, thusly NOT a web app.
No, it is a Web app. There are native PC, Mac, and iOS versions too, but it’s a Web app.
I agree. HIPS filaments does wonders in desktop 3D printing. HIPS – High Impact Polystyrene filament has an interesting property that makes it particularly well suited as a support material. It is also soluble in Limonene. I get my orders at 3D2print. You can shop their HIPS filaments here: http://www.3d2print.net/shop/filament/hips-filament/