Capacitance Measurement With The Arduino Uno

CapTestBoard1

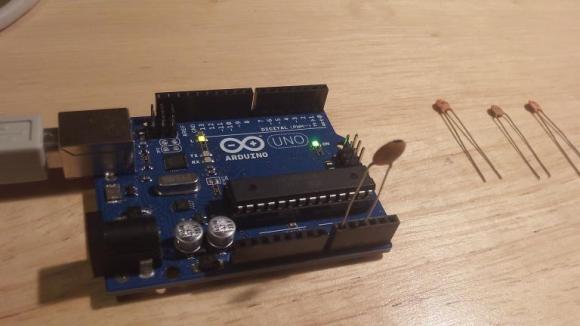
Have you ever found the need to measure the capacitance of a capacitor? No multimeter handy (for shame)? Well, as it turns out you can actually measure capacitance using your Arduino Uno, with no external components, and only ~20 lines of code.

[Jonathan Nethercott] does an excellent job explaining a capacitance test circuit which uses a reference capacitor to calculate the unknown capacitance. He further explains that, with the Arduino Uno, you can remove the reference capacitor from the circuit, and simply use the stray capacitance present in the board and microcontroller, which can be calculated. This results in the test circuit being as simple as plugging in your capacitor to pins A0 and A2. Continue reading “Capacitance Measurement With The Arduino Uno”

Sniffing And Decoding Bluetooth LE Advertising Packets And NRF24L01+ Comms. For Under $30

[Omri] just documented his journey to sniff and decode the protocol used by the popular NRF24L01+ transceiver off the air for very cheap. As he was designing a mesh network code and needed a way to monitor/debug the overall network performance, [Omri] decided to look for some RF hardware.

We’re sure that most of our readers are familiar with Software Defined Radio (SDR), which not so long ago became popular when some engineer discovered hidden registers inside Realtek RTL2832U chip, allowing many DVB-T dongles to be converted into RF listening devices. Unfortunately for [Omri], most of them have a maximum listening frequency of 2.2GHz, while the NRF24L01+ emits at 2.4GHz. The solution? Buy a 2.2-2.4GHz antenna from Aliexpress with a low-noise block downconverter (LNB), used for a Multichannel Multipoint Distribution Service (MMDS). The LNB therefore takes the 2.2-2.4GHz signal and downconverts it to around 400MHz, allowing any RTL-SDR-compatible DVB-T dongle to listen to the NRF communications. A program was then written to decode the RF signal and output the sniffed data in realtime.

GPS Engagement Ring Box

gpsEngagementRingBox

[James] got engaged recently, in part thanks to his clever GPS Engagement Ring Box, and he sent us a brief overview of how he brought this project to life. The exterior of the box is rather simple: one button and an LCD. Upon pressing the button, the LCD would indicate how far it needed to be taken to reach a pre-selected destination. After carrying it to the correct location, the box would open, revealing the ring (and a bit of electronics).

Inside is a GPS antenna and a Stellaris Launchpad, which are powered by three Energizer lithium batteries to ensure the box didn’t run out of juice during the walk. To keep the lid closed, [James] 3D printed a small latch and glued it to the top of the box, which is held in place by a micro servo. Once the box reaches its destination, the microcontroller tells the servo to swing out of the way, and the box can then open. As a failsafe, [James] added a reed switch to trigger an interrupt to open the box regardless of location. It seems this was a wise choice, because the GPS was a bit off and the box didn’t think it was in the correct place.

Swing by his blog for more information on the box’s construction and the wiring. We wish [James] the best and look forward seeing his future hacks; perhaps he’ll come up with some clever ones for the wedding like our friend Bill Porter.

Snapchat Person Verification Defeated In <100 Lines Of Code

out

[Steven Hickson] woke up this morning to an article about the new person verification system Snapchat has implemented. Thirty minutes later he cracked it to be solved by a computer, in less than 100 lines of code (GitHub).

First a little background. About a month ago, 4.6 million Snapchat users had their information compromised by a security hole. In an attempt to bump up security, Snapchat has implemented a new person verification method to ensure new accounts aren’t created by computers.

The method? Picking out a white ghost from a series of nine images. Kind of like a cute, less annoying Captcha. The problem? It’s a terrible way to prove you are a person. It took [Steven] only 30 minutes to write a program that uses simple thresholding, SURF keypoints and FLANN matching to find the ghost. In his tests, he’s found the ghost with 100% accuracy. He also muses that there is an even more efficient way to do it, he was just too lazy to do it.

Nice try Snapchat.

3D Printering: Making A Thing In Autodesk 123D

printering

In the continuing battle against 3D printers used exclusively for fabricating plastic octopodes and useless trinkets, here’s yet another installment of a Making A Thing tutorial. If you’ve ever wanted to make one single object in multiple 3D design softwares, this is for you.

Previously, we’ve built a ‘thing’ in a few different 3D modeling programs, including:

See that ‘Read more…’ link below? You might want to click that.

Continue reading “3D Printering: Making A Thing In Autodesk 123D”

Interactive Globe Is Awesome For Google Earth

projector

Time to brush up on your Portuguese if you want to learn how to build your own interactive globe! Or we guess we could use Google translate…

This project was originally presented at Campus Party 2012: an annual, week-long technology festival running 24 hours a day that features LAN parties, a hackathon, conferences, and more. It all started back in 1997 in Madrid, Spain. Today, there are now Campus Parties being held in Brazil, Colombia, Mexico, the USA, Ecuador, and Germany.

The team that created it—[Araujo, Barmak, Teo, Duprat, and Silva]—has now decided to give back to the community and share a tutorial on how make your very own. The globe uses a short throw projector, a mirror, a series of infrared lights, a modified PS3 Eye camera, and an acrylic dome with projector screen paint on the inside. The touchscreen works by the IR light being reflected off of your hand on contact, which is then picked up by the PS3 Eye camera that has had its IR filter removed.

Unless you can find a suitable acrylic dome, it is, unfortunately, rather expensive to make. They had to have one manufactured. Stick around after the break to see how it works!

Continue reading “Interactive Globe Is Awesome For Google Earth”

Body Of A Trinket, Soul Of A Digispark

TrinketDigispark

Adafruit’s Trinket and digiStump’s Digispark board are rather close cousins. Both use an ATtiny85 microcontroller, both have USB functionality, and both play nice with the Arduino IDE. [Ray] is a fan of both boards, but he likes the Trinket hardware a bit better. He also prefers the Digispark libraries and ecosystem. As such, he did the only logical thing: he turned his Trinket into a Digispark. Step 1 was to get rid of that pesky reset button. Trinket uses Pin 1/PB5 for reset, while Digispark retains it as an I/O pin. [Ray] removed and gutted the reset button, but elected to leave its metal shell on the board.

The next step was where things can get a bit dicey: flashing the Trinket with the Digispark firmware and fuses. [Ray] is quick to note that once flashed to Digispark firmware, the Trinket can’t restore itself back to stock. A high voltage programmer (aka device programmer) will be needed. The flashing process itself is quite a bit easier than a standard Trinket firmware flash. [Ray] uses the firmware upload tool from the Micronucleus project. Micronucleus has a 60 second polling period, which any Trinket veteran will tell you is a wonderful thing. No more pressing the button and hoping you start the download before everything times out! Once the Trinket is running Digispark firmware, it’s now open to a whole new set of libraries and software.