Mikey is [Mike’s] autonomous robot. Like any good father, he’s given the robot his name. Mikey is an Arduino based robot, which uses a Pixy camera for vision.
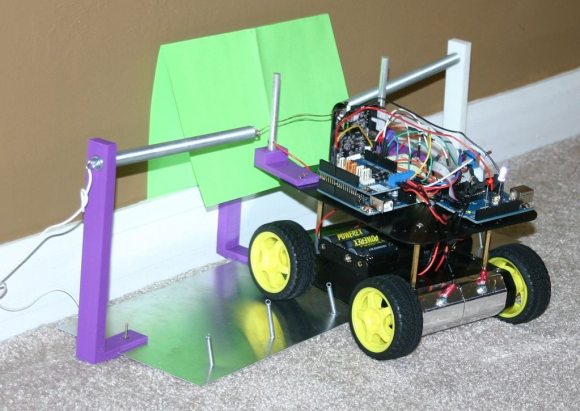
[Mike] started with a common 4WD robot platform. He added an Arduino Uno, a motor controller, and a Pixy. The Pixy sends directions to the Arduino via a serial link. Mikey’s original task was driving around and finding frogs on the floor. Since then, [Mike] has found a higher calling for Mikey: self charging.
One of the most basic features of life is eating. In the case of autonomous robots, that means self charging. [Mike] gave Mikey the ability to self charge by training the Pixy to detect a green square. The green square identifies Mikey’s charging station. Probes mounted on 3D printed brackets hold the positive leads while springs on the base of the station make contact with conductive tape on Mikey’s belly. Once the circuit is complete, Mike stops moving and starts charging.


I was considering a similar system, but i don’t like the idea of having the battery wires out in the air. I guess that a diode will do, in that regard, in order to prevent a short circuit from the battery. However, for the charger, i think that something should be used in order to ensure that the current flows only when the robot is in position. I considered using a small micro, reading a digital pin. The robot would try to make contact with a merallic surface, and then send small current (GPIO level) through the metallic surface/conductor/spring. The IC (a Attiny85 would do) would thus detect a signal, an enable the chaging current to flow with a transistor. Thereby, the robot can control the duration of the charging, or even the average current, if sending PWM signals.
My thought for this has been to always avoid the exposed terminals all together and instead take the longer charging times you get from using the contactless systems for cell phones. That’d make it so you have no strict orientation just need to target a spot well enough that the charger can line up, you could even have one side of the system not completely fixed and have it move into place by lining up a couple magnets. Then the whole thing ends up much more off the shelf and safer to boot. Though I’ve though of this route simply because it’d make in door UAVs more practical.
I also considered this solution. I even bought two cheap wireless charging stuff.
The problem is that each can provide a maximum of 500mA if the distance is less than 3mm : http://www.adafruit.com/blog/2013/06/14/new-product-inductive-charging-set-5v-500ma-max/
Perhaps that with two modules, we can get acceptable current. However, i suspect that unless i can have really accurate positioning, i will get quite low charging current.
My goal is to be able to charge my robots fast enough to be able to have always one robot charged and doing it’s tasks. So i’m aiming for 1 or 2 amps with a 6Ah lithium Ion battery.
I also considered retractable terminals engaging a socket. In order to simplify the docking operation, i think that one could use a magnet and an electromagnet on the other side.
This “summer”, i will conduct experiments about this. I however will need to find an efficient but simple way to position the robot. I wonder if an IR beacon will be enough or not (i don’t want to use video, since only my Raspberry pi robot has a camera. Other robots are based on Atmega, and use IR rangefinders, ultrasonic rangefinders, or even contact microswitches. So an IR beacon would be ideal for it is cheap (a few IR LED, and a sensor for each robot), but i wonder how precisely it can be used to position the robot.
What about OpenCV on a wifi cam overlooking the room where your station is located? Have it position the robot properly and enable the charging station.
this is also a possibility. I will probably study the efficiency of such solutions, but i’d like to have a low tech, low coast, low computing power solution as well (if i can’t get it to be accurate enough, i could try to have electromagnets snap to the robot in a way that positions it correctly, using the positioning system to roughly get in range of the magnets)
Well, if i get enough time to compare all those solutions, i will have to write about it!
That is my problem : i like to document stuff precisely, so i spend more time to write about it than doing it :)
Would you consider making your own inductive charger that could output more amps? I think that a good design for an exposed contact charger would be similar to a bull’s eye placed on the ground. The outer ring would act as the ground, and an inner ring would be the power source. An NFC is also a good idea to ensure that the robot is indeed on top of the charger.
Hi,
indeed, i did not considered making my induction charger. Considering that it is just a few components and a coil, it should not be that hard. This is a good idea. Furthermore, bu making it really larger, it may be less sensitive to positionning!
The only concern would be to keep it from radiating tons of IEM that would disturb other electronic stuff. However, considering how the energy density decreases with the square of the distance, i guess that it shouldn’t matter after a few centimeters :)
Why not just a small pressure switch under the plate to turn on the power, the robots weight will turn the power on just when needed.
I like this project a lot.
I was thinking that another robot with similar capabilities that steal the frogs from that this first robot is capturing (and presume storing somewhere) and hidding them somewhere else.
it will be like pets.
Could be cool for a place where you cannot have live animals. Make it vac the floor at the same time it plays hide the Froge and I’ll buy one.
I got an I-Cybie robot dog for xmas years ago. It sees mostly through emitting IR beams and picking up reflections, it’s pretty good at navigating and avoiding obstacles. An optional accessory is a power pack that plugs into the wall, and emits some sort of coded IR itself. The robot can play all day, then walk up to the charger, align 2 contacts on it’s chest, and stay there til it’s charged. 1990s technology, and a lot of ingenuity, though they weren’t cheap. Much cheaper than an Aibo though.
I have a very similar robot I’ve been working on I call “Zipper”. I’m using an Arduino Mega 2560, several IR proximity sensors, an ultrasonic distance sensor, 9v RC battery, DC motors, the [exact] wheels Mikey is using, and an L293D h-bridge. Zipper moves pretty fast by comparison to Mikey, but he does run into walls.
I’ve considered a charging dock similar to this, and I plan to add a camera and accelerometer in order to fine-tune positioning of the ‘bot since just DC motors + IR sensors don’t quite cut it.
I like the idea mentioned above using an inductive charging station – I remember seeing some nice tutorials on wrapping your own wire for inductive charging…I might give it a shot.
Great post – a little amateur to some, I’m sure, but it’s right up my alley. ;)
what about the inductive coils being the senser for alignment?
My roomba returns to its dock and charges itself. Like all roombas I guess.
It just drives into a base station with two metal contacts on the underside that only touch when it is fully in the base station.
heck you could even just pickup a base and then adapt it
http://www.amazon.com/iRobot-Roomba-4900-Self-Charging-Drive-On/dp/B00022HZ0O
I think something that is a particularly good attention to detail on the part of the Roomba designers is that if the contact with the charging station is intermittent then the Roomba will “twitch” back and forth, eventually backing out and re-entering the charging station until it makes a good contact.
hehe, it charges like a Delorian ;-)
How many jigawatts?
One point twenty-one jigawatts!
Charging like a Delorian sounds fine to me, except I probably wouldn’t get my deposit back on my flat, because of all the pairs of parallel scorch marks.
Simply Excellent !
The paleontologists among you might check out the June 1977 issue of byte magazine – to see a hobby robot that was able to plug itself into the wall to charge it’s own battery. This was about 3 years after people discovered that you could pry the lid off of early dynamic RAM chips and make a TV camera… back when it was still hip to build arrays of photo transistors to do feature extraction. Google “Newt Robot 1977 Byte” and behold the awesomeness.
The secret sauce was to put black face plates on white outlets. VERY easy to find.
The “turtle” robot from the 1930s did the same thing, and that was VERY primitive technology.