[Abe] wanted the perfect portable computer. He has a DevTerm, but it didn’t quite fit his needs. This is Hackaday after all, so he loaded up his favorite CAD software and started designing. The obvious choice here would be a Raspberry Pi. But [Abe] didn’t want to drop in a Linux computer — he was going for something a bit smaller.
An RP2040 Pico would be a perfect fit. Driving a display with the Pico can be eat a lot of resources though. The solution was a PicoVision from Pimoroni. PicoVision uses two RP2040 chips. One drives an HDMI port, while the other is free to run application software. This meant a standard HDMI screen could be used.
 The keyboard was a bit harder. After a lot of searching, [Abe] found an IR remote designed for smart TVs. The QWERTY keyboard was the perfect size but didn’t have an interface he could use. He fixed that with an adapter PCB including an I2C GPIO expander chip. A bit of I2C driver software later, and he had a working input keyboard.
Hardware doesn’t do anything without software though. The software running on the handheld is called Slime OS, and the source is available at [Abe’s] GitHub. It’s a launcher, with support for applications written in python. [Abe] has a few basic demos working, but he’s looking for help to get more features up and running.
Although it wasn’t quite what [Abe] was after, our own [Donald Papp] came away fairly impressed when he gave the DevTerm a test drive back in 2022. Something to consider if you’re looking for a Linux handheld and not quite ready to build one yourself.
Continue reading “The Perfect Pi Pico Portable Computer” →


 The G-15 can run several “high-level” programming languages, including Algol. The most popular, though, was Intercom. Intercom is an interactive programming language – you can type your program in right at the typewriter. It’s much closer to working with a basic interpreter than, say, a batch-processed IBM 1401 with punched cards. We’re still talking about the 1950s, though, so the language mechanics are quite a bit different from what we’re used to today.
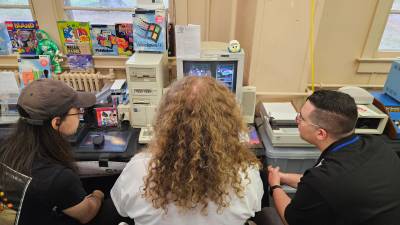 An exhibit like this isn’t thrown together overnight. [Commodore Z] and [Ms-Dos5] worked for months to assemble the right mix of desktops, laptops, and peripherals to showcase Windows 95. Many of the computers are networked as well – which was no easy task.


