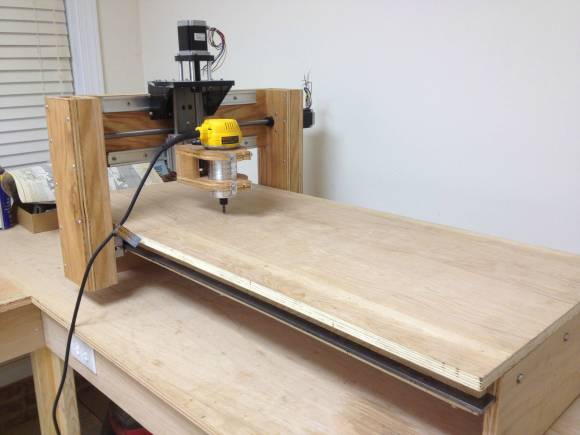
[David Taylor] needed a CNC router to do some more complex projects — so he did what any maker would do if they’re strapped for cash — make it from scratch!
The impressive part of this build is that it was built entirely in his workshop, using tools he already had. A chop saw, wood lathe, drill and a drill press, and finally a table saw — nothing fancy, but now with the CNC router he has a world of possibilities for projects! The mechanical parts he had to buy cost around $600, which isn’t too bad considering the size of the router. He lucked out though and managed to get the Y-axis and Z-axis track and carriages as free samples — hooray for company handouts!
The router is using an old computer loaded with LinuxCNC which is a great (and free!) software for use with CNC machines. It’s driving a cheap Chinese TB6560 motor controller which does the trick, though [David] wishes he went for something a bit better.
Some examples of the projects he’s already made using this baby include an awesome guitar amp, a wooden Mini-ATX computer case, and even a rather sleek wooden stereo with amp!
Did we mention it can even cut non-ferrous materials?
[via Reddit]


Those are some quality projects he has made with his cnc. Very impressive
nice project, impressive build. The title i not correct i think, it’s not a build from scratch with the electronics.
I think you could have let that one slide.
And the slides too
They already slide.
the reddit threads are at http://www.reddit.com/r/woodworking/comments/28dll5/i_made_a_cnc_router_table_out_of_wood/
http://www.reddit.com/r/diyaudio/comments/28ka7x/i_made_a_stereo_system/
http://www.reddit.com/r/diyaudio/comments/28v7pv/i_made_a_guitar_amp/
http://www.reddit.com/r/woodworking/comments/28az34/i_made_a_wooden_computer_case/
I’d be interested in knowing what software toolchain he’s using for CAM.
Same here, particularly for the ATX case. This is really nice work though!
Interestingly enough, if you are interested in 2 and 2.5D CAM that is free, open-source and actively developed, checkout jscut.org CAM right in your browser from svg files.
Did anyone catch the name of the X-Y slide manufacture? Not looking to replicate the free samples (although it would be nice) but they do look to be good with cost vs performance
pbc linear for the y and z and cncrouterparts for the x
Thanks! Looks like the X-Y is PCB Ready Rail and the Z axis perhaps Uni-guide.
The Ready Rail looks very similar to the maker slide products.
I use them at work on some tools. Those are Igus bearings and tracks; the vertical looks like a W series 16-60 rail and the horizontal appear to be a T series (I think). Can’t see the bearings on the T-rail, but it looks like he did something custom to mount the bearings on the W rail. Also looks like he is using their NEMA motors and leadscrews, though he could have sourced those elsewhere. I will say he saved quite a bit of coin getting samples!
Actually, after looking at the more detailed pictures, I was wrong, these are not Igus, they don’t have a flat profile (but it sure looks a lot like it in the pic above). The sliding carriage looks like a piece of machined 80/20. I wonder if he has some kind of bearing in the carriage or if the aluminum carriage slides on the linear rail itself.
Thanks! Looks like the X-Y is PCB Ready Rail and the Z axis perhaps PBC Uni-guide.
The Ready Rail looks very similar to the maker slide products.
TB6560 motor drives are not bad if you know what you’re doing with them. That know what you’re doing thing unfortunately eliminates most people though.
It sure does.
I found very little good info on properly using TB6560’s. Lots of conjecture, lots of questions, lots of regret at buying them, but very few good guides on making them work well and last. Oh sure, there are some mega threads that mostly repeat over and over.
Some say to cut the regulator pins and power the logic side from the arduino’s +5V (if you have one in the project), to at least clean up the TTL power quality. But not a lot of folks have apparently done that. I did. Will I fry it someday because of the wrong power up sequence, or due to a residential power blip? Probably.
Those imported driver boards are a collection of bizarre compromises. The biggest problem that I am aware of with them is the fixed current sensing resistors they ship with. Most of those boards are limited to one amp maximum current with the resistors they have. The drive IC is good to 3.5 amps. So there is quite a bit of potential being wasted there. I’m not sure why they have freewheeling diodes either. The TB6560 has those built into it. I have heard of people changing those diodes out for faster ones, I’d like to know if anyone has successfully simply removed them, and used jumpers in their place. I know my homemade TB6560 drives have no external freewheeling diodes and they run fine. Decreasing the PWM time may, or may not offer increased performance. I know I went with a low value. I’m not so sure today how critical that really is. At the highest stepping speeds maybe, but driving a load one never approaches that frequency of operation. I am not sure how optical isolation is implemented on those imported boards. I know it is a place where I spent considerable effort designing my drives though. There is a lot to be gained, or lost there, depending on how it is done.
Running regulation from off board is rarely a good idea. Each of the drives I made has its own regulator on board. I just use a 7805. Another critical element of the circuit design is how the twin grounds are filtered from one, and another. Distance to filtering capacitors must be less than the distance to each other is. I wrote an article about my drives. You may see it here:
http://www.instructables.com/id/TB6560-Microstepping-Bipolar-Chopper-Stepper-Motor/
The TB6560 was never designed for use in this sort of configuration. It /will/ fry eventually if the +5 logic power is derived from the motor supply (which all of the cheap chinese boards do).
Allow me to recommend the THB6064 kits which cost a /bit/ more but provide serious power and reliability:
http://www.ecomorder.com/techref/ecomprice.asp?p=416074
The problem with a good clean build like this is that it raises expectations for what comes next. I’ll only be half surprised to see a $300 ATC upgrade within the next year.
ATC?
Automatic tool change
For the price of this build – he would of been worth it to buy plans for Joes 4×4 hybrid CNC. I built mine for $500 or so before electronics. Its a solid design for a DIYer
$75 price for the plans does not include access to the forums or support = no thanks. And at $360 for just the MDF and HDPE parts I doubt you’d be below $1000 when you were done. Once done you’d have a machine made of MDF which expands and contracts with changes in the weather. Doesn’t sound like much of a deal to me.
this was in response to Ben W
my bad, it does include forum access but purchasing the kit requires an additional purchase of the plans for access to the forum so that’ll run you $435 without any metal parts or electronics.
If the weather is changing while you are running a job you need to cut faster. If you’re cutting MDF on your CNC then your machine is keeping up with the changes in your material too.
This is a very nice build.
Any issues with those acetal couplers slipping?
Had to retighten them after a couple of days but they’ve held tight since then.
It looks cool but seems quite complicate.
I have a fixed base router hence i would need to get a plunge base, god it will bite my pocket.
The problem with a good clean build like this is that it raises expectations for what comes next. I’ll only be half surprised to see a $300 ATC upgrade within the next year.
hi i am interested to by plans for 4×8 or 4×4 c n c with automatic tool change can samebody can help me where i can by and with one is good one. i like to build frame from steel or aluminium thanks Joe
Bravo I myself am looking to make one if u can email me the detail drawings I would really appreciate it
Just curious – with that ATX case (NICE job – really love that color and design) – what are you using for your ‘contouring’ CAM? I didn’t look too close at the pics but it almost looked at one point like you contoured in a 2.5D ‘stepped’ contour and then sanded the steps smooth. The results are beautiful – but I am looking to get as close to a finished surface as possible just with my router.
Good work! really enjoy the ingenuity in creating your own design.