Apple Forces Non-Mac User To Make Ergonomic Mac Keyboard

Mac Ergonomic Keyboard

If you’ve ever typed for a significant amount of time you know that it can become painful. Long term exposure can cause wrist and arm injuries. There are some things that can help alleviate the risk of injury like taking frequent breaks, good posture and using an ergonomic keyboard. [Ian] likes the feel of Mac keyboard keys but doesn’t like the traditional straight layout. Unfortunately, Apple doesn’t make an ergonomic keyboard so [Ian] stepped up to the plate and made one for himself.

Mac Ergonomic Keyboard

Just starting this project was an extreme pain. Apple glues their Mac keyboards together. A heat gun was used to melt the glue to 400°F as kitchen utensils were stuck in between the halves of the case, keeping the glue from re-sealing the case together. Once the case was apart the unnecessary keys were removed. [Ian] is actually modifying two keyboards into one because he wants the middle keys to show up on both sides of the keyboard. With the necessary keys identified, the metal support frame was removed from the unneeded sides of the keyboard.

Continue reading “Apple Forces Non-Mac User To Make Ergonomic Mac Keyboard”

An Online Course For FPGA And CPLD Development

FPGA

Over on the University of Reddit there’s a course for learning all about FPGAs and CPLDs. It’s just an introduction to digital logic, but with a teacher capable of building a CPLD motor control board and a video card out of logic chips, you’re bound to learn something.

The development board being used for this online course is an Altera EMP3032 CPLD conveniently included in the Introduction to FPGA and CPLD kit used in this course. It’s not a powerful device by any measure; it only has 32 macrocells and about 600 usable gates. You won’t be designing CPUs with this thing, but you will be able to grasp the concept of designing logic with code.

Future lessons include building binary counters, PWM-controlled LEDs, and a handheld LED POV device. In any event, it’s a great way to learn about how programmable logic actually works, and a fairly cheap way to get into the world of FPGAs and CPLDs. Introductory video below.

Continue reading “An Online Course For FPGA And CPLD Development”

LinuxCNC Based Plasma Cutter Router

If a wood CNC router just isn’t enough for you, you’re going to need something a little bit more powerful. Relatively speaking, the next most affordable step up is a CNC plasma cutter. Mhmm… Plasma…

maker-works

[Maker Works] of Ann Arbor decided it was time to add some serious metal working capabilities to their already impressive mech shop. The design is based on of  [JoesCNC], however they’ve opted for some seriously beefy servo motors, instead of steppers.

The frame is made out of 8020 aluminum extrusions, which certainly adds to the cost, but results in a very professionally built machine. X and Y axis’ make use of NEMA 34 Servo motors, driven by Granite Devices VSD-E servo drivers. The Z-axis uses a NEMA 23 with a Gecko 320X driver. To further increase the power of these guys, 10:1 reduction gearboxes are used on both the X and Y.

All in all the project cost approximately $8,000, though after lessons learned, they think they could redo it for around $6,000.

When they first started testing it, they were dismayed with how dirty the room got from the fine dust created by the plasma cutter — so they’ve upgraded to a water tray bed (2″ deep), which helps immensely. In fact, the part doesn’t even need to be fully submerged in water for it to cut down pretty much all of the dust. The water also helps prevent damage to the aluminum bed underneath.

Continue reading “LinuxCNC Based Plasma Cutter Router”

Solder Stencil

How To Laser Cut Mylar Solder Stencils

When you think about the difficulties of working with surface mount components, the first thing that often comes to mind is trying to solder those tiny little parts. Instead of soldering those parts by hand, you can actually apply solder paste to the pads and place all of the components on at once. You can then heat up the entire board so all of the parts are soldered simultaneously. It sounds so much easier! The only problem is you then need a solder stencil. You somehow have to get a thin sheet of material that has a perfectly sized hole where all of your solder pads are. It’s not exactly trivial to cut them out by hand.

[Juan] recently learned a new trick to make cutting solder stencils a less painful process. He uses a laser cutter to cut Mylar sheets into stencils. [Juan] appears to be using EagleCAD and Express PCB. Both tools are available for free to hobbyists. The first step in the process is to export the top and bottom cream layers from your CAD software.

The next step is to shrink the size of the solder pads just a little bit. This is to compensate for the inevitable melting that will be caused by the heat from the laser. Without this step, the pads will likely end up a little bit too big. If your CAD software exports the files as gerbers, [Juan] explains how to re-size the pads using ViewMate. If they are exported as DXF files, he explains how to scale them using AutoCAD. The re-sized file is then exported as a PDF.

[Juan’s] trick is to actually cut two pieces of 7mil Mylar at the same time. The laser must be calibrated to cut all the way through the top sheet, but only part way into the bottom piece. The laser ends up slightly melting the edges of the little cut out squares. These then get stuck to the bottom Mylar sheet. When you are all done cutting, you can simply pull the sheets apart and end up with one perfect solder stencil and one scrap piece. [Juan] used a Full Spectrum 120W laser cutter at Dallas Makerspace. If you happen to have this same machine, he actually included all of the laser settings on his site.

Hacklet #5 – Hackerspaces And DIY Laptops

sector67

Did you know that Hackaday.io has a hackerspace index? That’s right, you can enter your local hackerspace’s info, pictures, videos, and social media links. Members and crew can link their hackaday.io profiles and drop comments about their latest projects.

The map up at the top of the hackerspace index’s page is interactive too – zoom in on your country and local area to see any spaces nearby. It’s like one-stop shopping for awesome. Well, except that this awesome is free.

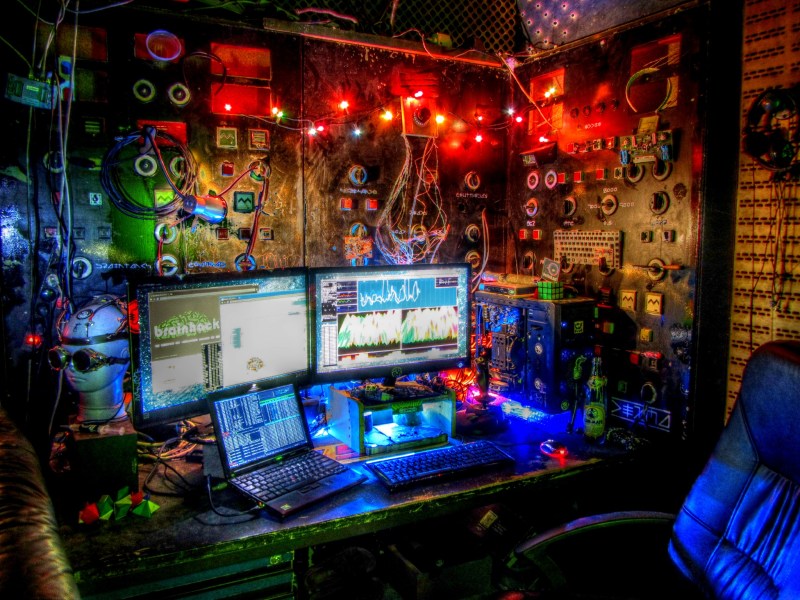
It really is great to see all the pictures of spaces large and small. Some of the most stunning shots are from c-base, in Berlin, Germany. Founded in 1995, the c-base crew have created an incredible space. Take a look at the workstation in the photo. Is it Steampunk? Matrix-punk? Heck no, that’s 100% c-base.

c-base


Do It Yourself Laptops

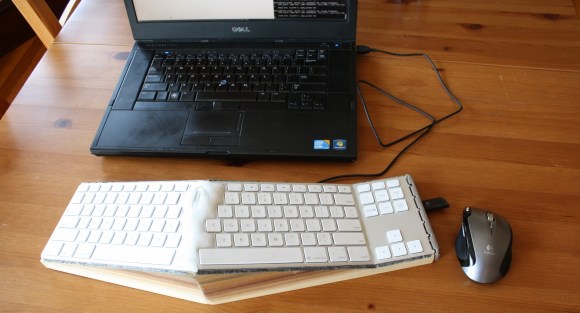
You don’t have to be Bunnie Huang to build your own laptop. All it takes is some time, ingenuity,and a good hot glue gun.

opentech-laptop

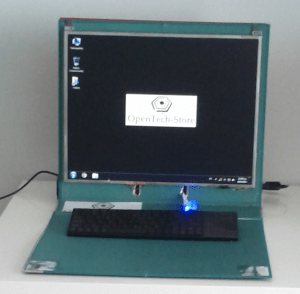
Our first laptop is actually inspired by Bunnie’s Novena. The OpenTech-Laptop uses two binders as it’s shell, but inside hides some decent computing power. [OpenTech] used a miniITX motherboard with an ATOM N2800 CPU. The screen came from an old laptop (long live matte 4:3 screens!) [OpenTech] even hand wired a Low Voltage Differential Signaling (LVDS) cable so the motherboard can push those pixels. A wireless keyboard, hard drive, and speakers round out the build. [OpenTech] is still looking for a portable power solution.Why not follow Bunnie’s lead and grab some R/C Plane LiPo batteries, [OpenTech]?

minibsd

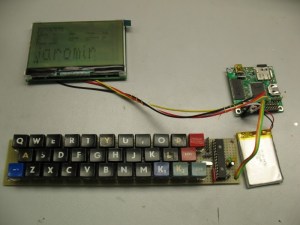
Next up is a MiniBSD laptop computer created by [Jaromir]. MiniBSD is based on RetroBSD, a PIC32 based BSD single board computer. Rather than use a premade platform like the Fubarino, [Jaromir] laid out his own board with everything he wanted – a microSD socket, SDRAM, real-time clock, and all the trimmings. He then added a graphical LCD, a LiPo battery, and a sweet retro keyboard from an old Czech computer company called Tesla. [Jaromir’s] next task is a 3D printed case. The only problem is the case is 2cm wider than his current printer’s bed!

http://hackaday.io/project/1559-Laptop-pi

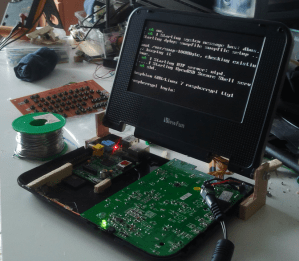
You didn’t think we’d leave the Raspberry Pi out, now did you? Laptop-pi is [Bram’s] project to convert an old DVD player (remember those?) into a Pi Laptop. Not only did [Bram] build a QWERTY keyboard from scratch on perfboard, he also hacked together an on-screen keyboard so he can type with just a D-pad. He’s currently fighting with a dodgy audio amp, but we’re sure that’s just a temporary setback. We think Laptop-pi will be a killer portable for retro gaming!


That’s it for this week’s Hacklet, stay tuned for next week when we bring you more of what’s happening at Hackaday.io!

Astronaut Or Astronot? Nobody Won The Voters’ Lottery (This Week, Anyway)

Yesterday we said we’d be giving away an awesome oscilloscope to a random person on Hackaday Projects if they have voted for their favorite project in The Hackaday Prize. We’re doing one of these a week, and today, at least, nobody won.

We’re going to be doing this every week, so register at Hackaday Projects and vote for your favorite projects entered in The Hackaday Prize. We’ll do this again next week.

Beams Of Light: An Oscilloscope Demo

beamsoflight

The demoscene is alive and well, with new demos coming out on a multitude of platforms, including oscilloscopes. Beams of Light is a new demo released at @party in Boston by [TRSi]. Beams isn’t the usual .EXE file format for PC based demos. It’s distributed as a 4 channel wave file. The rear left and right channels are stereo audio. The front channels, however, are vector video to be displayed on an oscilloscope in XY mode.

Beams of Light isn’t the first demo to use an oscilloscope. Youscope and Oscillofun preceded it. Still, you can see [TRSi] pushed the envelope a bit with his creation. He used Processing and Audacity to create the vector video, and his own line tracing algorithm to reduce flyback lines.

[TRSi] included an updated copy of a python based oscilloscope emulator so you can play the demo even if you don’t have the necessary hardware. We wanted to run this the right way, so we powered up our trusty Tektronix 465 and hooked it up to a 1/8″ stereo plug.

Sure enough, the demo played, and it was glorious. We did see a few more retrace lines than the video shows. This could be due to our scope having a higher bandwidth than the 10MHz scope used in the YouTube video. XY demos are one of those rare cases where an analog scope works much better than a low-cost digital scope. Trying the demo on our Rigol ds1052e didn’t yield very good results to say the least. Sometimes good old phosphor just beats an analog to digital converter.

Continue reading “Beams Of Light: An Oscilloscope Demo”