When it was first announced in 2010, the Boxee remote was a stroke of genius. Not because it controlled the BoxeeBox, the set-top media center PC, mind you. It was impressive because the reverse side of the remote had a small qwerty keyboard, just the thing for searching menus loaded up with movies and TV shows and entering URLs. [Martin]’s BoxeeBox loved his BoxeeBox, but it’s an old device now, with some support for web streaming (including Netflix) gone.
Other media center devices have filled the void in [Martin]’s life, but he loved that Boxee remote. Getting it working on his XBMC-equipped PC was a top priority. This meant figuring out a way to connect the RF receiver from a BoxeeBox to a USB port. It turns out this is pretty easy, requiring only a few parts and half of a USB cable.
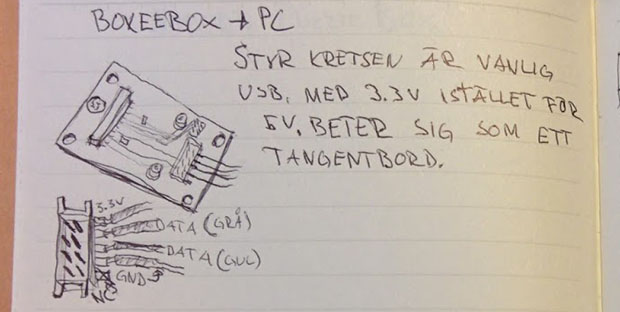
[Martin] traced out the connectors on the RF receiver for the BoxeeBox, and found the usual V+, V-, Power, and Ground connections found in a USB cable. The receiver operated at 3.3 Volts, so stepping down the voltage required regulator. The rest of the project was simply putting everything in a project box and stuffing it behind his PC.
Windows identifies the RF receiver as a normal keyboard, so everything went swimmingly. Since [Martin] built this small device, a few people have come up with better keyboard layouts for XBMC and the Boxee remote, allowing this device to function far into the future.


Or, you know, you could just buy a USB receiver for it. That’s only how I’ve been doing it for years…
They don’t sell the remote anymore, and they’ve never sold just the USB RF receiver.
The next on the handwritten note says: “The control circuit is an usual USB but with 3.3 volts instead of 5 volts. Acts like a keyboard.”
Really? I thought it was a spell to summon Odin!
Yep. It is. That is what you say to do that.
“[Martin]‘s BoxeeBox loved his BoxeeBox” – damn narcissistic DVRs.
Right? It was an utter POS gravitated to by folks amused by shiny. Never had a problem with my xbmc so never really saw what the fuss was about. As others have noted, I got one of those 20 buck media center remotes from ebay and never looked back. Even has a keyboard and trackpad so dunno what this is all about.
The Boxee Box remote is one of the simplest, elegant RF remotes available. It’s also extremely energy efficient. I definitely don’t want a remote with a trackpad and 60 buttons.
I had been using a Bluetooth PS3 remote for XBMC (because I don’t want an IR receiver eyesore), which is fine, but has a ridiculous number of buttons that I don’t use and eats batteries (even with standby mode enabled). The Boxee Box remote is so much better!
typo: “required A regulator”.
And…. V+ and V- should be D+ and D-….
wrong
Hi all, thanks för writing about my blog!
Not everyday you read about your self on one of your favorite sites.
I think the appeal of the BoxeeBox and similar devices is usability, I wouldn’t have a issue using xbmc two years ago, girlfriend and random friends on the other hand is another story.
Thanks again, I try to write a new post every week.
According to my reading of the board the V+ goes to the nRF24LU1 Vbus pin (pin 2) and according to the spec for that chip there is an on-chip LDO which is used when being fed through Vbus as opposed to through the Vdd. This obviously makes sense for a USB device to handle 5v inputs. I didn’t trace the external circuit to check if really it is fed 3.3v or 5v but the remote board goes through the USB host board which must get 5v so I guess it is all 5v in there and there is no need for any pre-regulator.
Can anyone double check? Before I ruin the only Boxee remote board I have :-)
I do remember that I found two versions of that chip, one 3.3v and one 5v. chip on the board is the 3.3v variant. Couldnt you just measure the voltages?
Feels silly that I didnt think of that.
Hello ! Please help me with 3 things.
1. I want to know if is possible to add more contour to subtitles on my movies. i mean all my movies from HDD. Is too thin and i have trouble to read especially when the subtitle it is on white. Maybe I can connect thru FTP to my box and edit a script or a line.
2. I want to shrink the distance between the lines of the subtitle. most of the movies have 2 line of subtitles…and i want the lines to be more close to each other. Also, maybe it s possible to connect thru FTP to my box and edit a script or a line.
3. It s there a way to program my boxee to sleep like a tv ? I often sleep and my boxee still running…
Thank you very much !
You should check out http://boxeed.in/
Looks like it enables better control over subtitles.
Any news on the 3.3v vs 5v? I am about to rip out the rf module from my Boxee to use the remote on my RPI. Can try to measure the input voltages to the module.
My unit seems to work but I’m not putting it to constant use yet since the Vdd also shows 5v whereas by the documentation I expected it to show 3.3v after regulation. If you can measure what happens in a real unit that would be very useful indeed, my own unit died so I can’t measure anything on it.
Are you saying you have hooked yours up to 5v through pin2, and got it working? I also found the the chip has a built in regulator alowing it to accept 5v through the VBUS, but I was not able to determin which pin VBUS would be. When I measured the Boxee, it gave 3.3v to pins 2 and 10.
Yes, I connected the unit to USB with its 5V and it did work. As your measurement shows the Boxee actually feeds it 3.3V so I think I’ll hook some diodes or a voltage regulator in between the 5V and the nrf chip to avoid possible damage. I wouldn’t want to risk the receiver.
One thing I want to try and haven’t managed yet is to see if I can read the firmware out of the USB device and maybe load it into another USB dongle with nRF24LU1 and then I’ll have a backup receiver.
Thank’s for the update. I will set this up with a couple of resistors to reduce the voltage to 3.3. Found a nice howto here: https://learn.sparkfun.com/tutorials/voltage-dividers/all?print=1. Please let me know if you succeed with the firmware transfer.
Backup receiver would be awesome, be sure to let us know how it goes.
That should perhaps give us a way to translate buttonpresses to other funktions, thinking play/paus to spacebar.
YES. Success! :)
This site was among the first ones i visited a few weeks ago when i started figuring out how to achieve this due to insane battery consumption of my current remote control and of course due to greatness of boxee :)
Take boxee remote, clone firmware to usb dongle and use it with my current (‘slightly’ more powerful than boxee) media center. easier said than done:)
I have to admit that i had a blast as a ‘higher language’ programmer that never had to go this low :) Spent nights trying to figure out how nrf24 works reading datasheets, getting to know raspberry/arduino in order to flash fw, searching high and low for that holy grail.. 32kb intel hex file representing usb hid boxee remote flashed into 32kb nrf24lu1+ dongle happily navigating through kodi using the greatest remote control i have ever held in my hands
s
Any chance ShoDaN can share the solution with us mortals that know much less about coding?
Also, did you use some off the shelf dongle or was it a specific device?
Good news, got it working. Ended up ordering a regulator and soldered it up just like you Martin. After that it was plug and play, works like a charm :-)
Hi, I’m thinking about slaughter one of my boxeebox and try this mod in my Raspberry Pi 2. This might be a stupid question but on the PI there is a GPIO Header and i noticed that one of the pin is 3.3v, can I use that instead of a getting a regulator that converts 5v into 3.3v
So in that case i will only solder d+ and d- to the board.(and gnd ofc:P)
Thx Martin for this awesome mod!
Thanks!
Sound like a good idea, should work.
At least nothing should break if you try it :P
Thanks very much Martin and everyone else on this page! I used the 3.3v GPIO header to power the red wire, and connected the green, white and black ground wire to a usb cable I ripped apart. My Boxee Box Remote works straight out the box with OSMC on my Raspberry Pi 2.
All I needed was a Boxee Box, needlenose pliers, screwdriver, scissors, some electrical tape and a couple hours. Sorted!
Looks like I finaly can use my Boxee Box as a case for my Raspberry Pi and still use the Boxee Box remote in Kodi!
“One thing I want to try and haven’t managed yet is to see if I can read the firmware out of the USB device and maybe load it into another USB dongle with nRF24LU1 and then I’ll have a backup receiver.”
any luck backing up the firmware?
Boxee Remote Control Rebuild
https://www.youtube.com/watch?v=_OXB0XT1HFs
What are the chances that somebody can extract the firmware from their device so I can re-flash a dongle to work with my remote? It’s a thrift store find, so no Boxee available to rip apart.
Haha awesome! Six years later and I found this info to be really useful still! I have successfully added the remote receiver to my rpi4 setup and while I was at it, I reused the boxeebox case as case for the rpi4. It’s a ten minute job to gut the whole case and leave only the metal frame for mounting things onto. Then you can easily reuse the power button with the rpi and also connect the logo LEDs. My boxeebox was always a POS until now! Wish they’d stuck to the GPL and released this thing with an unlockable bootloader in the first place,then this device would not have been an ugly doorstop for so many years.
Can confirm it works fine with 5V. Took the risk on mine and I see no issues, no heat from the chip, nothing.