[Pat] is a luthier and general guy that likes to build stuff. In order to get his guitars to come out the best they can, he needed a thickness sander. For those who don’t know, thickness sander is a machine that will sand off a small amount of material from the surface of a large wood panel. There are certainly commercially available thickness sanders but [Pat] thought that they were simple enough machines so he decided to give a go at making one himself.
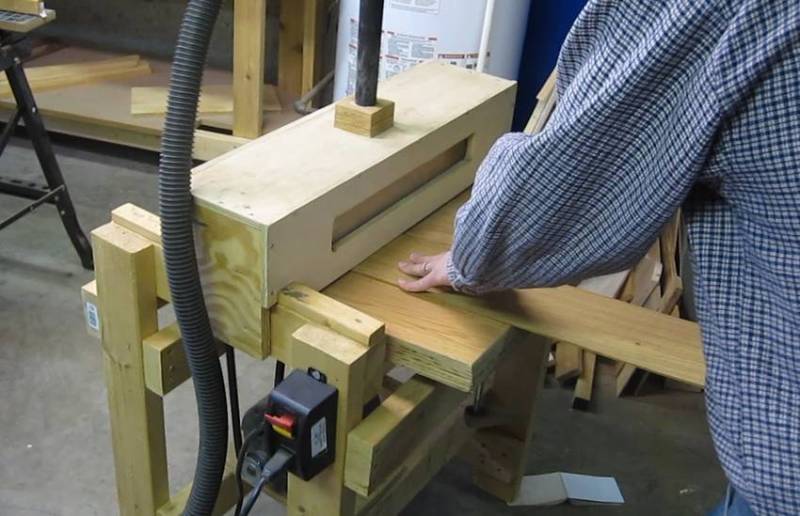
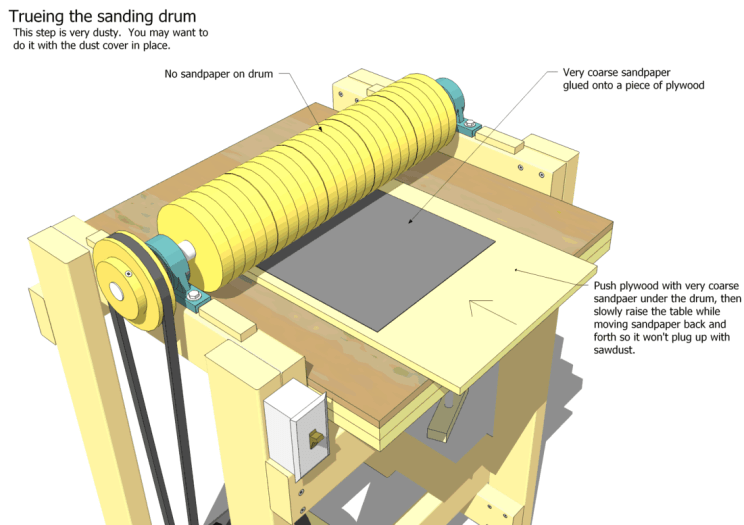
Since [Pat] already had access to a pretty nice wood shop, it only made sense to build the thickness sander primarily out of wood. The frame is made from standard 2×4’s. The drum is made from many disks of MDF mounted on a shaft and spun by an AC motor. You might imagine that a bunch of MDF disks mounted on a shaft would not result in a very cylindrical shape and that is exactly what happened here. So before applying the sand paper to the drum, course sandpaper was applied to a sheet of plywood and used to sand the drum round. It’s a super simple technique that resulted in a true-spinning drum. Afterward, velcro is attached to the drum and velcro-backed sandpaper is wrapped around the drum. This allows quick and effortless changing of sand paper.
With a tool like this it is important to be able to adjust how much material is removed. This is done by way of a hinged table that can increase or decrease the distance to the drum. A simple wooden dust cover and shop vac suck up the dust. If you’d like to make your own sander, check out these extremely detailed plans.


Impressive build, but I might have put a guard over the belt if I had built it. Probably not necessary, but I have a missing fingertip that has made me much more aware of running belts over the last 24 years.
That is one of those things you don’t think can happen… til it does. I’ve been raised by wood workers and always have the upmost respect for anything that can remove parts… Excellent reminder
I was raised around machinery also, but as a teenager I knew everything and thought that being cautious was for wimps. Lesson learned.
OK, I have to ask. Where did you find the fingertip? I know a guy who lost one.
Thanks for the laugh.
To be honest, I found the fingertip several feet away from the pulley that pinched it off. Unfortunately, it was too badly damaged to be reattached. Fortunately, it was only the last 1/2″ of my left ring finger. Losing it never prevented me from doing anything, except sticking my hand into another running belt. For some reason, injuries like that make one more cautious.
I don’t know what the folks at the hospital did with the fingertip, but I doubt they kept it. If I happen to find it, your friend is welcome to have it, though I doubt it would be helpful to him.
Once bitten, twice shy. Funny what a good teacher pain is.
http://sandpaperamerica.com/ is the goto place for virtually any size of sandpaper.
Nice folks, too.
Thanks for the link. Almost local. Not all sandpaper comes from Canada.
Wow. This place is literally around the corner from my house…I’ve never seen any activity there. Then again, I work during the day. This project was exactly the sort of thing I’ve needed for a while and had been trying to find a decent used planer for the few times I need it (generally save things up for a year until I’m ready to do something and send them out to a friend when I actually find the time to do anything…probably a dozen instruments sitting in my garage in various states of build).
Website says its the same address…might have to take a walk next week to see the place. Thanks for posting this!
How does this differ from a thickness planner? Finer control? Better finish (with the planner you usually have to use a orbital sander afterwords)? What? And hopefully the guy uses hearing protection (between the shop vac and the sander, there was ALOT of noise).
This one sands. A planer planes.
Basically, you use a thickness sander on really thin stuff. I don’t know where you’re getting the ‘better finish’ idea. A properly set up planer with sharp blades will leave a perfect (relative, at least) finish. A planer is pretty much a jointer turned upside down, so if you have to sand after putting it through a planer, you’re doing something wrong.
Oh, if you’re using a thickness sander, you might want to scrape the board afterwards.
I have 12″ dewalt planer and 16-32 Performax drum sander in my basement workshop. I use the planer to clean up and flatten rough sawn boards. Even with brand new knives on the planer there is always some imperfections like minor chipout/tearout after planing. Especially if you try to plane highly figured exotic woods. Or a small nick on the blade that leaves a line when planing. The planer is used mostly to quickly cut down several boards to the same thickness. I almost always use a random orbit hand sander afterwards with 150 and 320grit to clean up any imperfections left by the planer. Very rarely that a board comes out of a planer that I didn’t have to finish sand afterwards.
A drum sander takes off material at a slower more controlled rate. Very good for highly figured woods that would be damaged by a planer. Drum sander can be used for thicker items too. Doesn’t necessary have to be for thin stock only. If I have a piece of wood that is a larger width than my 12″planer than I use the drum sander instead. Great for flattening larger panels after glue up. Drum sander is also good for very thin or small pieces that a planer would most likely damage or be unsafe to send through. You can put a very fine grit paper on the drum and sand pieces very very smooth. Although I mostly just use 150grit on the drum and then hand sand with finer grit with the random orbit anyways. Different tools for different jobs. One isn’t better than the other. It’s great to have both.
Sorry Brian, other than a rotating blade, planers and jointers are very different tools with very different purposes even when used upside down. “Most” jointers and planers leave milling marks that should be removed with hand planes, sanding and scrapers (among others).
Perhaps I’m slow but does this design produce a fixed thickness? I don’t see any feature to raise or lower the table or roller. Superb graphics otherwise. Thanks
Re read post. It’s the hinged table bit. Sorry.
What prevents it from flinging the sheet or part you fed into it across the room?
I figure you feed the part against the rotation of the sander, so that at most it will push it against you with the same force you push against it. I can see how this could become dangerous if anything got caught between the piece being worked and the drum, though, so it’s probably a good idea not to sytand directly in the path of the piece being worked.
“What prevents it from flinging the sheet or part you fed into it across the room?”
His pelvis?
Nice build, and good write-up :-)
(Note however that the linked article correctly capitalizes the use of the proper noun, Velcro. ;-)
Are you using a sanding paper that has Velcro on it? Or is the sanding paper glued to the drum?
The article states that the drum gets velcro glued to it, for quick easy paper changes. So yes your using velcro backed sand paper.
I have made a few table tops of 1200mm X 3600mm and 50mm thick with exotic woods – it’s hard work but the end product is worthwhile. The top is usually composed of various planks glued together to make up two boards of 600mm by 3600mm and these then require shaping to the same thickness before they, in turn, can be glued together. The company that used to be able to do this, unfortunately, closed down. I intend building a similar thicknesser sander with a large table to take 600mm wide boards up to 100mm thickness. To enhance safety, the trick would be to build in anti-kickback pawls on both entry and exit sides of the sanding drum and then to ONLY take off a tiny bit of material at a time. When occupied in the Nutcracker Suite the utmost care needs to be taken – there is no need for speed.
Thanks for the designs, got many additional ideas.
Very cool I will build one
Wondering how you attach the discs to the 1″ shaft to keep it from spinning inside the holes through the discs.
I was wondering exactly the same thing. Also, what is keeping the axle from sliding back and forth in the pillow blocks? I’m not seeing that on the plans either.
Pretty much copied this – but without using hook and loop (I made a method of screwing the belt ends to the mdf instead).
It gouges large panels (not just visibly – you can feel the indentations). Perhaps hook and loop would improve that. Also, the table design is not good – far too small outfeed, and too small sanding height.
All in all, not successful. Back to the drawing board….
[Pat] also added a few clever features to his DIY thickness sander. He added a depth gauge to the front of the machine so that he can dial in the exact tthicness he wants to sand off. He also added an adjustable dust port to the back of the machine to help with dust collection.The end result is a machine that works well and saves [Pat] a lot of time and effort in the guitar-making process. Plus, it’s a great feeling to know that he built it himself. This project is a great example of how DIY can be a cost-effective and rewarding solution for specialized tools like thickness sanders.