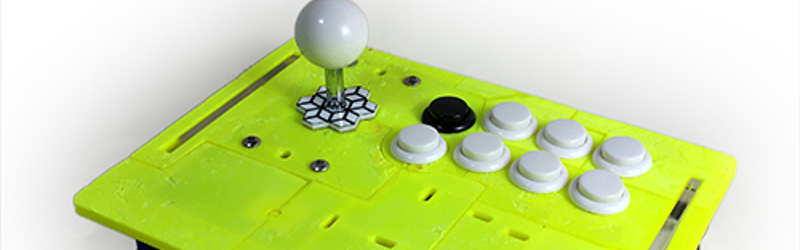
A keyboard and mouse simply can’t stand in for games originally meant to be played with a joystick and buttons. We are of course thinking of coin-op here and building your own set of arcade controls is a great project to give back some of the thrill of those classics. But these are not trivial builds and may push your comfort zone when it comes to fabrication. Here’s one alternative to consider: 3D printing an arcade controller housing.
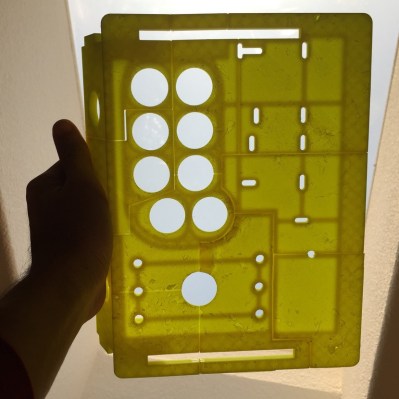 [Florian] already had experience building these using laser cut acrylic and MDF. This is his first foray into a 3D printing build method for the controller body. The top is too large to easily produce as a single piece on inexpensive printers. He broke it up into sections; eleven in total. When the printing is complete he chemically welds them together using a slurry of acetone and leftover ABS.
We think one possible extension of this technique would be to build a mounting system that would allow you to swap out segments (instead of welding them all) while you dial in the exact placement that you want for each component. You know, like when you decide that rectangular button pattern doesn’t fit your hand. That said, this looks like a beautiful and functional build. At the least it’s a great way to practice your 3D printing skills and you end up with a wicked controller at the end of it.


Three things:
1. [Florian] says 3D printing is good because if you have a 3D printer already then it’s cheaper than buying other tools, it’s good experience, easy to replicate and accessible… But what about the rest of the case? Why not laser cut the whole thing if accessibility is a concern and quite a lot more laser cutting is required? At least then you don’t have to worry about getting some of it laser cut and some of it 3D printed chemically fusing the 3D printed bits and all that. I see the 3D printed lid is lighter, surely there are ways of lightening an acrylic/polycarbonate chassis though; perhaps by using thinner material but bonding selective reinforcement at key points (kind of like how the 3D printed lid has a thicker border)?
2. How rigid is this compared to even a thin (say, 6mm) sheet of MDF?
3. Why not use the advantages of 3D printing to make assembly a little easier? I’m thinking dovetail joints to lock pieces together for more secure bonding, use of support structures to improve the rigidity, that sort of thing. Then again maybe it’s perfectly rigid already, it just looks a bit dubious to me.
Pretty much the same thinking here. ^^
I have a 3D printer and a laser, and I always resort to the laser instead of the printer, it’s just faster at prototyping things like that.
1) I’m working on the bottom half of the 3D printed case now. A lot of the things you mentioned (improved rigidity, locking features, etc) are being incorporated. As I mention in the blog post, doing it in incremental steps lets me learn from successes and move quick. So I chose to translate the laser cut design rather than design from scratch and include typical plastic design features. The bottom half I’m working on now incorporates some of these already.
In response to your question about laser cutting the whole thing: I’m working on the bottom half now so the final version will be all 3D printed, this was simply a milestone. I have multiple designs for arcade controllers including some that are laser cut with 3D printed joints and I’ve learned that you should either go all 3D printed or all laser cut. I totally agree with you.
2) 6mm is crazy thick, bro :) I’m dealing with arcade controllers on your lap, so I’ve never had to use anything thicker than 1/4inch (6.3mm) MDF. That’s a hard question to answer because we’re not comparing the same internal geometry and we’re not comparing equal masses. I think what you’re getting at is that yes it IS A LOT less rigid and I’m not claiming my 3D print is more rigid. However, much like a monocoque body is really thin, it provides extreme rigidity with the correct shape and nothing is better at shape than 3D printers. When I get to version 2 of this design and can design it like a plastic assembly should be, I think we’ll have a much more interesting conversation.
3) I’m on it, stay tuned :)
It would probably help out if the pieces were cup-like pieces (with walls going inward) that were bolted together instead of welded. The walls would add a ton of rigidity, and replacing a portion for a different shape would be simple.
Neat idea, though! I would actually consider this for an arcade cabinet build, I just need to find button/joystick/USB interface hardware for cheap.
We got buttons&joysticks for our office arcade machine from: http://www.arcadeshop.de/
Not that expensive, and they still work fine and not show any signs of wear after 1.5 year of extensive use.
You could also try Suzo-Happ. They have just about every type of arcade component you could need. http://na.suzohapp.com/
If you look closely, the “walls” you mention are already there. They were used to weld the assembly together because they obviously had more surface area. I could make them taller but the risk is increased warping while the plastic cools…should still be ok for a little bit taller.
I’ve had bolted together frames and it’s quite the pain TBH. Something like 15 screws would be needed which adds a lot of weight and all the advantages of having a 3D printed part. I do agree that some locking/alignment features would be REALLY helpful.
Thanks for the feedback!