We’ve seen a few of these builds before, but the build quality of [Mathieu]’s timeless fountain makes for an excellent display of mechanical skill showing off the wonder of blinking LEDs.
This timeless fountain is something we’ve seen before, and the idea is actually pretty simple: put some LEDs next to a dripping faucet, time the LEDs to the rate at which the droplets fall, and you get a stroboscopic effect that makes tiny droplets of water appear to hover in mid-air.
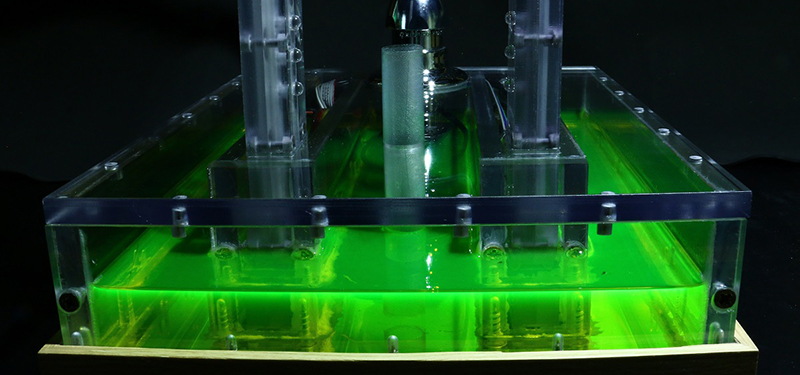
Like earlier builds, [Mathieu] is using UV LEDs and is coloring the water with fluorescein, a UV reactive dye. The LEDs are mounted on two towers, and at the top of the tower is a tiny, low power IR laser and photodiode. With the right code running on an ATxmega16A4, the lights blink in time with the falling water droplet, making it appear the drop is hovering in midair.
Blinking LEDs very, very quickly isn’t exactly hard. The biggest problem with this build was the mechanics. The frame of the machine was machined out of polycarbonate sheets and went together very easily. Getting a consistent drip from a faucet was a bit harder. It took about fifteen tries to get the design of the faucet nozzle right, but [Mathieu] eventually settled on a small output hole (about 0.5 mm) and a sharp nozzle angle of about 70 degrees.
[Mathieu] created a video of a few hovering balls of fluorescence. You can check that out below. It’s assuredly a lot cooler in real life without frame rate issues.


Without all that ambient light this would be much nicer…
How about using a UV Laserdiode with a diffusor lens and “zap” the droplet as it falls by?
I dont think the leds are visible to the naked eye. At least thats the impression i got from the linked article.
I guess the camera is sensitive to a broader rannge of frequencies than we are
I agree with 8)… the columns of “blue” lights on either side will be invisible to the naked eye while the droplet will be visible because of the dye. Anyone know of an easily sourced UV filter that could have been used with the camera to make a better video?
Human cornea are uv opaque (mostly).
I have a few of these LEDs and they look blueish-purplish to me and far from invisible. Am I doing something wrong?
UV isn’t a single wavelength, it’s a band. 400-410nm is visible as purple, and produces mild fluorescence. 365nm is invisible, and produces strong fluorescence.
If you just buy a generic “UV” LED, you’ll probably get something in the 395-410nm range, which is visible, and looks a lot like a good old fashioned fluorescent blacklight (BLB) tube. Get 365nm specifically if you want the light to be invisible.
Though I have a 3W 365nm LED, and it looks dull blue-white. This isn’t the actual 365nm light or its sidebands, but a white plastic part in the LED itself fluorescing! A common recommendation to remove this is a Rosco Permacolor #3660 “UV Pass” filter, but it filters out much of the desired 365nm UV as well. Very soon I’ll be trying a #1048 “Purple Fusion” instead. This may not be a problem with the smaller 365nm LEDs like T1-3/4, I think they lack such parts, but as I haven’t tried them I can’t say with certainty.
Polarized film from an office supply store or a camera shop. Might have to play with it by rotating it until it blocks the light out but the stuff works wonders for making light frequency filters.
Old lcd monitors too
I should also mention that I couldn’t use my 60d to shoot this video because of the artifacts that would appear. Unfortunately I didn’t have access to a professional video camera! It would indeed have been perfect with a UV filter.
Very nicely done! All of your stuff looks really cool and professional.
thanks for the kind message!
Ain’t this a remake of 2006 project? https://www.youtube.com/watch?v=v1sD8Vj0DtM
http://cre.ations.net/creation/the-time-fountain
It’s nice to see other ways to make it though. congratulations.
Mentioned in both the HaD summary and the original article.
When the video title said ping pong, I was hoping someone had made a pong game using multiple drippers.
This is pretty much how we used to adjust “continuous jet inkjet” printers when I worked on that tech in the 1990’s. The strobe light flashes at the desired frequency. The frequency of the piezo that pushes out the ink drops is then carefully adjusted until the drops appear to be stationary. That’s when you get the optimum charge transferred to the drops.