Experimenting with optics can be great fun and educational. Trouble is, a lot of optical components are expensive. And other support paraphernalia such as optical benches, breadboards, and rails add to the cost. [Peter Walsh] and his team are working on designing a range of low-cost, easy to build, laser cut optics bench components. These are designed to be built using commonly available materials and tools and can be used as low-cost teaching tools for high-schools, home experimenters and hacker spaces.
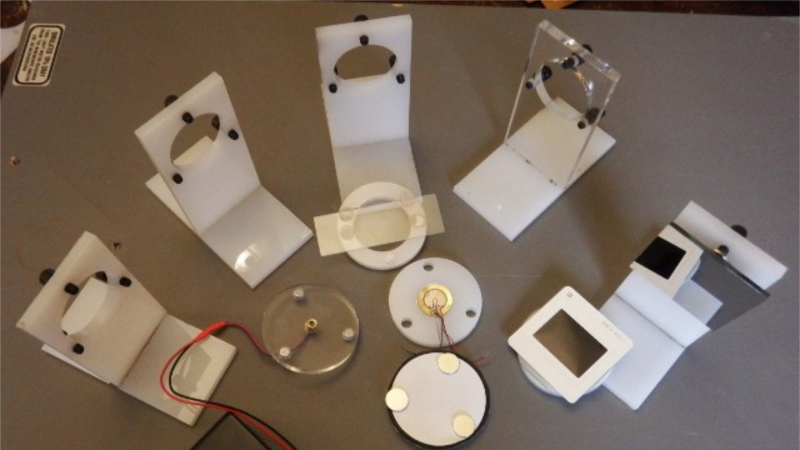
They have designed several types of holders for mounting parts such as lasers, lenses, slits, glass slides, cuvettes and mirrors. The holder parts are cut from ¼ inch acrylic and designed to snap fit together, making assembly easy. The holders consist of two parts. One is a circular disk with three embedded neodymium magnets, which holds the optical part. The other is the base which has three adjustment screws which let you align the optical part. The magnets allow the circular disk to snap on to the screws on the base.
A scope for improvement here would be to use ball plunger screws instead of the regular ones. The point contact between the spherical ball at the end of the screw and the magnet can offer improved alignment. A heavy, solid table with a ferrous surface such as a thick sheet of steel can be used as a bench / breadboard. Laser cut alignment rods, with embedded magnets let you set up the various parts for your experiment. There’s a Wiki where they will be documenting the various experiments that can be performed with this set. And the source files for building the parts are available from the GitHub repository.
Check out the two videos below to see how the system works.


Woot – my team!
We are *just* getting started with populating the project. Expect to see wiki pages with no text and maybe some issues with the dropcut files. We should be in a better state in about a month.
Ball plunger screws are a nice idea, but cost about $1 each on eBay. We’re not having any problem with slippage or aiming using regular screws, and we’re trying to keep the costs to a minimum so that anyone can make these on a budget.
Our biggest issue ATM is finding inexpensive optics, such as glass lenses (we want to avoid plastic lenses). We’re aware of American Science Surplus and the other surplus sheds, but as far as we can tell lenses are about $5 or more apiece.
We think the best bet is to grab slide projectors and movie cameras on craigslist and take the barrels apart for lenses.
Does anyone have a source for inexpensive glass optics?
Also – ball plunger screws are stainless steel, which is only slightly magnetic.
The screws have to be [black] regular steel and not [shiny] stainless steel. There’s a note about this in the wiki.
The 1st video shows an (old prototype) holder with stainless steel screws – if you look closely you can see it’s wobbly. There’s no problem when regular steel screws are used.
That makes sense. Well, it’s always possible to grind the end face of the screw smooth if it’s causing alignment issues.
It’s all about what you’re looking for. There are cheap uncoated spheric/plano glass elements from East Asian suppliers but that’s at scale if you want to go below five dollars for a double convex lens, but why the aversion to plastic? The lens in that laser is plastic, and the lens in front of the CMOS sensor in your camera is plastic. If you need a specific index of refraction for an experiment I’d understand, but if you’re just showing kids what a bi-convex does vs a plano-convex plastic is going to be far less expensive for procurement and shipping, way easier to adjust the diameter at home, and much less likely to be damaged.
If the experiment calls for higher precision optics, in my opinion it may not be worth skimping on glass, but instead focusing on fixtures where the costs fly through the roof when experiments require precision and repeatability.
Also amateur astronomer resources may have a lot of useful tricks and tips! Using chalkboard paint as cheap blackening, finely threaded screws as micrometers, vibration dampening techniques, alignment techniques, system test designs, help with theory, construction.
Good luck guys
What about 3D printing the parts instead? Using your layout files that should be straightforward too, no? For glass lenses, you think the bottom of a wine bottle – properly cut out – might do? Otherwise broken CD players can provide mirrors, lenses, powerful laser diodes and beamsplitters (small form factor though). Polarizers for visible light can be obtained from broken LCD screens. Just take a cutter, cut out the front layers of the screen and pull them off. If you know how to get waveplates, I’d be very interested!
That is definitely quite neat. Great job !
I would also try to make holders capable of resting on this kind of rail : http://pe2bz.philpem.me.uk/Lights/-%20Laser/Info-999-LaserCourse/C06-M01-OpticalTables+Benches/FIG4.JPG. A v-shaped feet, a hole on the side and a screw.
This would allow pre-existing lab supply in schools to be used without hassle.
“Inexpensive laser-cut” is an Oxymoron. One way or another someone has to pay for the expensive laser cutter.
Nah, laser cut parts are really cheap even commercially made, once you get past the setup cost. Like 50 EUR for a 50×50 cm sheet where you could fit atleast 10 of these designs.
“…once you get past the setup cost.” You made my point.
You bring me back some childhood memories (all those hours playing with a GDR made optik-cabinet ;)).
Reminds me of an educational optics playset i got once for Christmas. Big box with all sorts of lenses. You could use it to build a microscope, binoculars and a whole lot of experiments. Used it a lot actually, contrary to my chemistry set.
That’s just what we’re trying to make. We’re taking inspiration from the “Legacy Chemistry Set” in trying to make a system that can be used for real experiments as well as learning.
We plan to describe standard optics demonstrations (microscope, projector, telescope, and so on), and also have some open-ended setups that can be used by Citizen Scientists to measure and record experiments.
For example, the cuvette in the 1st video holding a colored liquid. Along with the spectrum, we can (probably!) measure the specific angle of rotation of the liquid, which would let chemists identify a substance, or (if the substance is known) the concentration.
The intent is for the set to be used as a learning toy, but still be of use it when you get older.
If i remember correctly, the lenses in that set were all plastic and encapsulated in a colour-coded holder you could screw onto other parts. Optical Lego, as it were. I loved playing with it but it did lack a prism. Make sure you add a prism if you’re aiming it at kids.
What about 3D printing the parts instead? Using your layout files that should be straightforward too, no? For glass lenses, you think the bottom of a wine bottle – properly cut out – might do? Otherwise broken CD players can provide mirrors, lenses, powerful laser diodes and beamsplitters (small form factor though). Polarizers for visible light can be obtained from broken LCD screens. Just take a cutter, cut out the front layers of the screen and pull them off. If you know how to get waveplates, I’d be very interested!