[Tim Trzepacz] is working on a pretty cool MIDI controller project over on Hackaday.io. It involves, naturally, a bunch of knobs and buttons. And it’s one of these nice arcade-style buttons that broke when he slammed on his car brakes and it went flying.
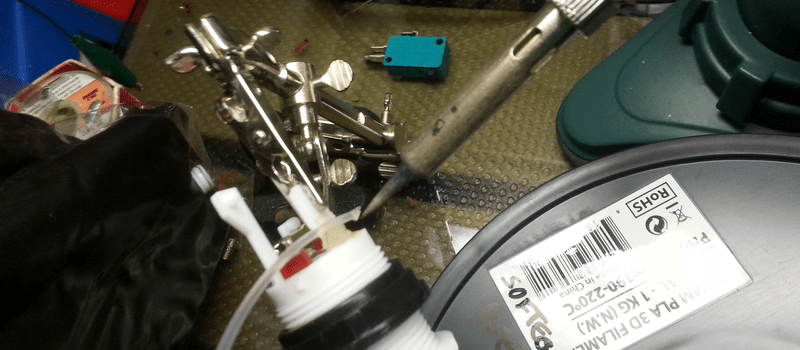
He tried gluing the plastic bits back together, but we all know how that works — temporarily. Next, he thought that maybe he could 3D-print a model of the arcade button’s housing. Besides being a lot of work, [Tim] didn’t have a reliable printer on hand. But he did have filament and a soldering iron.
The rest of the story is a slightly ugly mess, but it looks like it’ll work. (And it’s on the inside of the case, after all.) A working part is a good part.
The irony here is that the original choice of 3 mm ABS filament as a printing material is that it’s cheap and available because it’s commonly used in plastic welding. And there are more elegant ways to melt the plastic than with a soldering iron. And more ways to get it melted than direct heating, like ultrasonic welding and friction welding, for instance.
But we still like to see the occasional quickly hacked together effort, at least one per day. What’s your craziest plastic welding success or failure?


Great hack.It looks much like using a filler when brazing. I tend not to do this sort of thing anymore, especially with an ABS plastic. Nasty fumes.
As a bit of a “nit pick”. That button is nothing like an “arcade style” button except that it has a micro-switch hanging off the end of it. If it were actually an “arcade style” button then it wouldn’t have broken.
True about those buttons. They seem to last forever despite pizza grease and mashing as fast as possible! Maybe he has an 80’s keyboard that can donate something better.
30 secs with Google found this: https://www.coolcomponents.co.uk/concave-arcade-button-red.html?gclid=CjwKEAjwsYW6BRCTzvu5y8DPhi0SJABnGLlHipgrpWiDW8P3rom4G7KMV704t5mzstYYwMTR2dBdQRoCOjjw_wcB
I wonder if an 80’s arcade button saw more cycles than the average industrial limit switch. Cheap chinese parts are ok for the home hacker but can they stand up to thousands of cycles per day?
Early arcade games used leaf switches, they changed over to microswitches by the 90’s. I’d guess most were “cherry” switches, they’re a quality switch.
The button *is* quite rugged, but the tabs that hold the switch in aren’t generally mashed into the carpet at 40 MPH, as this one was.
I got it from All Electronics: http://www.allelectronics.com/make-a-store/item/pb-9r/spdt-momentary-pushbutton-red-button/1.html
Check out suzohapp or marcospecialties if you feel pressured by internet experts to be “authentic” or whatever.
I concur. I was manager of an arcade in the ’90s. I have a bunch of those arcade buttons with Cherry microswitchs from All Electronics, and they match those arcade game buttons. They’ll take tremendous punishment on the button, but not on the back.
It totally is an arcade style button. A cheapo arcade style button, but still an arcade style button.
Wipe the hot tip and gun it. The trusty Weller gun gets a workout specially the trigger switch as I weld plastics that don’t crumble or burn instead melt. I keep the heat in the sweet spot manually with minimal charring. I get a good repair that holds but is ugly, built up enough with donor plastic it’s sometimes better than new. Soon as it cools it’s done ready to use. Donor plastic can be found inside in webs and extra pieces of the case.
To repair somethi g like that get some hard steel dowel(think drill bit shank) cut to legnth, drill out hole in one side, holdin pliers and heat with a torch and shove in other side, then slather in epoxy and shove into drilled hole. Steel dowel provides the stregnth, epoxy keeps it in place.
Plastic welding is very common and even harbor freight has a plastic welding kit.
the photo composition was funny. if it clicks like a duck, has low on-resistance like a duck, it MUST be a …. microswitch!
It was kinda hard to take that photo! One hand to hold the filament, one hand to hold the soldering iron, one hand to hold the camera and press the button… wait…
I actually put the soldering iron in my PCB vice to hold it for the shot. I would have liked to have more shots showing exactly how I tacked the end of the filament down first with the tip of the iron, cut the end off by placing the iron perpendicular to the filament, and then used the flat part of the tip parallel to the filament to mash it into the corner and melt it. But I didn’t have enough hands, and setting up a tripod and timer was too awkward to bother with.
But that photo clearly shows PLA.. not ABS. :/
Good eye!
I don’t know what kind of plastic the button actually is, but I know that ABS cement completely failed to work on it, so I’m guessing PLA. The PLA filament seems to stick to it fine, and a week later it is still holding, so maybe that was it.
thats the problem right there; arcade buttons made out of PLA.
wicked skills there, ive used actual solder mixed-in with scrap plastic to plastic-weld before, not easy, and note easy to make-strong!
i mean, after the plastic fumes hit the brain… it’s not the same
I doubt the buttons are made from PLA, they are more likely to be nylon or some other engineering grade plastic (*PE, delrin, etc).
I’ve fixed a lot of front panels, plastic chassis, and doors on VCRs, cassette decks, TVs, etc. I had an old soldering iron I used, because it was really difficult to get the tip retinned after doing this. I’d use plastic cut from junked equipment.
I was very good at making the repair invisible on the outside.
This is the same as old plastic repair kits that they used to sell with their own curtain burners; they usually had a receiving hole in the iron that made it easy to use the supplied rods.