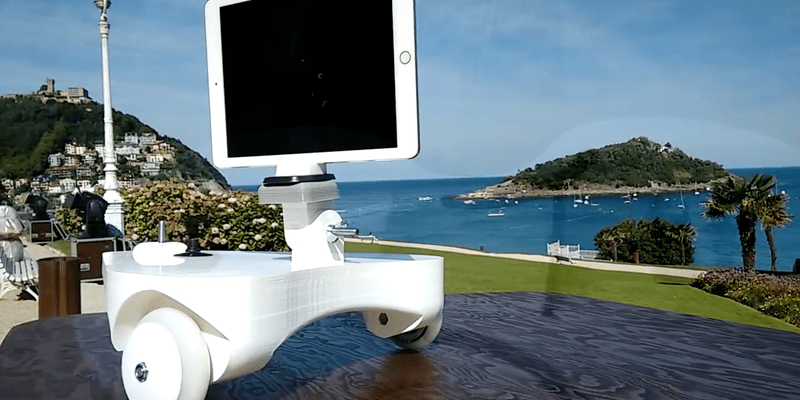
[Ivan] likes to take time lapse videos. Using his 3D printer and a stepper motor he fashioned a rig that allows him to control the camera moving any direction on a smooth floor.
The dolly has a tripod-compatible mounting plate and scooter wheels. An Arduino runs the thing and a cell phone battery provides power. A pot sets the speed and [Ivan] provides code for both a linear pot, which he suggests, and for a logarithmic pot, which he had on hand. You can see a video of the results below.
The device looks good thanks to the 3D printed body; [Ivan] provides the STL files if you want to reproduce his work. You have to print several of the parts multiple times.
We’ve seen good looking dolly rigs made of wood, if you are better at woodworking than 3D printing. We also saw a less-polished looking set up using Makeblock.
https://www.youtube.com/watch?v=lVN6WlPhj74&feature=youtu.be


Quite a large 3D print. Obviously great for a finished look.
I woulda just hacked a frame together with 80-20 parts, but then again I don’t have a 3D printer!
Interresting point. Ive had a 3D printer (prusa i2). Not the best working horse… So I even ended up ditching the printer and going back to the McGyver technique. Better for single version prototyping maybe, but a 3D printer does have its cons! But it needs to be build correctly.
I’m dragging my ass on owning a 3D printer, but I tend to regard them as more useful for making special, awkward shape parts. Use sheet, angle, bar, rod, dimensional lumber etc. for structure, make 3D parts to help interface bits together. Maybe make jigs to make using other materials easier.
Its funny, ever since I McGyverd a larger (12″x14″ build space) delta 3d printer and used it to print replacement parts for itself I have not even looked at making parts by hand. Does it take longer sometimes to get the part? Yes, but generally speaking most of the parts I have designed took less than 1 hour to design and multiple hours to print. With that said a 3d printer has allowed me to work on other things while the print is going and therefore it has made me more efficient. Sometimes it has been cheaper to 3d print the parts in plastic than to buy raw material and build by hand, the fit and finish is much better as well. When you factor in time and gasoline its cheaper to 3d print on allot of cases. I buy plastic at 16bux per kilo from the local electronics store and keep some in stock, not much 2-3 rolls is what I keep in stock. The 3d printer has also been an invaluble prototyping machine. While I am getting better at designing parts in general there are parts that I 3d print more than once to verify fit and finish. For me its the most valuable machine in my workshop. Recently I needed a replacement wheel for a shower door, it would have been a nightmare to track it down at a local hardware store or simple if I spent a few hundred dollars to get a whole new door. I took the old wheel chunks off, modeled it in less than 10 minutes, had a working wheel in the shower door in less than 1 hour including assembly and post processing. That is certainly way less time than just taking a trip to the store and back. The cost savings are huge too.
Agree! You would have to pry my Craft bot 3d printer out of my cold dead hands. It is amazing to think of something and hold it in your hand a couple of hours later. My poor mechanical skills usually mean the first few prints are wrong, but it is wonderful to just tweak some dimensions and hit print again until it is perfect. My old metal and woodworking stuff is getting dusty!
The chassis is bigger than 12″x12″. I didn’t think many printers went that big.
Probably printed as multiple parts then assembled. like the Hovalin. http://www.hovalin.com
It is one piece printed in one go. It took two tries because I run out of filament once. But I did a Laser Cut violin also a few months a go if you want to check it out in my channel.
There’s bigger ones out there. If you narrow your focus to the $200 to $600 range, you’ll only see smaller ones though.
However, Between the ages of about 6 and 12 I made a thorough study of the assembly of Kinder Surprise toys, and between about 10 and 14, the assembly and construction of Airfix/Revell plastic kits…. therefore if I wanted something bigger than print bed size, I think I would be able to work it out.
This printer did cost about 350$ in raw materials. If you don’t count the time though. But it is doable for that dough, just have to invest some more time designing.
It’s 15.7″x15.7″x15.7″ in size.
I agree, just add wheels to a framing system
http://www.absolutelyautomation.com/articles/2016/01/29/build-frame-mini-pilot-plant
Neat idea! Perhaps the next revision could include active steering and a line follower circuit/cliff edge detector.
Looks great! Nice work adnarimnavi!
Thanks!!