When we think of an old-style computer terminal, it has a CRT screen: either one of the big 1970s VDUs with integrated keyboard, or maybe one from a later decade with more svelte styling. You would have found other displays in use in previous decades though, and one of them came our way that we think it worthy of sharing.
![]()
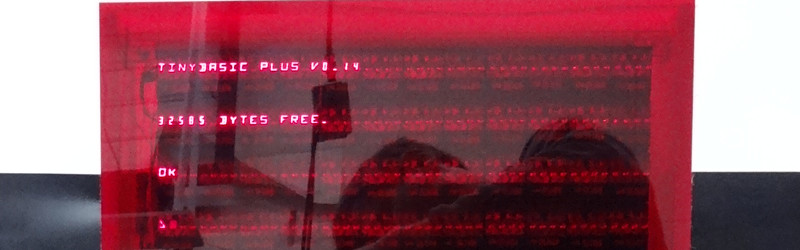
[Dan Julio] was given several tubes of Siemens DL1416B 4-digit 17-segment LED displays by a friend, and decided to use them as an unusual retro display for his terminal project. These devices are an alphanumeric display with a parallel interface that can show a subset of the ASCII character set as well as a cursor. He had 213 of them, so made plans for a 64 character by 16 line display, however on discovering a quantity of the parts were non-functional he had to scale back to 12 lines of 48 characters.
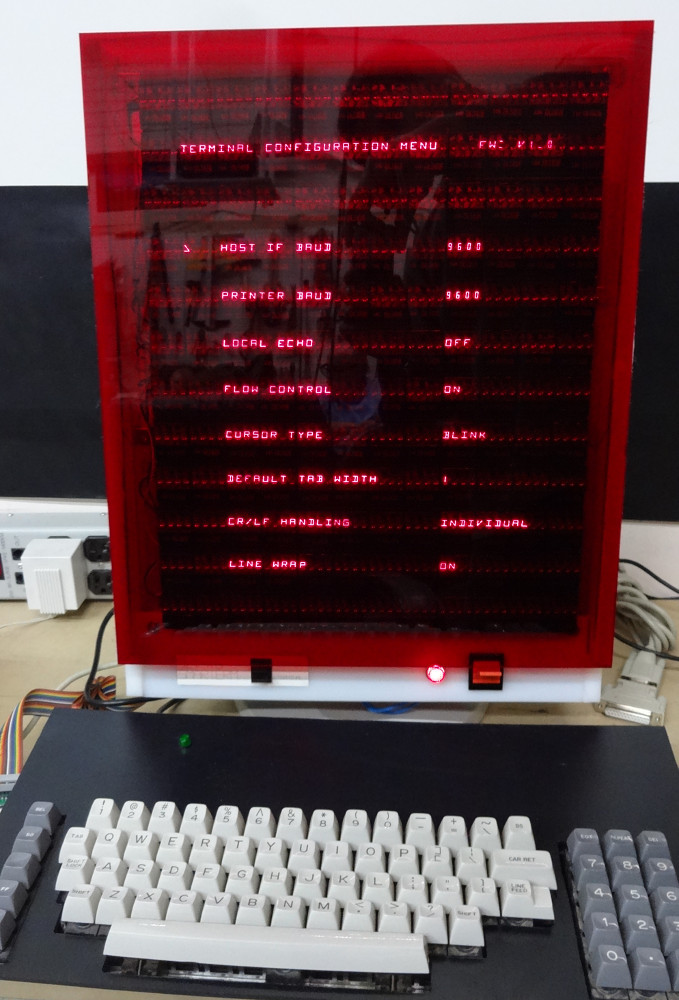
The displays are mounted on PCBs in groups of four, controlled by a PIC16F1459 and some shift registers. These boards are then daisy-chained via a TTL serial line. The whole display shares one of the three serial ports on a Teensy 3.1 with his retro keyboard that has its own PIC controller, the others serving a serial printer port and the terminal serial port. The Teensy software has two modes: serial terminal or a Tiny Basic interpreter, and the relevant repositories are linked from the project page.
Since each set of DL1416Bs takes 250 mA, the whole display consumes about 9 A at 5 volts. On top of that the keyboard uses another 500 mA, so a sufficiently powerful supply had to be incorporated. This is mounted along with the Teensy in a very well-made enclosure, and the whole is mounted on what looks like a surplus monitor stand for a very professional finish.
To take us through the terminal’s features he’s posted a YouTube video that we’ve placed below the break. It comes across as a surprisingly usable machine, as he logs into a Raspberry Pi and edits a file, and takes us through some features of the BASIC interpreter.
Multi-segment displays like these are rather rare, so we’ve not featured a huge number of projects using them. There was this tiny clock with another 16-segment part, and this rather nice 14-segment array, but that was nowhere near as large as this one. We’ve had plenty of more conventional terminals though, like this DEC VT100 with a Beaglebone, and this VT510 with a Raspberry Pi.
16 segment animation, Michael J, (PD) Wikimedia Commons.


Not retro enough?
As far as I remember, there were CRTs long before there were LEDs.
And before CRTs, there were lamps and dials.
Truly one comment to sum it all up, can’t add anything of value to this discussion myself.
In terms of personal computing though, LEDs did come before the CRT. If you’re talking about calculators and more mainstream old school, computers, then yes, there were certainly other technologies, but the earliest small computing systems did use LEDs before CRTs. Look at the Altair with it’s individual LEDs, or the KIM-1 with the hex display.
When specifically talking about terminals… More retro than this is an impact printing teletype, or some such electromechanical artifact.
VFDs be like, “bitch please..”
Individual tube VFDs did appear early on, mostly in calculators, as alternatives to nixie tubes, but again, in desktop computing, barely made a scratch. Around the time computing hit the desk, LEDs were the Preferred method of outputting data, as alphanumeric models were more readily available than they were in VFD form. LEDs held an advantage until the CRT took over, thanks to the usefulness of the increased data display area, and the proliferation of “TV typewriter” style interfaces.
Now someone needs to have a multi-output device that combines a CRT, nixies, VFD, LED segment, LED dot, Edge illumination-planar displays, numitrons, panaplex…
If you’re going to bring calculators into it, VFDs were more popular until late 70s.
VFDs flew to the moon ;-)
The DSKY used a custom made VFD…
This display is awesome. Slightly less retro than fascists seizing power through fear and ignorance.
What are you talking about, this project happened before Trump was elected.
(no, I know which fascists you’re talking about :P)
I’m so glad Wikileaks and the Hacking community warned the world about what a power hungry fascist she was! ;)
Id like to see a split flap terminal
Back in the late seventies my second computer, the AIM-65, had a row of 1×20 characters of this type of displays. And as I remember it it was quite usable to code inBASIC on it. Today I really can’t imagine how I coped entering, editing and debugging on it.. ;-)
http://www.oldcomputers.net/pics/Aim-65.jpg
How did you edit on this thing? Could you scroll through the program on the display?
I don’t really know, but I got bored and found this: http://www.easy68k.com/paulrsm/6502/PL65MAN.TXT
My HP 9825 is jealous of all those LED displays!
So am I ;)
LED display watch
http://grail-watch.com/2014/05/28/1975-girard-perregaux-casquette-led/
I still have it boxed and wrapped with extra linkages grandfather brought it in TOKYO when it was released.
Slow clap. Beautiful.
I totally agree, would love to have that sitting near me.
Thank you.
Oh, man, I was ready to give all my praise to this project until I heard about the Pi and the Teensy. Talk about ruining the cake. :( But I guess comments like these aren’t welcome at Arduino-a-day.
ha. The Teensy was because it had a lot of RAM to hold various buffers and working space for Tiny Basic and the Pi was just a test tool. A terminal has to have something to connect too…
Maybe let the attention be on the project and its merits, not your tired, irrelivant prattling about a popular minrocomtroller platform. Built something yourself and share it, let others show off their efforts without your useless criticism.
“When all you have is a hammer, everything looks like a nail.”
That’s the problem with today’s hobbyists, they try to solve every problem with the Arduino. I saw a guy on a forum wanting to build a fake car alarm (blinking LED), and someone suggested he’d use an Arduino. Yes, seriously.
People need to snap out of this mindset and start exploring the wonderful world of electronics – not just software.
If I had built this awesome display — and, yes, I want to stress that it is SUPER awesome — I would have used a real CPU from the same era. Say a i8080, Z80 or even a 6502. I’d add some RAM, write my own ROM, maybe throw in a 6526 for the UART. This is not difficult, it would take a day or two tops. Elementary and essential stuff that everyone in electronics ought to know about!
Also: Yes, I’ve built lots of stuff, I’ve shared it and some of it have been featured on this site before. Now you try the same — don’t waste your time being a keyboard warrior.
‘elementary and essential stuff’ to you, and the timeframe it might take you in particular to build the project is irrelevant. The fact that it uses an arduino and a pi is totally besides the point – it’s the display that we’re talking about here.
Why not use an arduino for a very simple task? they’re ultra cheap and easy to use. Saving time can be more important than doing things according to an arbitrary set of guidelines which are more cool.
Also, having made stuff yourself and being featured on the site is totally irrelevant to this discussion. You’re right, comments like yours aren’t welcome here and will get blowback, but not for the reasons you think!
> ‘elementary and essential stuff’ to you
No, to almost everyone who wants to learn electronics. Learn about clock cycles, data busses, decoupling capacitors, interfacing, selecting the right chip with logic etc. How are you going to debug your broken Arduino if all you’ve done is connecting shields?
> The fact that it uses an arduino and a pi is totally besides the point
It’s absolutely not besides my point, which is what we’re arguing here. Are you paying attention?
> Why not use an arduino for a very simple task?
Like blinking an LED? I’m sorry, but that’s just outright stupid. It’s like using a car just to have a seat to sit in.
> Also, having made stuff yourself and being featured on the site is totally irrelevant to this discussion.
You asked. “Build something yourself and share it”, I did.
> comments like yours aren’t welcome here
Ok, I’m sorry Mr. Representative for Hackaday.
Am I the only one that remembers “Hyperball”?????
At my arcade, I ordered extra balls, jacked the machine up as high as I could!!!
I really (kinda) miss those days…
This thing: http://www.ipdb.org/showpic.pl?id=3169&picno=5997 ?
I’m reading the FAQ on what it is, and I still don’t understand what it is.
Yep! that’s it!
Not really a pinball machine as such, the 2 handles at the front aimed a “ball cannon”, the display would say things like “Spell Hyper”, you then shot balls into the letter holes.
Williams stopped supporting the machine for a while, when the coil on the ball shooter burned out, I had to rewind the coil.
The LED displays were huge, 30 or 40mm high, I never saw them again in anything else, all I know is they had an HP part number on them.
this thing was addictive as hell!
Another interesting display technology from the USSR is the MS6205 plasma character display. They have a parallel interface and can be easily driven from an Arduino with a shift register.
but can it play mattel electronic football though?
Gosh, and here I am thinking about replacing the LED display on my HP97 (printing, desktop version of 67) with an LCD dispay to get around the 2 – 3 AMPs the LED display draws. (Explaing why the battery pack had FOUR C cell NiCads in it.)