A while ago, [drygol] was asked to repair a few old Amiga keyboards. The key switches worked fine, but in the past decade or two, the flexible PCB ribbon connector has been mistreated, and was in an unworkable, nonfunctional state. The fragile traces underneath the green epoxy coating were giving way, but [drygol] found a few cool ways to repair these flex cables.
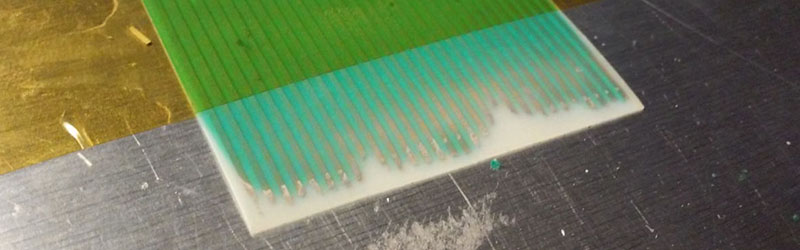
The end of this keyboard cable was beyond repair, but the Commodore engineers were gracious enough to leave a bit of slack in this keyboard connector. After cutting off the most damaged section, [drygol] had a strip of plastic, a few copper traces, and a green coating that had to be removed. The first attempt to remove this green covering used methanol, but that didn’t work. The next chemical attempt was with an epoxy solvent that contained nasty chemicals. This was applied to the end of the flex cable, with the remainder of the cable masked off by Kapton. It worked remarkably well.
In removing the Kapton masking tape, [drygol] discovered this green film sticks better to Kapton than it does to copper and plastic. A mechanical solution was found, allowing these keyboard cables to be easily repaired.
Of course, this was only half of the problems with these flexible circuits. Over the years, a few cracks appeared in the traces. To repair these broken traces, [drygol] turned to silver glue and a few laminations of Kapton to make this keyboard cable whole again. It worked, and the ancient keyboard was returned to service. Great work, and a fantastic observation for anyone with one of these keyboards sitting around: just grab a roll of Kapton to repair these circuits. It can’t get any easier than that.


Could the reason the Kapton worked as well as it did is because the epoxy solvent had softened things up?
I’m guessing that the epoxy solvent contained acetone.
Acetone is not really the best solvent, in a wider sense.
Most epoxy solvents, depending on how bad the regulations are in your region, contain DCM. This pretty much used to be the universal go-to solvent, but it turns out it was horrifically bad for the environment. The stuff available in some states in the US is DCM mixed with some petroleum-based gel. Since DCM is so low viscosity, it’s hard to work with in a non-immersion manner unless it’s gelled, and this lets you leave it on a surface, let it slowly dissolve your coating, and then allow you to wipe it away.
See: Jasco’s paint and epoxy remover
Nope, it was on a fresh (not treated with a solvent) part.
Also, double-sided adhesive tape worked better.
I mean, they would’ve known that if they bothered to actually look at the article though.
Was using the silver “ink” he used to repair the breaks not an option to fixing the ends?
Not sure how the old Amiga boards were constructed, but I would have given serious thought to retrofitting the ribbon to something else. What is that, 30 conductor? Got quite a bit of old ribbon and braided cables that meet or exceed that count.
Usually the keyboard itself is exactly the same piece of plastic that also works as the contacts for the keys so there is no-where that you can solder too as soldering temp is too high for the plastic sheet.
Reminds me of trying to fix virtualboys. Definitely going to give this a shot next opportunity.
Can you not just buy a new FFC? Am I missing something here?
The FFC is part of the whole keyboard assembly, it is not a straight connector, look in the first link to see.
Nice trick!
I found out another flat flex trick a while back, which is especially helpful for repairing membrane keyboards. It turns out Circuitscribe or similar pens work pretty well for repairing broken traces.
Exactly ! I’ve tested it the other day and it works very nice on small breaks !
Good the you’ve mentioned it ! works like a charm.
I repaired one with a laser cutter. ‘engraved’ a patch over the end of the cable on low power twice, and then washed off the burnt plastic with alcohol cleaning solution. It left a nice shiny row of contacts
A fibreglass pen ( http://www.ebay.co.uk/bhp/fibreglass-pen ) or “soft” emery paper (fine grit) works quite well for removing the green topcoat. We used to encounter this a lot, back in the day when these machines were popular.