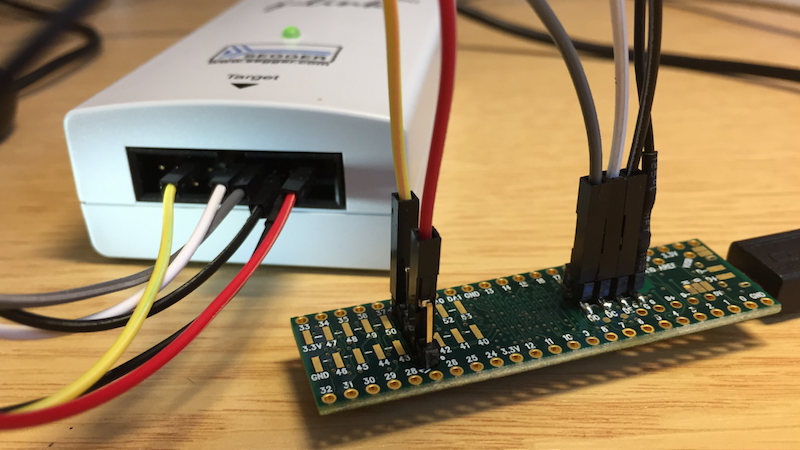
The Teensy is a powerful ARM-based development board with loads of features that can do fun stuff with USB as well. Like many dev boards, it uses a less powerful processor as an interface. Teensy designer [Paul Stoffregen] added a debug header to allow direct SWD JTAG access to the main chip, but the interface microcontroller has to be silenced for that to work, and the code to do so is still in progress.
Impatient, [Erich Styger] documents the changes he made to add support for the J-Link SWD protocol by removing the offending NXP Kinetis KL02Z that serves as the as the onboard interface and bootloader that helps the Arduino IDE talk to the K64F which is the main chip. After the KL02Z was removed, [Erich] populated the debug headers and then wired up the Segger J-Link to the board and tested it out with Eclipse, GDB, and standard SWD debug tools.
The end result is a Cortex M4F board that can work with standard tools at a third of the price of the Kinetis’ development board. [Paul Stoffregen] confirms that the debugging functionality will be added to the bootloader code soon but until then, a hardware hack is a working, if brutal, approach to debugging on the platform.
More information on the JTAG interface is available for the interested. And if Teensy isn’t your thing, you might consider an STM32-based development board.


I have not been following PJRC since Teensy LC (great product, by the way!), but it is hard to believe that debugging is not one of the very first things to be added to such a product family; specially if you think that it is one of the basics for any product development!. Looking forward to see it oficially implemented on the 3.5/3.6
Couldn’t you just tie the RST pin of the KL02Z low?
You cannot pull the reset low, as it is shared between the K6x and the KL02Z.
It is a shame they didn’t put a normal openSDA header (the freescale equivilent of the ISP header on an arduino). Like [danny] mentioned above as long as you have access to the serial debug lines you can just hold the programmer chip in reset and use a normal programmer. In fact, the freescale openSDA protocol only requires isolating the CLK pin (the programmer should not assert the DIO pin with the clock removed) to use an external debugger, so it is easy to add in a jumper to switch between using an on-board or off-board programmer.
My understanding is that the KL02Z contains a secret sauce bootloader that loads programs via the Teensyloader. This design choice is intentional to prevent others from cloning the board. The Teensys were never really intended to be attached to a debugger…..
Wait what, you couldn’t JTAG debug a Teensy until now?
There’s a whole load of idiots out there that think an Arduino is a microcontroller and the way to debug is by printing stuff out to a serial port.
While debuggers are indispensible and simpley the best debugging solution out there, especially when using the DMA,
printf and LED debugging can cover about 80-85% of all of ones debugging needs.
+1, sir!. But I would say 50-60%
In most cases, I much prefer to print stuff to a serial port than to use a JTAG debugger. With a debugger, you can only see the state by halting the device, which often messes up real time behavior. Also, it’s much easier to have a customer hook up a UART cable, and e-mail me a logfile than it is to have them mess with a debugger.
+1
Not true for STM8 or STM32, the debugging is live while the application runs.
Printf is slow.
Its insane that you debug that way, your method slows down the whole application.
I don’t think you can simply pull the RST since the KL02Z is actively driving it. Also simply having the “debug support” in the software of the KL02Z might not be possible since there’s no external pull-up so if you turn the KL02Z into open drain mode then RST will be floating (unless the KL02Z allows setting up an internal pull-up on the this pin).
Anywhoo, the much simpler solution would have been to simply cut the trace powering the KL02Z which is far less risky; the method shown here really should only be attempted by a pro with the right tools as you can easily mess up the board by knocking off adjacent parts (ignoring the fact that you also might pull a few traces around the KL02Z because if you do make this modification you probably don’t care anyway ;) )…
Great way to rip pads off a pcb. If you go to grab the component and it is still attached to the board and you are actually lifting the pcb up by doing so, then you are doing it wrong.
What kind of shitty PCB are you using if a few grams of force is ripping the traces off? If he was dangling something the size of a motherboard, sure, but this? C’mon.
[X] I have no real PCB experience
Seriously: If you’ve never ripped off traces you probably haven’t handled too many PCBs; if you have then you would know how fragile they can be, especially when you heat them up enough to actually desolder a settled chip because you’re operating at temperatures where de-lamination kicks in so you want to be absolutely sure that all solder is molten before applying even the tiniest amount of force…
The reason why the chip is lifting the board after being heated enough is the surface tension of the middle ground plane. Otherwise a QFN with melted solder is unable to lift a small board like that and won’t rip traces, unless you’re very aggressive.
I prefer to flick the side of the chip to see if everything has melted, slide it off to the side and then lift.
That is how you do it. But just to be sure that you don’t accidentally know off other parts I’d secure them (and protect fragile ones like LEDs from the heat) with Kapton tape.
Well, only if you’re lucky enough that the big ground sticks; if you’re unlucky the ground is lose but you missed just a few pins on the side and then you’re screwed. Long story short: Don’t do that.
If I remove the KL02Z, how do I program it afterwards?
That’s the whole point of the mod: With any of the many debuggers out there… The idea of the KL02Z is to provide copy protection and enforce the use of the (rather clunky) common Teensy downloader.
Is any tutorial how to debug teensy adruino-like code with jlink?