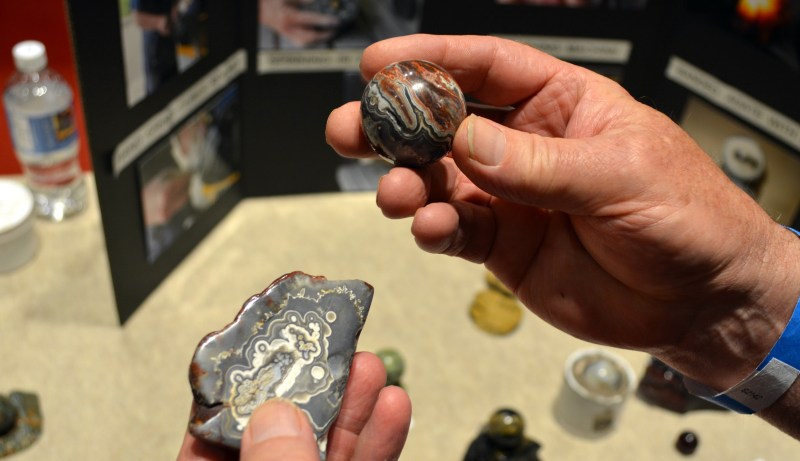
[Tom Lange] said he was looking for a new hobby when he saw a marble made out of stone and wondered what goes into making one for himself. Fast forward three years and he set up shop at the Madison Mini Maker Faire to show off the tools he built and the fascinating glossy orbs he’s produced. Read on to see the awesome process he uses to turn a hunk of stone into a perfect marble.


[Tom] doesn’t have a YouTube channel or a web page, but he brought along a photo board which documents the process (click above to embiggen). The first step is to choose your stone and cut it down to a rough cube before using a silicon carbide grinding wheel to take off the sharp edges and begin to get something round.
He then moves to a block of silicon carbide seen above where he has made hemispheres of different sizes using a diamond grinding wheel. These are not used progressively for each marble, but instead, they allow him to work on marbles of three different sizes. Put the rough orb in one of them, then hold it up to the carbide grinding wheel and the orb will spin around in the pocket becoming a little more spherical in the process.


With rough grinding behind him, [Tom] moves on to sanding. He built this custom jig to hold the orb using PVC pipe and body putty (you may know this by the brand name Bondo). He packs it into the PVC, with a ping pong ball used as a mold for the hemispherical pocket.
Sandpaper of various grits is cut first into a circle, then given relief cuts from the outside toward the center so that it will sit flat inside the hemispherical pocket. The marble is placed in the jig and it gets a ride from a sanding wheel with the same grit. [Tom] works his way from coarse to fine, switching to ceramic polishing pads along the way. This gets close, but it won’t be gleaming quite yet.


The coup de grâce is this automatic polishing jig which does the final work. [Tom] fabricated it himself. The three motors are pulled from the turntables of old microwaves. I love the pair of rubber bands which apply tension to the three polishing arms.
The most brilliant move is the mechanism to automatically apply liquid polish to the marble. There is a tray sitting below which has the polish in it (and also catches any drips). To transport polish back up to the marble [Tom] has looped a length of ball chain around where the marble meets the polisher. He originally tried using string but that got clogged up. He was in his basement at the time, trying to solve the problem, when he looked up at he light and thought the chain might be just perfect. It is!
Don’t miss the video below of the polisher in action. I’m really glad to have run into [Tom] at this faire. He’s a great example of a maker: he did something cool and now has turned around to share his methods and get other people excited about what they can do in their own home shops. I failed to get an email address from him, so if you know [Tom] please send a link his way and let him know how excited the Hackaday crowd gets about cool builds like this one!
I’ll bet at Maker Faire Bay Area this weekend so make sure to hit me up on Twitter and tell me what cools things I should seek out. If you’re going to be there, stop by the Tindie/Hackaday booth to grab stickers and say hi, and don’t forget to come party with us on Saturday night!


For the sanding stage, why not use a regular rock tumbler with an abrasive medium? (Or a series of increasingly fine abrasives?)
Too irregular. You’ll end up with river stones. Smooth shapes but not spherical. The process that removes material has to do so across the spherical shell evenly. The tumbling motion creates a lot of rough uneven chips instead of a rolling shear abrasion.
I imagine that would take much longer, but it would probably be far easier and require little to no baby sitting. Maybe you could do more than one marble at once then?
seems like a nice relaxing hobby – Might be something to look into when /if I get some sparetime
(Old) lapidary equipment is amazingly clever.
If he’s planning on making marbles regularly, using a wet saw is probably gonna be faster than grinding down the corners on an abrasive wheel. A circle of copper or worn out plywood blade set at low speed in a pool of abrasive slurry will do the trick. No need to buy an expensive saw, but for your own safety use a GFCI outlet!
Maybe a drip feed bottle and a tray to catch it for the auto polisher or back feed like a roll on deodorant.
I like the way it looks. Great results too (:
Could you do other rock or metal material? Obviously not diamond but things like steel or tungsten or quartz? Is there a hardness limit?
However hard your abrasive is. Silicon Carbide is right up there with sapphire/ruby and Tungsten carbide.
You could do diamond but good luck getting a golf ball sized diamond. You’d just need diamond grit or one of the man-made compounds harder. Like with jewel cutting, you’re more likely to run into trouble with fracturing/cleavage trying to make one of these than trouble finding a grit hard enough.
I remember many years ago seeing a similar setup at a gem and mineral show except they were making these softball sized orbs. They’d cut the corners off a block until they had a 20 or 40 sided orb (Like a D&D die on steroids) and then they had a polisher setup similar to the one shown except it had I think 6 polisher heads. Abrasive was in the form of a hamster bottle (minus the ball) full of sand that was at an angle and would rotate slowly, with each rotation a little of the sand would pour out onto the orb. Motors I think the guy said were copy machine drive motors, not sure what he used for the rest. Wish I had a few pictures, but this was probably 25 years ago that I saw it.
That polishing rig is really interesting! I’d like to see one made for bowling-ball sized stones.
Solid rock bowling balls…Imagine taking THAT to the lanes!
Flintstones, meet the Flintstones, they’re your modern stone age fam-ill-lee!
There was a guy that did this 20 or more years ago locally. Said at the time he and 2 others were it in this craft. I never saw his rig. Baseball sized.
You can make a larger one with iron pipe fittings.
https://www.youtube.com/watch?v=9GK5eFOgOWs