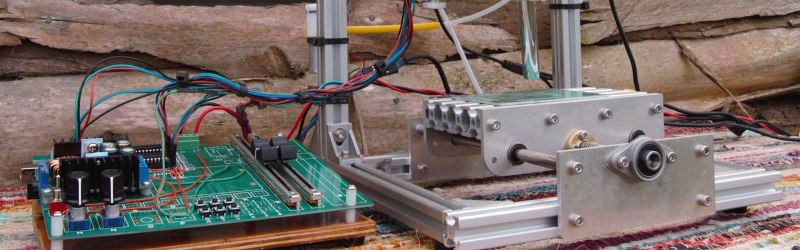
Everyone who wants a 3D printer probably already has one, and even laser cutters and CNC machines are making their way into garages and basements ’round the world. Pick and place machines are the next great frontier of personal manufacturing, and even though that’s a long way off, [Tegwyn]’s project for this year’s Hackaday Prize is bringing us that much closer to popping down 0201 LEDs reliably.
This project is a manual pick and place machine — otherwise known as ‘tweezers’. It’s a bit more complicated than that, because the entire idea behind [Tegwyn]’s build is to decouple a human’s fine motor skills from the ability to place components on a board. To do that, this project is using an off-the-shelf, blue light special CNC machine. There’s not much to it, just a bit of aluminum extrusion and some threaded rods. However, with the addition of a vacuum pump, a hollow needle, and a few manual controls to move the axes around, the operator has very fine control over where a resistor, cap, or LED goes.
There are a few neat additions to the, ‘put a vacuum pump on a CNC machine’ idea. This is a 4 axis machine, giving the user the ability to rotate the part around a pad. There’s also a microscope hooked up to a small monitor mounted to the machine. If you’re assembling hundreds of boards, this is not the machine you want. If, however, you only need a handful, don’t mind spending a few hours placing parts, and don’t want to go insane with tiny QFN packages, this is a great build and a great entry for the Hackaday Prize.


This is so cool. One more piece of Santa’s Workshop in the bag.
yup
https://en.wikipedia.org/wiki/Santa_Claus_machine
Damn, this needs a hot air reflow and tweezer extension too!
I have spent a few weeks trying to solder two wires to pins 4 and 5 on a RTL2382U dongle and between keep a loupe in my eye not vaporizing the flux, not burning the chip, and not frying off my eyebrows or adding any more burns to the loupe I still have not gotten the damn wires to stick!
I think 20 or even 10 years ago(and no disability) I could have done this with bare eye and some concentration.
#30 Kynar wire wrap wire is silver plated and great for dead bug and all that little stuff.
Could also use a record and high-speed playback feature. Like with most industrial robots, you could train it once, and then have it repeat the motion to lay down a series of identical parts.
Nice, but when the apocalypse happens all this will disappear without power backup.
I’ll have to upgrade it to pedal power ?
If you can’t get any power what are you building electronics for?
I will take all the washing machines I can find, socks and PVC pipes and one of them Club cars.
Take a look at the SmoothieBoard (http://smoothieware.org/smoothieboard). Works for up to a 5-axis CNC machine and has a GRBL mode available which I am using on my 3-axis CNC machine.
Nice!
OMG. this is awful. takes ages, is loud and ridiculously over complicated. and then the1206 smd footprints on that board. by the time he has his first resistor placed and back to the strip to pick another one, I’ve finished at least two of those boards with lets say 5 different parts with just tweezers and a soldering iron with fine tip.
Why make smd so complicated. it is not so. and the cheap hand held pick and place vacuum tools work so much better. just remember to have your board fixed on something like a rotating platform so you can reach every part of the board easily. then you dont have to rotate the part. :-)
(note to self: make video and post online)
Go for it. I just did a bunch of boards with 0603 and VSON 10. I used a stencil and tweezers and a toaster oven.
Tweezers might be okay for 0603 but even Dave at EEBlog would agree that 0402 and smaller is pretty tricky. In any case some of us just can’t use tweezers for actual biological reasons. Yes the video is slow and it is 1206 but that was the first time that I ever used it so what would you expect? Obviously it is a lot faster now. As for the noise of the small vacuum pump, I now play very loud music like Nirvana to drown it out so yeah no problem.
Maybe a fridge compressor would work as a less noisy vacuum pump?
Yes that would be a good idea.
I think it is a great effort, and pretty obvious you intend to work up in speed after you get repeatability ironed out. A water aspirator is a quiet vacuum source for testing. I have a rework station with one of those vibrating things inside and from what I can tell, it just makes lost of noise.
I use a little jig with a 1inch wide piece of wood with a couple of wooden legs on it so you can rest your wrist while you place parts (see example pic – https://imgur.com/a/izFvL). It really gives you the finesse you need, even to place 0402s.
Oh I just found this. Amazing simple design – http://vpapanik.blogspot.com.au/2012/11/low-budget-manual-pick-place.html
This looks like a very good machine.
With OPENCV could one maybe even Automate it to read tags and board locations vs a List ?
Yes no doubt sometime in the near future this will be possible.
Thumbs up, Teg!
Just wondering, what else have you considered for user interface?
My first thought would have been small joystick as it provides intuitive 2-axis movement and speed control.
Sliders might have other benefits though – less tiring, no constant pressure needed?
Ordinary mouse might work?
Or something like a reversed etch-a-sketch – 2 sliders and some linkage – move a pointer on 2D plate, CNC follows? Separate large-scale and fine-scale movement?
Seems like an ordinary wired mouse can be plugged into arduino due native port which I think is compatible with the Cnc driver chips- I’ll have to check the data sheet.
Oh dear it looks like logic level converters would be needed with the Arduino due so the PCB would have to be completely redesigned.
A joystick would be okay for the course control but, yes, a mouse would be probably the best thing to use other than sliders. Any clues as to where to get a Wi-Fi mouse PCB shield or whatever?
What about this semi-automatic machine ?. It has some good ideas for how to handle the “complicated” controls.
https://www.youtube.com/watch?v=F9bRd8wS6GU
I want one ! How much do you sell them for?
Ah ….. 15,000 Euro ….. minimum … looks ideal though. Some very good ideas to copy.
Here is a not very good video of my take on this from a year ago:
https://www.youtube.com/watch?v=ZgtyGcAtx6k
That looks really very good – nice one !