Have you ever upgraded your computer’s memory sixteen-fold, with a single chip? Tynemouth Software did for a classic Sinclair micro.
For owners of home computers in the early 1980s, one of the most important selling points was how much RAM their device would have. Sometimes though there just wasn’t much choice but to live with what you could afford, so buyers of Sinclair’s budget ZX81 computer had to put up with only 1 kiB of memory. The system bytes took up (by this writer’s memory) around 300 bytes, so user programs were left with only around 700 bytes for their BASIC code. They were aided by Sinclair’s BASIC keywords stored as single bytes, but still that was a limit that imposed coding economy over verbosity.
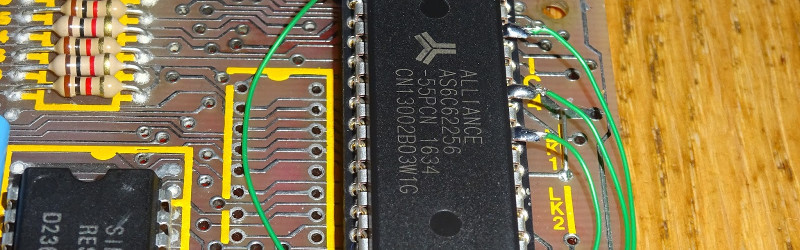
Sinclair sold a 16 kiB upgrade, the so-called “Rampack”, which located on the ’81’s edge connector and was notorious for being susceptible to the slightest vibration. Meanwhile the mainboard had provision for a 2 kiB chip as a drop-in that was never sold in the UK, and enterprising users could fit larger capacities with soldered combinations of other chips piggybacking the original. And this is what the Tynemouth people have done, they’ve replaced their machine’s dual 1 kiB x 4 chips with a single 62256, and with a bit of pin-bending they’ve managed to do it without the track-cutting that normally accompanies this mod.
Adding chips to a 36-year-old home computer for which there are plenty of available Rampacks might seem a bit of a niche, but in doing so they’ve made a standalone ’81 that’s just a little bit more useable. They’ve also brought a few other components up-to-date, with a composite video mod, switching regulator, and heatsink for the rare ULA chip. If you are of a Certain Generation, it might just bring a tear to your eye to see a ZX81 being given some love.
Did you lose your ZX81 along the way? How about emulating one in mbed?


If these chip sizes were affordable in the 80’s! What we did was piggybacking another 2K on top to get 4K total and use a single inverter gate to switch the ENB pin between the chips with the higher address line. A 32K sram was 70$ from my local shack back then. Too much for teen! Also mentioned in the article; the 7805 linear voltage regulator was, and still is, a pig. It burned 900mA so you could only run a ZX81 2-3 hours on a string of D-cells. Having had a switchmode regulator would wave extended that to days, but none were available outside NASA then,
Why would anyone run their ZX81 on batteries without a screen? Well memorizing 85 something basic commands and sprinkling some BEEP commands around your code , simple programs could be tried and tested on the bus on my way to school.
Did you try just skipping the reg and wiring it to 3 D cells?
I’m not entirely sure what the point was of using 9V to drop to 5V, making that reg get so hot, maybe Sir Clive found a warehouse full of 9V supplies for cheap.
An LM7805 requires a minimum of about 8V to accurately regulate to 5V. A popular thing to do back then was to make your own tightly regulated 8V supply to cut down on the heat dissipated in the ZX-81.
Those 9V supplies weren’t regulated, so they often put out more than 9V, increasing heat in the case.
TTL chips are rated for 5V+-5%, so 4.75 to 5.25V. Much below that, they become unreliable. So while three D cells may start out within that range, after a short time of use they will drop too low for reliable operation.
Sir Clive was well-known for doing things the cheap-and-dirty way. When confronted with the high number of dead units off of the assembly line (probably due to ESD), his solution was to step up production speeds.
Ahh, I was thinking it only needed a volt over. I was also thinking TTL worked in a plus or minus 10% range.
LOL “30% defects Sir!!!” “Increase warp factor 30%, engage.”
What I did on several projects was run the TTL from a 6 volt 4-cell pack with a silicon power diode in series to knock off 0.7V. This starts you out just slightly above spec for the chips and stays within spec until the batteries are near their natural EOL.
“If these chip sizes were affordable in the 80’s!”
Then you would have had more memory then with some other upgrade to even more memory available but out of reach. Today you would be reading almost the same article but the numbers would be different.
There’s also some great projects and links on the Tynemouth site about building clones of the ZX81.
One clone has several 74xx series chips to replace the ULA – if you like the retro DIP look.
Another has the ULA programmed into a more modern CPLD. The source is in Schematic Entry which is great if you want to have an easy taste of programming a CPLD. There were both Altera and Xilinx implementations.
A coworker of mine has a ZX-80, which was the forerunner of the ZX-81 but without the PLA. I changed out his 7805.
I still have my ZX-81 with my Momotek 32k RAM. The USAF thought it was a great idea to put your SSN on all your valuables, so many of my “collectibles” will never get to enjoy being auctioned off on ebay.
Eh, I’m pretty sure the hax0rz have your SSN and real name already. Thanks, Equifax!
You could also shunt the rom chip with the UDG char set with a piggyback ram chip, then the machine would put the udg’s in ram space, whayhay, customizable ascii char sets, real onscreen graphics!
This, the extra ram chips for expanding ram and many more hardware hacks (distorting the display output to make crt displays hum loudly and connecting different patterns to the keys to form a buzz emitting organ was another great hack) were documented in a rather spiffing book available at the time called “The explorers guide to the ZX81” by Mike Lord which was responsible for at least 2 dead zx81’s including one of mine when it over time evolved into a mess of hookup wire and dodgy soldering, along with a much deeper understanding of how lumps of it worked at a nice low level.
I still have a zx81 in my collection, sir clive’s budget cheap nasty everyman computer.
The ZX81, where ‘3D’ gaming was born??…. sort off, pushing the term a bit, but it was an ace game. The first survival horror game???
https://www.youtube.com/watch?v=dmug1nQmd4U
3D Monster Maze! Yes, definitely one of the highlights of the platform.
My dad had to pay a “super bargain price” of DM 360,- (around € 180,- plus inflation) for a set of DIP ICs so I could solder them into my Atari ST 520STM – ultimately giving me a whooping 1 Megabyte to work with… Thanks Dad!
I had 2.5 Mbytes in mine…
I used the same 32k RAM on my SYM-1!
memory addressing was dead easy, all the addresses with A15 low!!
as a bonus it’s got battery back up, uses 50mA, the 2114’s use 80mA, that’s 1k x 4 bits!
I’m still a big fan of Jörg Wolfram’s AX81 (a ZX81 in an AVR).