One Chip, Sixteen Times The RAM

Have you ever upgraded your computer’s memory sixteen-fold, with a single chip? Tynemouth Software did for a classic Sinclair micro.

For owners of home computers in the early 1980s, one of the most important selling points was how much RAM their device would have. Sometimes though there just wasn’t much choice but to live with what you could afford, so buyers of Sinclair’s budget ZX81 computer had to put up with only 1 kiB of memory. The system bytes took up (by this writer’s memory) around 300 bytes, so user programs were left with only around 700 bytes for their BASIC code. They were aided by Sinclair’s BASIC keywords stored as single bytes, but still that was a limit that imposed coding economy over verbosity.

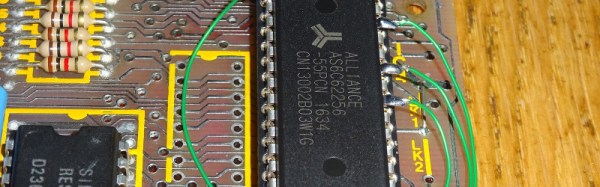
Sinclair sold a 16 kiB upgrade, the so-called “Rampack”, which located on the ’81’s edge connector and was notorious for being susceptible to the slightest vibration. Meanwhile the mainboard had provision for a 2 kiB chip as a drop-in that was never sold in the UK, and enterprising users could fit larger capacities with soldered combinations of other chips piggybacking the original. And this is what the Tynemouth people have done, they’ve replaced their machine’s dual 1 kiB x 4 chips with a single 62256, and with a bit of pin-bending they’ve managed to do it without the track-cutting that normally accompanies this mod.

Adding chips to a 36-year-old home computer for which there are plenty of available Rampacks might seem a bit of a niche, but in doing so they’ve made a standalone ’81 that’s just a little bit more useable. They’ve also brought a few other components up-to-date, with a composite video mod, switching regulator, and heatsink for the rare ULA chip. If you are of a Certain Generation, it might just bring a tear to your eye to see a ZX81 being given some love.

Did you lose your ZX81 along the way? How about emulating one in mbed?

Low-Budget Hydroformer Puts The Squeeze On Sheet Metal Parts

Between manufacturing technologies like 3D-printing, CNC routers, lost-whatever metal casting, and laser and plasma cutters, professional quality parts are making their way into even the most modest of DIY projects. But stamping has largely eluded the home-gamer, what with the need for an enormous hydraulic press and massive machined dies. There’s more than one way to stamp parts, though, and the budget-conscious shop might want to check out this low-end hydroforming method for turning sheet metal into quality parts.

If hydroforming sounds familiar, it might be because we covered [Colin Furze]’s attempt, which used a cheap pressure washer to inflate sheet metal bubbles with high-pressure water. The video below shows a hydroformer that [Rainbow Aviation] uses (with considerably less screaming) to make stamped aluminum parts for home-brew aircraft. The kicker with this build is that there is no fluid — at least not until the 40,000-pound hydraulic press semi-liquifies the thick neoprene rubber pad placed over the sheet metal blank and die. The pressure squeezes the metal into and around the die, forming some pretty complex shapes in a single operation. We especially like the pro-tip of using Corian solid-surface countertop material offcuts to make the dies, since they’re available for a pittance from cabinet fabricators.

It’s always a treat to see hacks from the home-brew aviation world. They always seem to have plenty of tricks and tips to share, like this pressure-formed light cowling we saw a while back.

Continue reading “Low-Budget Hydroformer Puts The Squeeze On Sheet Metal Parts”

3D Printed Gear Serves Seven Months Hard Labor

Even the staunchest 3D printing supporter would have to concede that in general, the greatest strength of 3D printing is not in the production of final parts, but in prototyping. Sure you can make functional prints, as the pages of this site will attest; but few would argue that you wouldn’t be better off getting your design cut out of metal or injection molded if you planned on putting the part into service over the long term. Especially if the part was to be subjected to rough service in an industrial setting.

While that’s valid advice, it certainly isn’t the definitive word on the issue. Just because a part is printed in plastic on a desktop 3D printer doesn’t necessarily mean it can’t be put into real service, at least for as long as it takes to get proper replacement parts. A recent success story from [bloomautomatic] serves as a perfect example, when one of the gears in his MIG welder split, he decided to try and print up a replacement in PLA while he waited for the nylon gear to get shipped out to him. Fast forward seven months and approximately 80,000 welds later, and [bloomautomatic] reports it’s finally time to install those replacement gears he ordered.

In the pictures [bloomautomatic] posted you can see the printed gear finally wore down to the point the teeth were essentially gone where they meshed with their metal counterparts. To those wondering why the gear was plastic to begin with, [bloomautomatic] explains that it’s intended to be a sacrificial gear that will give way instead of destroying the entire gearbox in the event of a jam. According to the original post he made when he installed the replacement gear, the part was printed in Folgertech PLA on a Monoprice Select Mini. There’s no mention of infill percentage, but with such a small part most slicers would likely have made it essentially solid to begin with.

While surviving seven tortuous months inside of the welder is no small feat, we wonder if hardier PLA formulationstreatment of the part post-printing, or even casting it in a different material couldn’t have turned this temporary part into a permanent replacement.

Everything Worth Knowing About Lockwire

We were tipped off to an older video by [AgentJayZ] which demonstrates the proper use of lockwire also known as ‘safety wire.’ In high vibration operations like jet engines, street racers, machine guns, and that rickety old wheelchair you want to turn into a drift trike, a loose bolt can spell disaster. Nylon fails under heat and mechanical lock washers rely on friction which has its limits. Safety wire holds up under heat and resists loosening as long as the wire is intact.

Many of our readers will already be familiar with lockwire since it is hardly a cutting-edge technology — unless you are talking about the cut ends of lockwire which [AgentJayZ] warns will slice up your fingers if you aren’t mindful. Some of us Jacks-or-Jills-of-all-trades, with knowledge an inch deep and a mile wide, may not realize all there is to lockwire. In the first eight minutes, we’ll bet that you’ve gotten at least two inches deep into this subject.

[Editor’s Note: an inch is exactly 25.4 mm, if the previous metaphors get lost in translation. A mile is something like 2,933.333 Assyrian cubits. Way bigger than an inch, anyway.]

Now, those pesky loose bolts which cost us time and sighs have a clear solution. For the old-hands, you can brush up on lockwire by watching the rest of video after the break.

Thank you [Keith Olson] for the tip, and we’ll be keeping an eye on [AgentJayZ] who, to date, has published over 450 videos about jet engines.

If safety isn’t your highest priority, consider this jet engine on a bicycle or marvel at the intricacies of a printable jet engine.

Continue reading “Everything Worth Knowing About Lockwire”

Hackaday Prize Entry: Two Leg Robot

If you’re working on your own bipedal robot, you don’t have to start from the ground up anymore. [Ted Huntington]’s Two Leg Robot project aims to be an Open Source platform that’ll give any future humanoid-robot builders a leg up.

While we’ve seen quite a few small two-legged walkers, making a pair of legs for something human-sized is a totally different endeavor. [Ted]’s legs are chock-full of sensors, and there’s a lot of software that processes all of the data. That’s full kinematics and sensor info going back and forth from 3D model to hardware. Very cool. And to top it all off, “Two Leg” uses affordable motors and gearing. This is a full-sized bipedal robot platform that you might someday be to afford!

Will walking robots really change the world? Maybe. Will easily available designs for an affordable bipedal platform give hackers of the future a good base to stand on? We hope so! And that’s why this is a great entry for the Hackaday Prize.

Cable Bots, Arise! Domination Of The Universe Is At Hand

Most CNC robots people see involve belts and rails, gantries, lead screws, linear bearings, and so forth. Those components need a rigid chassis to support them and to keep them from wobbling during fabrication and adding imperfections to the design. As a result, the scale is necessarily small — hobbyist bots max out at cabinet-sized, for the most part. Their rigid axes are often laid out at Cartesian right angles.

One of the exceptions to this common configuration is the delta robot. Deltas might be the flashiest of CNC robots, moving the end effector on three arms that move to position it anywhere in the build envelope. A lot of these robots are super fast and precise when charged with carrying a light load, and they get put to work as pick-and-place machines and that sort of thing. It doesn’t hurt that delta bots are also parallel manipulators, which means that the motors work together to move the end effector, with one motor pulling while the matching motor pulls.

But while Cartesian CNC bots are sturdy workhorses, and deltas are fly-weight racehorces, neither can really cut it when you want to go gigantic. In terms of simplicity and scale, nothing beats cable bots.

Cable Bots

Cable bots use wires or strings pulled by reel-mounted motors, with dimensions limited only by the room to mount the motors and the tensile strength of the cables used. When the strings are tensioned you can get a surprising degree of accuracy. Why not? Are they not computer-controlled motors? As long as your kinematic chain accounts for the end effector’s movement in one direction by unwinding another cable (for instance) you can very accurately control the end effector over a very wide scale.

The following are some fun cable bots that have caught my eye.

Continue reading “Cable Bots, Arise! Domination Of The Universe Is At Hand”

Supercon Badge Hacking Quick-Start

The hardware badge Mike Harrison designed for this year’s Hackaday Superconference is begging to be hacked. Today, I wanted to help get you up and running quickly.

The Hacker Village atmosphere of Supercon is starting up a day early this year. On Friday, November 10th badge pick-up starts at noon and badge hacking continues throughout the afternoon, followed by a party at Supplyframe HQ that evening. Plan to get to town on Friday and join in the fun. Of course, you need to grab a Supercon ticket if you haven’t already.

Check out the 2017 Superconference Badge project page for full documentation that Mike has put together during his development process.

Continue reading “Supercon Badge Hacking Quick-Start”