Now that anyone can go online and get a fairly decent 3D printer for around $200, they’ve officially fallen out of the “Elite Hacker” arsenal and are now normal, if perhaps highly specialized, tools. That’s great for the 3D printing community as a whole, but what about those who want to be on the fringe of technology? Telling people you have a 3D printer at home doesn’t get that wide-eyed response like it used to. What’s a “l33t” hacker to do?
Enter the laser engraver/cutter: it’s like a 3D printer, but easier to build and has a higher capacity for bodily harm! While there are a couple good options for kits and turn-key setups out there, just like the early days of 3D printers, some of the best machines are still home built. In his latest video, YouTuber [MakerMan] takes us through his build which features an impressively low part count.
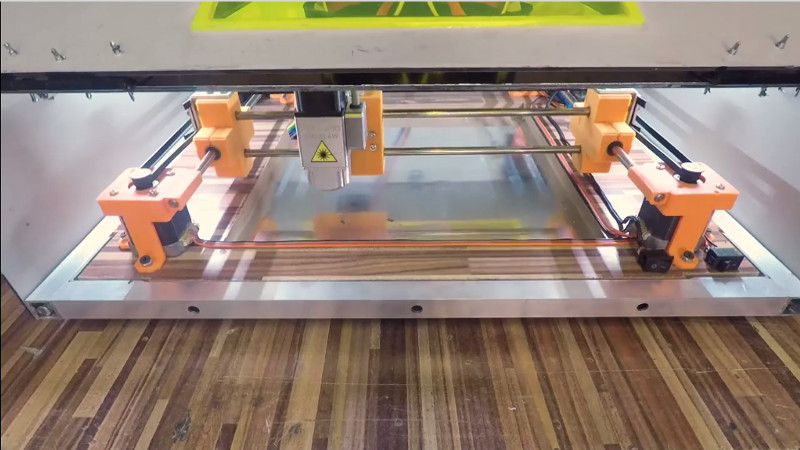
 To start his build, [MakerMan] strips down four printers and salvages seven high quality 8 mm linear rods; a huge cost saving tip in itself. We’ll certainly be picking up any printers we see in the trash for the next couple months hoping to score some rods. With the addition of some cheap LM8UU bearings and 3D printed holders for them, [MakerMan] has a smooth 2D motion platform for just a couple bucks. The frame of the machine is built out of type of aluminum square tubing you can find at the hardware store, no expensive extrusion here.
For the laser itself, [MakerMan] is using a six watt PLH3D-6W-XF from Opt Lasers. This module features integrated driver and cooling, so all you need to do is provide it power and a stable means of moving it over the work piece. They even offer a magnetic “dock” which allows you to remove the laser from the mount without any tools for servicing or tool changes. [MakerMan] reports he’s been able to engrave stainless steel with this laser module, and cut thin wood.
This isn’t the first laser engraver we’ve seen built out of scrap parts, though if you want to save some work you could just upgrade a cheap commercial model.


Why salvage parts if you can afford $550 laser module..
Because you can pull apart as many printers, TVs, toasters, dishwashers and old VCRs as you like, you ain’t finding a 6 Watt laser in them.
Not true, in fact the 6w 445nm diode used in this build was originally intended to go into a projector. In fact, it is likely that it was literally salvaged from a projector like the ones on ebay are ex https://www.ebay.com/itm/122669522099
As far as I know currently there is no reasonably priced source of the >5w 445nm diodes other than salvaging from projectors
It is wonderful living in the future, the first generation laser-based projector (casio XJ A140 with qty 24x 2w 445nm diodes) are starting to show up on ebay for $100 and it won’t be long before they are literally in the trash along with the laser printers that provide the stepper motors and linear rails needed for a laser cutter.
Wow we really are living in the future, but where are my salvaged Alcubierre Drive?
Aah! Subject verb agreement.
Unfortunately it’s in a dumpster in a parallel universe with no causality.
You can however buy a complete 40W cutter/engraver machine for less than your 6W diode.
^ this.
Really, wow, maybe I was wrong about how nasty laser cut plywood looks… >:-D
I actually LIKED how laser cut plywood looks… when I first saw it at the local hackerspace.
Then… it became popular, started showing up everywhere. The clincher for me happened one day when I was walking through the local overpriced craft store with my wife. I was noticing a lot of goods for sale that would have been very easy to have made myself in a few minutes back at the space for a whole lot less money. Then, contemplating the sheer quantity of laser-cut plywood trinkets in the store it occurred to me that far more people out there in the world had these overpriced consumer goods in their house than had ever actually cut something on a lasercutter themselves. Worse… if they ever did get their own laser cutters they would probably pay big bucks for rom cartridges or something equally crappy that had simple, easy to do oneself or download free on-line type designs on them. Everyone would make the same stuff, buying their roms from the same company or twos’ limited catalogs. And.. they would probably think this was awesome.
Now laser cut plywood makes me a little sad.
If you’re after raw power, sure the K40 is the best bet right now.
But using a solid state laser does have advantages. They are much more robust than gas laser tubes, and don’t (generally) require complex cooling systems.
And if you want to go the solid state route then you can put together a 6W NUBM44 diode module from parts for about $200. $550 is crazy money for a system based on salvaged parts.
“To start his build, [MakerMan] strips down four printers and salvages seven high quality 8 mm linear rods; a huge cost saving tip in itself.”
I’m guessing he doesn’t live in Canada (and probably not in the USA either) because I scavenged about four dozen printers last year and there was a lot of different smooth rods in the printers. 6mm, 8mm, 9mm, 10mm, 3/8″, 1/4″, 5/16″… In the end I did get six 8mm smooth rods for my DIY i3-style 3D printer but I would not recommend scavenging old printers unless you absolutely knew for a fact the brand and models to search for in order to get 8mm smooth rods.
I really loved the creativity behind this build. 3D printing where it mattered, simple clamps and brackets where good is good enough. The enclosure, piza oven style was the thing I really liked. The video got me all pumped up… then I noticed the costs of the laser module, I expect something cheap and underpowered, And although you could say thay 6W is underpowered for this kind of build/machine for the cost of it makes no sense at all.
But despite from the pretty costly laser module, the design is something we can certainly learn from and/or enjoy watching.
Regarding the 8mm linear rods… this guy must be indeed a very lucky guy because 8 identical rods from 4 different kind of printers?!?! I disassembled a lot of printers over the years and they all where pretty different, the really old ones (matrix) sometimes had 12mm rods, some cheap old ones had hollow rods. I guess my printers were just too old and I’m sure that modern printers (less then 10 years) old, combined with a scanner, give you higher chances of success. Looking ate the video he used modern printers and if these were inktjet I’m slightly surprised that after 4 printers his hands are still clean, but If he only took out the rods, that’s not impossible. Personally I would have looked like a 4 year old after a finger painting session. haha…
I think some people are focusing too much on the laser module. The company sponsored him so the laser was free, that’s why he used it. If he had to source the laser himself, then of course he wouldn’t have used this one.
But I think the platform is the biggest takeaway here. Like you said, with very minimal parts and straight-forward design, he came up with what looks to be a very nice system to move around whatever kind of lightweight laser you can get your hands on.
Gloves are a thing….
I buy boxes of 100 disposable latex gloves at a time. It’s just like what I see at the doctor’s office except no guarantee on the box that it is sterile enough to handle an open wound.
I think youll find the ones in box in a doctors office arnt sterile either.
The sterile ones are individually packaged.
Judging by the videos, I’d say he’s probably in India, where scavenging parts is basically a way of life.
But it does seem unrealistically lucky that he was able to get identical rods from different (it looks like) makes and models of printers. Could be he had a list he didn’t mention, or that for the purposes of the video he skipped the 10 other printers he had to take apart. If you notice he only shows disassembly of one.
“…where scavenging parts is basically a way of life.”
Best to avoid drawing massive generalizations when dealing with a nation of 1.3 billion people. I’d hesitate to call it ‘a way of life’. Having been to India, and worked with dozens if not hundreds of people there, this would make their hair stand up. They own homes, go to the supermarket, watch sports, and buy stuff same as you and me. Their hackers salvage like we do sometimes, but still order from Digikey or ComKey.
Does India have scavenging? Of course, but is it far from the ‘norm’ and it is certainly not ‘basically a way of life’.
In addition to other observations. Why he scavenged the rods but not the motors and belts? Also, having two motors on the X axis seems weirdly excessive.
I was wondering why he didn’t use CoreXY and only two steppers. Three does seem to be a waste.
Good point, many new printers (including the ones in the video) use some kind of semi-standard linear actuators with a carriage pulled by a belt driven by a DC motor that is closed-loop position controlled using either a linear encoder or a rotary encoder in the shaft. For some reason they are always mounted in a way that makes i very easy to separate the linear actuator from the printer as a whole assembly… it even looks like it was designed for hacking. Missed opportunity!
I wonder why the hell he is not including all the needed holes in the 3D printed part, but doing it manually with a drill when mounting the pulleys and laser and belt guides… weird…
Laser is too expensive, but options are available…
Nice project by the way…
Maybe he forgot the holes and… being a one-off it wasn’t worth his time to reprint.
I did wonder that myself, actually. Presumably he wasn’t 100% sure of where the hardware was going so didn’t want to commit to an arrangement for things like the pulleys before he could see it all together.
Generally speaking you should not be drilling into printed parts as it can undermine the structural integrity of the infill, but I suppose it’s possible he printed them at 100% infill so this wouldn’t be an issue.